Heart Quilt

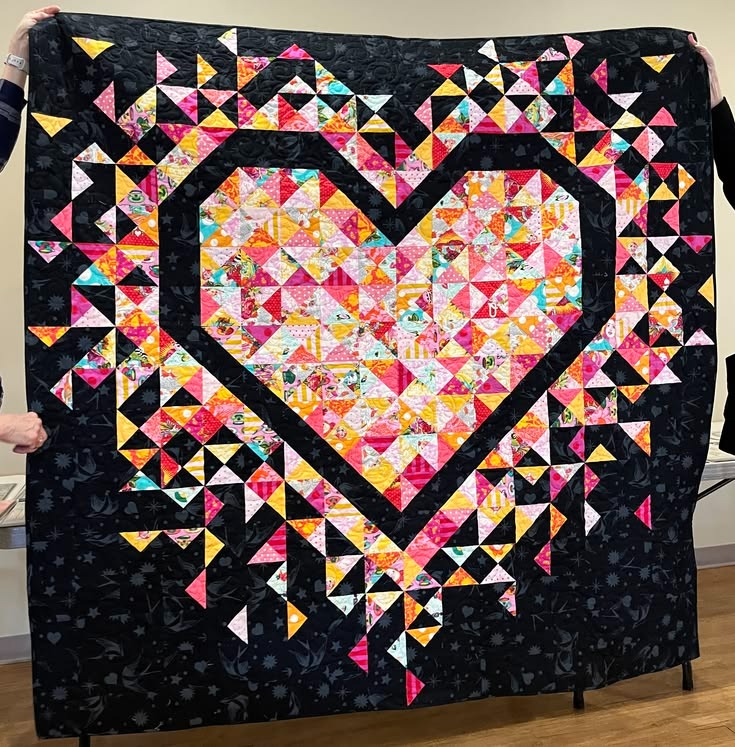
Create a striking DIY heart quilt using a mix of pink, white, and patterned fabric scraps against a deep black background. This eye-catching quilt combines patchwork, half-square triangles, improvisational piecing, and decorative quilting to form a large heart surrounded by colorful geometric shapes.
The finished design has a modern, artistic feel while still being a wonderful project for anyone who enjoys traditional quilting techniques. It can be made as a wall hanging, lap quilt, throw quilt, bed quilt, or handmade gift.
The best part is that you can adapt the colors, dimensions, and amount of detail to suit your own style.
Gather everything before beginning so the cutting and piecing process goes smoothly.
You will need:
Scraps are especially useful for this project because many of the colorful pieces are small.
Before cutting any fabric, determine the final size of your quilt.
Because the design is square, it can easily be adapted to different dimensions.
Some possibilities are:
If this is your first project using lots of small pieces, starting with a smaller quilt can make the process considerably easier.
The inspiration design uses a dramatic combination of black, pink, and white.
The black fabric forms the background, while the pink and white fabrics create the heart and the scattered geometric shapes.
Try combining several tones instead of using only one shade.
For example:
Small amounts of patterned fabric can add even more visual interest.
You can also completely change the palette.
Try:
Prewash your cotton fabrics before cutting them.
This helps prevent unexpected shrinking after the quilt is finished.
Once the fabrics are dry, press them thoroughly.
Cut away any loose threads and organize the scraps according to color.
Keeping the fabrics separated into groups makes it much easier to find the right piece while assembling the quilt.
The large heart is the central element of this design.
You can draw a heart template on paper or create one digitally.
The heart should take up a significant portion of the quilt while leaving enough room around it for the black background and scattered patchwork pieces.
You don’t need to make the heart perfectly symmetrical.
A slightly organic shape can actually give the finished quilt a more artistic appearance.
Instead of cutting the heart from a single piece of fabric, build it from many smaller geometric units.
Half-square triangles are especially useful for this.
You can combine:
Arrange them randomly or create a more organized pattern.
The finished effect should resemble a colorful mosaic.
Half-square triangles, often called HSTs, are one of the most versatile units in quilting.
To make them:
Each pair of sewn squares creates two triangle units.
Repeat this process using different combinations of pink, white, and printed fabrics.
The inspiration quilt has a lot of variation in the size of its geometric pieces.
You can reproduce that effect by making HSTs in several sizes.
For example:
However, using one consistent size is perfectly fine if you want a simpler project.
The important thing is to maintain enough contrast between the colors so the heart remains easy to see.
Lay your colorful triangle pieces inside the heart template.
Don’t sew immediately.
First, experiment with different arrangements.
Try placing dark pink beside light pink, then adding white pieces between them.
Occasionally introduce a patterned fabric to break up large areas of solid color.
Turn some of the triangle blocks in different directions to create movement.
When you like the arrangement, photograph it before beginning to sew.
This gives you a reference if the pieces become mixed up.
Rather than trying to sew the entire heart at once, divide it into smaller sections.
Join pieces into rows first.
Sew one piece to the next, matching the edges as carefully as possible.
Press each seam as you go.
Then join the completed rows or sections together.
Working in smaller sections makes a complicated-looking design much more manageable.
The dark outline around the heart is an important feature of the design.
Use strips of black fabric to create a bold border around the colorful center.
This dark frame separates the heart from the surrounding patchwork and makes its shape much more noticeable.
Measure each section carefully before cutting the strips.
Press the seams after attaching them.
The inspiration piece has colorful triangles extending beyond the heart.
This creates the impression that the heart is breaking apart or spreading into the surrounding background.
To recreate this effect, make additional pink, white, and printed triangle units.
Arrange them around the heart.
Some can be grouped together, while others can remain isolated.
Leave plenty of black fabric visible between the colorful pieces.
This contrast is what gives the design its dramatic appearance.
Continue working outward from the heart.
Arrange small geometric sections around the black background.
There is no need for everything to be symmetrical.
In fact, an irregular arrangement can make the quilt feel more contemporary and artistic.
Use a combination of:
Keep stepping back from the quilt occasionally to see how the entire composition looks from a distance.
The original design has a bright pink inner border.
Cut four strips of pink fabric to create this frame.
Attach the side borders first.
Press them flat.
Then measure the quilt again before cutting the top and bottom strips.
This helps compensate for any small differences caused by piecing.
Sew the remaining borders into place and press them.
The pink frame creates a strong transition between the colorful center and the dark outer edge.
After the pink border, add a wider black border.
This creates a strong final frame around the entire composition.
It also ties the outer area back to the black background of the heart.
Measure your quilt carefully before cutting these strips.
Keeping the borders straight and square will make the final quilt look much more polished.
Choose a backing fabric that complements the front.
You can use:
Cut the backing slightly larger than the quilt top.
Having a little extra fabric around all four sides makes assembling the quilt sandwich easier.
Place the backing fabric on your work surface with the right side facing downward.
Place the batting over it.
Finally, position the finished quilt top on the batting with the right side facing upward.
Smooth all three layers carefully.
Remove any wrinkles before basting.
You need to keep the three layers from shifting while quilting.
You can use:
Start near the center and work toward the outside.
This helps keep the layers flat.
The original quilt has beautiful free-motion quilting across the black areas.
The quilting consists of loose, looping lines that add texture without overpowering the heart.
You can experiment with:
If free-motion quilting is new to you, practice on a small quilt sandwich before working on the finished piece.
To make the central heart stand out, quilt around its outline.
You can sew a line close to the black border surrounding the heart.
This creates definition and visually separates the center from the surrounding background.
Avoid making the center excessively dense with quilting if you want the colorful patchwork to remain the main focus.
The borders can be quilted more simply.
For the pink border, straight lines or narrow decorative stitching work well.
For the black outer border, you can continue the looping free-motion design.
Try to maintain a similar quilting density throughout the piece.
After completing the quilting, trim the quilt carefully.
Place it on a large, flat surface.
Use a long quilting ruler and rotary cutter to straighten the edges.
Check each corner to make sure it is as square as possible.
This step should be completed before attaching the binding.
Prepare your binding strips and sew them together into one continuous strip.
Fold the strip in half lengthwise and press it.
Attach the binding around the front of the quilt.
When you reach a corner, fold the binding to create a neat mitered corner.
Continue around all four sides.
Finish the binding by stitching it securely to the back.
This design contains many tiny geometric pieces, so a little organization will save you a lot of frustration.
Use small bowls, trays, or containers to separate colors.
Don’t try to construct the whole design simultaneously.
Complete one portion before moving to the next.
Photographs are extremely useful when recreating an improvisational layout.
Pressing after each major section helps keep the blocks flat and easier to assemble.
Accurate trimming is especially important when working with multiple HST units.
If the original design feels too complicated, you can simplify it.
Instead of using dozens of tiny triangles, make larger blocks.
For example:
Beginner: 4–5 inch HST units
Intermediate: 2½–3 inch HST units
Advanced: 1–2 inch HST units
The smaller your pieces become, the more detailed and intricate the finished heart will look.
This is an excellent project for using up leftover fabric.
You only need small amounts of each print to create the colorful pieces.
Save scraps from:
Combining fabrics from different projects can make the quilt even more meaningful.
You don’t have to use pink and black.
Use red, white, and black for a traditional Valentine’s Day look.
Combine lavender, violet, plum, white, and black.
Use navy, turquoise, pale blue, and white.
Fill the heart with multiple colors while keeping the background black.
Try rust, mustard, terracotta, cream, and brown for a warm autumn-inspired quilt.
This design can be adapted for many purposes.
Use a small version as:
Make a medium version as:
Create a larger version as:
Because the design is centered around a heart, it makes a lovely personalized gift.
It would be especially appropriate for:
For an extra-special touch, add embroidered initials, a meaningful date, or fabric from a special piece of clothing.
This DIY heart quilt is a creative combination of traditional patchwork and modern improvisational quilting. The strong black background allows the pink, white, and patterned pieces to stand out, while the large heart gives the entire design a clear focal point.
You can recreate the original style closely or use the idea as inspiration for a completely different quilt.
Experiment with the colors, change the size of the triangles, add your favorite fabric scraps, or create your own quilting pattern.
There is no need for every section to be identical. The beauty of a scrap quilt comes from the combination of fabrics, colors, textures, and handmade details.
With a little patience, even small leftover fabric pieces can become a dramatic and meaningful heart patchwork quilt.