Green Floral Star Quilt Block

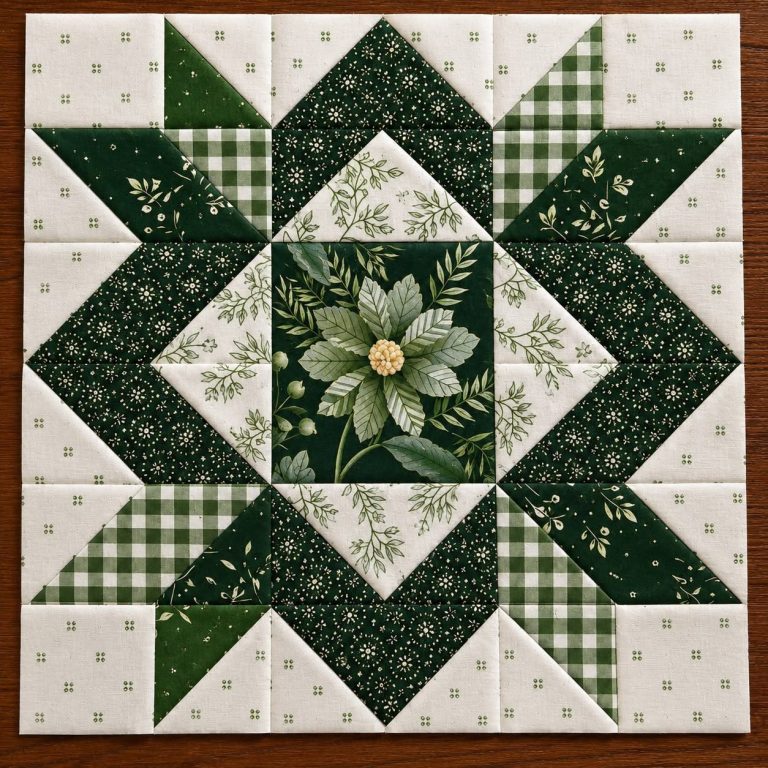
Create a beautiful Green Floral Star Quilt Block inspired by the elegant patchwork in the reference image. This design combines deep forest-green florals, delicate botanical prints, green gingham, and a soft cream background to form a striking geometric star around a floral centerpiece.
The block works beautifully as a wall hanging, a cushion front, a table topper, or the center of a larger quilt. Its traditional patchwork geometry makes it especially appealing to quilters who love cottage, farmhouse, and botanical styles.
Craft: Traditional machine quilting
Patchwork, half-square triangles, and flying-geese-inspired units
Skill level: Intermediate
Requires accurate diagonal piecing and careful point matching
Finished size: 18 × 18 inches
An original adaptation inspired by the reference image
Pattern note: The reference image does not provide a cutting chart or original pattern measurements. The tutorial below gives a complete, measurable variation using a 6 × 6 grid of 3½-inch unfinished units. It recreates the green-and-cream star effect but does not claim to reproduce every seam in the pictured block exactly.
Use quilting cotton in four coordinating prints.
| Fabric | Suggested print | Cutting requirements |
|---|---|---|
| A — Cream background | Small green motifs on cream | 12 squares, 3½ × 3½ in |
| B — Dark green floral | Tiny cream flowers on forest green | 8 squares, 3½ × 3½ in |
| C — Green gingham | Green-and-cream checks | 4 squares, 3½ × 3½ in |
| D — Botanical print | Cream with green leaves and stems | 8 squares, 3½ × 3½ in |
| E — Centerpiece | Large botanical flower print on dark green | 1 square, 6½ × 6½ in |
You will also need:
Cutting note: The quantities above provide the units for the adaptation described below. Additional fabric is recommended for directional prints, matching motifs, and correcting mistakes.
| Abbreviation | Meaning |
|---|---|
| HST | Half-square triangle |
| RST | Right sides together |
| SA | Seam allowance |
| WOF | Width of fabric |
| WIP | Work in progress |
| QST | Quarter-square triangle |
Half-square triangles: Two triangles joined along a diagonal seam to create a square patchwork unit.
Flying-geese-inspired piecing: A geometric arrangement that creates pointed shapes resembling wings or arrows. The adaptation below uses HST units to simplify construction.
Point matching: Aligning diagonal seams so that the star’s points meet cleanly at intersections.
Pressing seams: Press toward the darker fabric when practical to reduce the visibility of dark seam allowances through cream fabric.
Use a consistent ¼-inch seam allowance throughout the patchwork.
Cut the fabric pieces listed in the materials table.
For this adaptation, the finished block is constructed from a 6 × 6 grid of 3-inch finished units, with a larger 6-inch center panel replacing the four central grid squares.
Before sewing, arrange the pieces on a flat surface and confirm that you have enough cream, dark green, gingham, and botanical prints to create a balanced design.
Select the following pairs of 3½-inch squares:
For each pair:
Repeat until you have the required HSTs.
Important: Each pair produces two HST units. Keep the units grouped by fabric combination so you can arrange the star consistently.
Take the 6½ × 6½-inch centerpiece square.
If the fabric has a large flower or leaf motif, center it carefully before cutting. A motif with the main flower in the middle will echo the reference image.
Press the square flat and check that all edges are straight.
The centerpiece will finish at approximately 6 × 6 inches after it is sewn into the block.
Arrange the cream squares around the outside of the block to create the light background visible in the reference.
Place cream squares at the four corners and in the outer areas where the star points need contrast.
Keep the dark green floral and gingham pieces nearby. These fabrics will form the star’s outer points and diagonal bands.
Use the HST units to build the upper portion of the star.
Place dark green floral triangles against cream triangles so the dark sections form a pointed shape toward the top center.
Arrange gingham units on the outer sides to create contrasting green checks.
Align the diagonal seams before sewing. Pin at the intersections and sew with a ¼-inch seam allowance.
Press the seams carefully, checking that the points remain sharp.
Arrange the next group of HST units on the left and right sides of the centerpiece.
Use dark floral units to create bold diagonal bands, with botanical-print triangles providing contrast nearer the center.
Add gingham units in the outer corners to echo the checks in the reference image.
The left and right sections should appear balanced, although the exact print placement can be varied to suit your fabrics.
Sew the units into rows or small sections, then press each seam before joining the sections together.
Repeat the same process at the bottom of the block.
Arrange dark green floral HSTs so the dark sections form a downward-facing point. Position gingham pieces toward the outer corners and cream background squares at the edges.
Compare the lower portion with the upper section to ensure the star has a balanced shape.
Sew the pieces together, matching diagonal seams wherever the star points meet.
Lay out the left and right sections around the center panel.
Check that the botanical prints point toward the centerpiece and that the dark green floral bands create a continuous geometric frame.
Join the small patchwork units into larger sections, using a ¼-inch seam allowance.
Press the seams toward the darker fabrics where possible. If several seams meet at one point, alternate pressing directions to reduce bulk.
Place the centerpiece and the surrounding patchwork RST.
Match the center marks and pin the edges carefully. Sew the top and bottom sections to the centerpiece, then attach the left and right sections.
If the edges do not align, check the unit measurements before sewing. Do not stretch the fabric to force the pieces together.
Press the completed block from the wrong side, then gently press the right side.
Place the block on a cutting mat.
Use a quilting ruler to check that the edges are straight and the corners form right angles.
Trim only the excess fabric needed to square the block. Avoid trimming through star points or reducing the seam allowance around the centerpiece.
The finished top should measure approximately 18½ × 18½ inches unfinished, resulting in an 18 × 18-inch finished block after it is joined to borders or other blocks.
Because the reference design uses more complex piecing than this simplified adaptation, the exact final dimensions may vary slightly depending on your layout.
If you are making a wall hanging or table topper, cut backing fabric and batting larger than the patchwork top by approximately 2–3 inches on every side.
Layer the backing with the wrong side facing upward, place the batting on top, and position the patchwork top right side up.
Smooth the layers and baste with safety pins or temporary stitches.
For a clean traditional finish, quilt along selected patchwork seams using stitch-in-the-ditch quilting.
You can also add straight-line quilting around the centerpiece to emphasize the botanical flower.
Avoid dense stitching directly through delicate printed details if you want the fabric design to remain prominent.
After quilting, trim the excess batting and backing so the edges align with the top.
Cut binding strips approximately 2¼ inches wide from your chosen coordinating fabric.
Join the strips into one continuous length and press them in half lengthwise, wrong sides together.
Sew the raw edge of the binding to the quilted block with a ¼-inch seam allowance. Fold the binding over the edge and stitch it down on the back by hand or machine.
Finish the corners neatly and secure all loose threads.

Traditional botanical
Use dark green florals, cream botanical prints, and gingham for a cottage-inspired look.

Soft sage palette
Replace forest green with sage and muted olive tones for a lighter, more delicate design.

Statement centerpiece
Choose a large floral or botanical print for the center and keep the surrounding prints small to highlight the flower.
This Green Floral Star Quilt Block combines traditional patchwork geometry with botanical prints and gingham for a timeless handmade look. Whether you use it as a decorative wall hanging or as part of a larger quilt, the mix of dark green and cream gives the design depth and elegance.
Choose your favorite coordinating fabrics, take your time matching the points, and enjoy the process. Leave a comment below or share your finished block with the quilting community—we would love to see your version!