Crochet Floral Summer Dress Pattern Outline

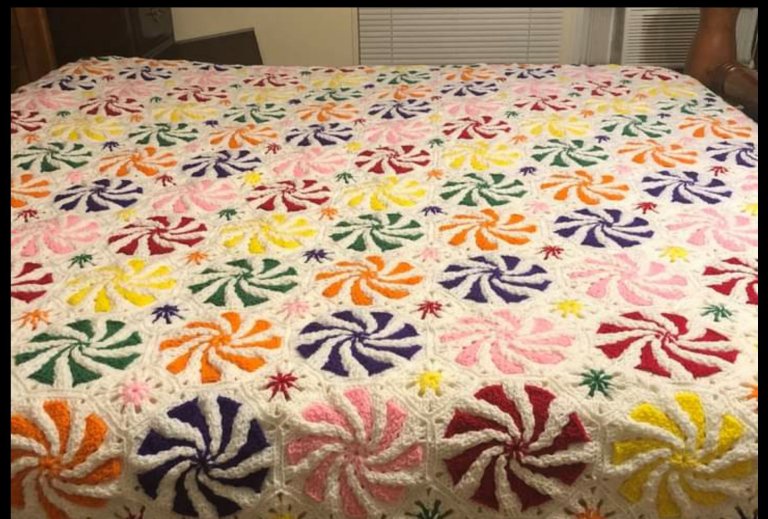
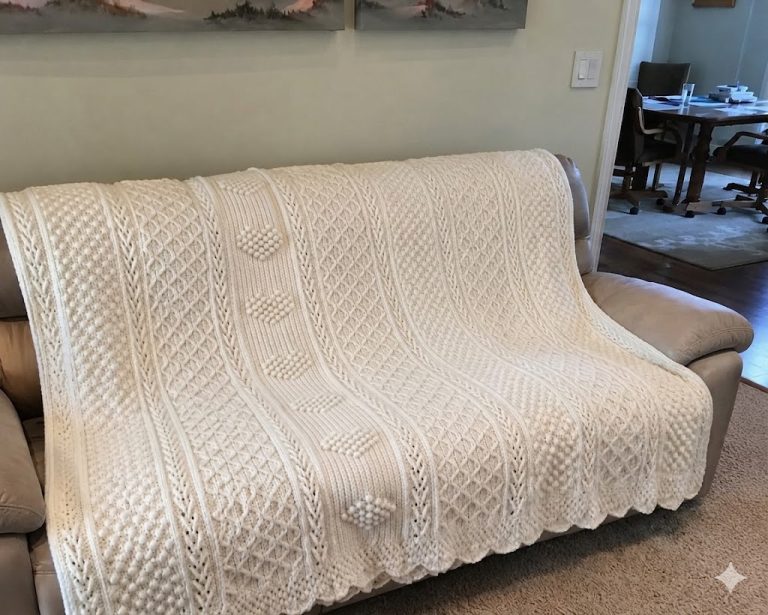
Spiral Mint Blanket with a perfect stitch and a beautiful design ready to change the face of your environment. With its beautiful coloring, this piece can help a lot, whether decorating the house or keeping you warm at night. Comfortable and beautiful it’s very easy to make, which is even better. Crochet is very useful for decorative pieces that complete the look of the house with a lot of style, like this piece we brought you today. I’m sure you will love this piece.
The blanket suggested here has beautiful colors, but they are just a suggestion the choice of colors is to your liking and according to your decor to make the environment complete and with an incredibly charming and stylish look. A job that needs a little more attention, but has a worthwhile result.
Mixing colors can often be fun and interesting, leaving your living room cheerful and cozy looking incredibly lovely. This blanket has a classic and stylish design. This can be a nice gift for someone who likes it a lot.
Materials:
Yarn: Any Soft cotton yarn will do
Crochet Hook: 5.5mm [US I-9]
Yarn needle, 16″ (40.5 cm)
Let’s Begin
Round 1 (right side): Ch 4 (counts as dc, ch 1), dc in ring, [ch 1, dc in ring] 6 times, ch 1; join with slip st in 3rd ch of beginning ch—8 dc and 8 ch-1 spaces worked with A. At the end of each round, drop and enlarge the loop on the hook so that it doesn’t unravel as you work the next round. If desired, place loop on a stitch marker.
Round 2: With B, working in front of Round 1, join B with slip st in beginning ring between the beginning ch and first dc of Round 1, ch 4 (counts as dc, ch 1), dc in ring between next 2 dc, [ch 1, dc in ring between next 2 dc] 6 times, ch 1, bring A loop and working yarn to the front of piece; working behind the A loop and working yarn, join with slip st in 3rd ch of beginning ch—8 dc and 8 ch-1 spaces worked with B. Notes for Rounds 3–10 Begin interlocking technique. Current round is always worked in front of previous round but not into its stitches. A stitches are only worked in A stitches of odd-numbered rounds and B stitches are only worked in B stitches of even- numbered rounds.
Round 3: Place A loop back on hook, slip st in first ch-1 space, ch 3 (counts as first dc here and throughout), dc in same space, bring B loop and working yarn to front of piece, [ch 2, 2 dc in next ch-1 space] 7 times, ch 2; join with slip st in top of beginning ch—16 dc and 8 ch-2 spaces with A.
Round 4: Place B loop back on hook, slip st in first ch-1 space, ch 3, dc in same space, [ch 2, 2 dc in next ch-1 space, ch 2] 7 times, ch 2, bring dropped A loop and working yarn to front of piece; join with slip st in top of beginning ch—16 dc and 8 ch-2 spaces with B.
Round 5: Place A loop back on hook, skip first dc, slip st in next dc, ch 3, 2 dc in next ch-2 space, bring dropped B loop and working yarn to front of piece, [ch 3, skip next dc, dc in next dc, 2 dc in next ch-2 space] 7 times, ch 3; join with slip st in top of beginning ch—24 dc and 8 ch-3 spaces with A.
Round 6: Place B loop back on hook, skip first dc, slip st in next dc, ch 3, 2 dc in next ch-2 space, [ch 3, skip next dc, dc in next dc, 2 dc in next ch-2 space] 7 times, bring dropped A loop and working yarn to front of piece; join with slip st in top of beginning ch—24 dc and 8 ch-3 spaces with B.
Round 7: Place A loop back on hook, skip first dc, slip st in next dc, ch 3, dc in next dc, 2 dc in next ch-3 space, bring dropped B loop and working yarn to front of piece, [ch 4, skip next dc, dc in next 2 dc, 2 dc in next ch-3 space] 7 times, ch 4; join with slip st in top of beginning ch—32 dc and 8 ch-4 spaces with A.
Round 8: Place B loop back on hook, skip first dc, slip st in next dc, ch 3, dc in next dc, 2 dc in next ch-3 space, [skip next dc, dc in next 2 dc, 2 dc in next ch-3 space, ch 4] 7 times, ch 4, bring dropped A loop and working yarn to front of piece; join with slip st in top of beginning ch—32 dc and 8 ch-4 spaces with B.
Round 9: Place A loop back on hook, skip first dc, slip st in next dc, ch 3, dc in next 2 dc, 2 dc in next ch-4 space, bring dropped B loop and working yarn to front of piece, [ch 5, skip next dc, dc in next 3 dc, 2 dc in next ch-4 space] 7 times, ch 5; join with slip st in top of beginning ch—40 dc and 8 ch-5 spaces with A.
Round 10: Place B loop back on hook, skip first dc, slip st in next dc, ch 3, dc in next 2 dc, 2 dc in next ch-4 space, [ch 5, skip next dc, dc in next 3 dc, 2 dc in next ch-4 space] 7 times, ch 5, bring dropped A loop and working yarn to front of piece; join with slip st in top of beginning ch—40 dc and 8 ch-5 spaces with B.
Fasten off B.
Edging Notes for Large Motif Edgings #1–#6 All edging stitches are worked in A stitches of Round 9. As instructed, work in front of or behind, but not into, B stitches of previous round. After completion, label each motif with its edging number for easier identification when assembling throw.
Edging #1: Place A loop back on hook, skip first dc, slip st in next dc, ch 3, dc in next dc, (dc, ch 3, dc) in next dc (corner made), dc in next dc, dc in next ch-5 space, working behind B sts, 4 dc in same ch-5 space, [working in front of B sts, skip next dc, dc in next 2 dc, (dc, ch 3, dc) in next dc (corner made), dc in next dc, dc in next ch-5 space, working behind B sts, 4 dc in same ch-5 space] 7 times; join with slip st in top of beginning ch—80 dc and 8 corners.
Fasten off, leaving a long tail for sewing.
Edging #2: Place A loop back on hook, working in front of B sts, skip first dc, slip st in next dc, ch 3, dc in next 3 dc, working behind B sts, (3 dc, ch 3, 3 dc) in next ch-5 space (corner made), [working in front of B sts, skip next dc, dc in next 4 dc, working behind B sts, (3 dc, ch 3, 3 dc) in next ch-5 space (corner made)] 7 times; join with slip st in top of beginning ch—80 dc and 8 corners. Fasten off, leaving a long tail for sewing.
Edging #3: Place A loop back on hook, working in front of B sts, skip first dc, slip st in next dc, ch 3, 2 dc in next dc, (dc, ch 2, dc)
in next dc (corner made), dc in next dc, dc in next ch-5 space, working behind B sts, 4 dc in same ch-5 space, [working in front of B sts, skip next dc, dc in next 2 dc, (dc, ch 3, dc) in next dc (corner made), dc in next dc, dc in next ch-5 space, working behind B sts, 4 dc in same ch-5 space] 4
times, working in front of B sts, skip next dc, dc in next 2 dc, (dc, ch 2, dc) in next dc (corner made), dc in next dc, 2 dc in next ch-5 space, working behind B sts, 6 dc in same ch-5 space, [working in front of B sts, skip next dc, dc in next 4 dc, 2 dc in next ch-5 space, working behind B sts, 6 dc in same ch-5 space] 2 times; join with slip st in top of beginning ch—88 dc and 6 corners. Fasten off, leaving a long tail for sewing.
Edging #4: Place A loop back on hook, working in front of B sts, skip first dc, slip st in next dc, ch 3, dc in next 3 dc, 2 dc in next ch-5 space, working behind B sts, (4 dc, ch 2, 3 dc) in same ch-5 space (corner made), [working in front of B sts, skip next dc, dc in next 4 dc, working behind B sts, (3 dc, ch 3, 3 dc) in next ch-5 space (corner made)] 4 times, working in front of B sts, skip next dc, dc in next 4 dc, working behind B sts, (3 dc, ch 2, 4 dc) in next ch-5 space (corner made), [working in front of B sts, skip next dc, dc in next 4 dc, 2 dc in next ch-5 space, working behind B sts, 6 dc in same ch-5 space] 2 times; join with slip st in top of beginning ch—88 dc and 6 corners.
Fasten off, leaving a long tail for sewing.
Edging #5: Place A loop back on hook, working in front of B sts, skip first dc, slip st in next dc, ch 3, 2 dc in next dc, (dc, ch 2, dc) in next dc (corner made), dc in next dc, dc in next ch-5 space, working behind B sts, 4 dc in next ch-5 space, [working in front of B sts, skip next dc, dc in next 2 dc, (dc, ch 3, dc) in next dc (corner made), dc in next dc, dc in next ch-5 space, working behind B sts, 4 dc in same ch-5 space] 2 times, working in front of B sts, skip next dc, dc in next 2 dc, (dc, ch 2, dc) in next dc (corner made), dc in next dc, 2 dc in next ch-5 space, working behind B sts, 6 dc in same ch-5 space, [working in front of B sts, skip next dc, dc in next 4 dc, 2 dc in next ch-5 space, working behind B sts, 6 dc in same ch-5 space] 4 times; join with slip st in top of beginning ch—92 dc and 4 corners.
Fasten off, leaving a long tail for sewing.
Edging #6: Place A loop back on hook, working in front of B sts, skip first dc, slip st in next dc, ch 3, dc in next 3 dc, 2 dc in next ch-5 space, working behind B sts, (4 dc, ch 2, 3 dc) in same ch-5 space (corner made), [working in front of B sts, skip next dc, dc in next 4 dc, working behind B sts, (3 dc, ch 3, 3 dc) in next ch-5 space (corner made)] 2 times, working in front of B sts, skip next dc, dc in next 4 dc, working behind B sts, (3 dc, ch 2, 4 dc) in next ch-5 space (corner made), [working in front of B sts, skip next dc, dc in next 4 dc, 2 dc in next ch-5 space, working behind B sts, 6 dc in same ch-5 space] 4 times; join with slip st in top of beginning ch—92 dc and 4 corners.
Fasten off, leaving a long tail for sewing.
Small Motif (make 30) With A, ch 4; join with slip st in first ch to form a ring.
Rounds 1–2: Work same as Rounds 1–2 of large motif—8 dc and 8 ch-1 spaces
Fasten off B.
Round 3: Place A loop back on hook, slip st in first ch-1 space, ch 3 (counts as first dc here and throughout), dc in same space, [ch 2, 2 dc in next ch-1 space] 7 times, ch 2; join with slip st in top of beginning ch—16 dc and 8 ch-2 spaces.
Round 4: Ch 3, dc in same st as join, *ch 3, 2 dc in next dc (corner made), 2 hdc in next ch-2 space, sc in next 2 dc, 2 hdc in next ch-2 space, 2 dc in next dc, repeat from * 3 times, ch 3, 2 dc in next dc (corner made), 2 hdc in next ch-2 space, sc in next 2 dc, 2 hdc in last ch-2 space; join with slip st in top of beginning ch—40 sts and 4 corners.
ASSEMBLY With right sides facing, arrange large motifs as shown in assembly diagram. Using photograph as a guide, position rounded edges of motifs with edgings #3–#6 facing outwardly. Place small motifs in spaces between large motifs. Sew all motifs together.
FINISHING Border Round 1: With right side facing, join A with slip st in back loop of any dc, working in back loops only, slip st in each dc around; join with slip st in first slip st. Fasten off. Weave in ends.

A Spiral Mint Blanket to change the face of your environment in an incredible way. Spiral Mint Blanket is an incredibly charming and stylish piece that can blend in with the decor leaving everything very beautiful and complete in addition to being very charming and stylish. Blankets are well used these days, many people use them to keep warm at night or just to decorate the bed.
Feel like making this wonderful Spiral Mint Blanket? so come with us, follow the tutorial which is well explained and i am sure you will be able to make this wonderful project easily. A tip for you: Separate the materials and tools before starting the tutorial, so you can follow it and go on with the project!!

