Crochet Elephant Baby Blanket Pattern

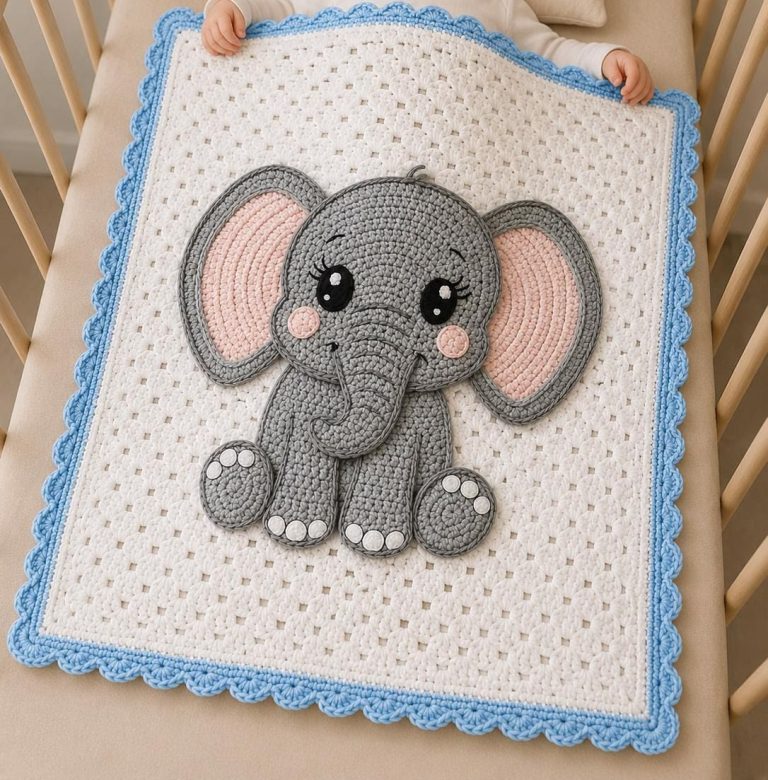
This charming crochet baby blanket features a classic textured square blanket with a large three-dimensional elephant appliqué sewn onto the center. The design combines simple stitches for the blanket with shaped amigurumi-style pieces that create a soft, cuddly elephant. The finished blanket is perfect for baby showers, nursery decoration, stroller use, or tummy time.
The blanket shown uses a white textured background with a light blue scalloped border, while the elephant is worked in soft gray with blush pink inner ears and embroidered facial details. The raised elephant creates wonderful texture while remaining lightweight enough for everyday use.
Intermediate
The blanket itself is beginner-friendly, but the elephant appliqué requires shaping, increasing, decreasing, and assembly.
Approximately:
30 x 36 inches (76 x 91 cm)
The size can easily be adjusted by making the blanket larger or smaller before adding the elephant.
Colors:
Hooks:
Other Supplies:
Chain 121
(or any multiple of 4 plus 1 to adjust size)
Sc in 2nd chain from hook.
Sc across.
Turn.
Ch 3.
Skip first stitch.
Work:
DC
Ch 1
Repeat across.
Finish with DC.
Turn.
Work 3 DC into each chain space.
Skip each DC.
Continue across.
Finish with DC in turning chain.
Turn.
Sc across entire row.
Turn.
Repeat Rows 2–4 until the blanket reaches approximately 36 inches long.
This creates the lovely shell-like textured fabric seen in the photo.
Fasten off.
Join Light Blue yarn.
Sc evenly around entire blanket.
Work:
3 sc in each corner.
Join.
Skip 2 stitches.
Work 5 dc in next stitch.
Skip 2.
Slip stitch.
Repeat around.
At corners:
Work 7 dc shell.
Join.
Slip stitch into first shell.
Work:
(sc, hdc, dc, hdc, sc)
inside every shell.
This creates the rounded scalloped edge.
Fasten off.
The elephant is made in separate pieces.
With Gray
Magic Ring
6 sc
Inc around (12)
(sc, inc) x6 (18)
(2 sc, inc) x6 (24)
Continue increasing evenly every round until:
60 stitches.
Work 8 rounds even.
Fasten off leaving a very long tail.
Do not overstuff.
The head should remain mostly flat.
Magic Ring
6 sc
Increase gradually to 54 stitches.
Work several rounds evenly.
Flatten slightly.
Fasten off.
Chain 8.
Work around both sides of chain.
Increase gradually to create a rounded tube.
Continue for approximately:
5 inches.
Curve naturally by placing increases on one side only during several rows.
This creates the curled trunk.
Lightly stuff.
Sew closed.
Outer Ear
Magic Ring
6 sc
Increase every round until approximately:
7 inches wide.
Instead of making a full circle, stop after ¾ of a circle to create the rounded ear shape.
Fasten off.
Repeat same process.
Stop one round sooner.
Sew centered onto gray ear.
Magic Ring
6 sc
Increase to 18 stitches.
Work even.
Flatten slightly.
Lightly stuff.
Leave long tail.
Magic Ring
6 sc
Increase to 24 stitches.
Work several rounds.
Flatten.
Lightly stuff.
Leave long tail.
With White
Magic Ring
6 sc
Increase once.
Sew onto bottom of feet.
Add tiny toe circles using French knots or embroidered satin stitches.
The sample uses oversized safety-style cartoon eyes.
For baby safety:
Do NOT use plastic safety eyes.
Instead:
Cut black felt circles.
Add tiny white felt highlights.
Sew securely.
Alternatively:
Embroider the eyes completely using satin stitch.
Using black embroidery floss:
Work 3–4 long stitches extending outward.
Repeat for second eye.
Using Pink yarn
Magic Ring
6 sc
Increase once.
Fasten off.
Sew below eyes.
Embroider a small curved smile using dark gray yarn.
Backstitch gently above each eye.
Attach three short strands of gray yarn.
Tie.
Trim evenly.
Lay the blanket completely flat.
Pin every piece before sewing.
Sew in this order:
Take time to check symmetry before permanently sewing each piece.
For a slightly raised appearance like the sample photo:
Place a thin layer of polyester stuffing behind:
before stitching the pieces completely closed.
Avoid overstuffing so the blanket remains soft and comfortable for babies.
Weave in all loose ends securely.
Steam block lightly (avoid direct heat on acrylic yarn).
Check that every appliqué piece is firmly attached.
If the blanket will be used by infants, ensure there are no detachable pieces. Embroidered facial features are the safest choice.

