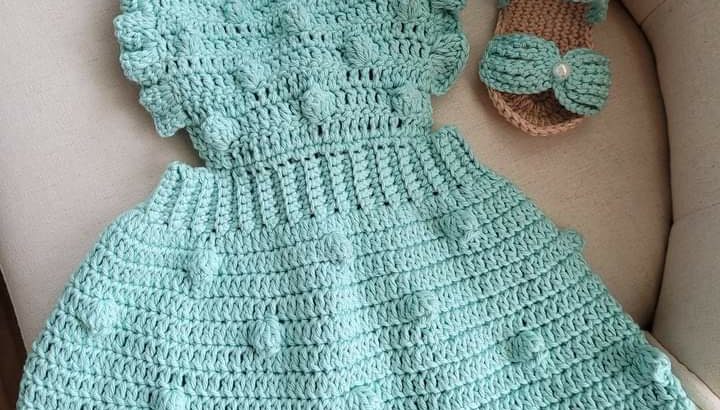
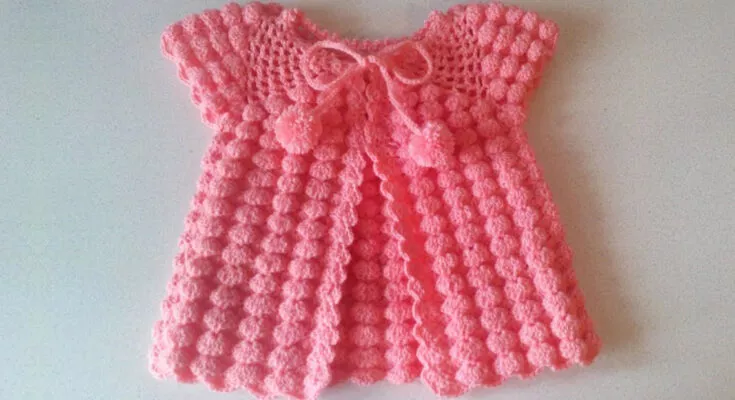
Crochet Bobble Baby Top

Planning a project for a children’s room is a fun step for those who participate, as entering the world of children is discovering the tastes and dreams of their children. It is essential for your child to choose everything from shades to accessories so that he or she is happy and happy where they spend most of their time.
Regardless of a themed room or not, try to create a special environment in which accessories and furniture stimulate your creativity.
This way, they will be more interested in everyday activities such as studying, playing, resting, reading, drawing, among others.

Materials
Acrylic yarn
3.5 mm crochet hook – Size made : For a 1 to 2 years – 24 month old
Terminologies
fsc : Foundation single crochet ch : Chain
dc : Double crochet sp(s) : Space(s)
st(s) : Stitch(es) hk : Hook
lp : Loop(s) yo : Yarn Over
sk : Skip sc : Single crochet
Rnd 1 : with fsc in multiples of 10 for the round neck of the child you are making this for. Turn
And straight off the bat, here are two ideas :
You could decide to make this is a slip on , with no opening for a button ;
OR you could make an opening for one / two buttons
If you decide to work it in rounds without buttons, then ensure that the first round will slip in neatly around the head of the child.
Rnd 2 : dc in the 1st fsc ; ch 2, sc in the next fsc ;
*ch 5, sk next 2 fsc, sc in the next fsc* ;
rep *to* till last 2 fsc ; ch 2, sk next fsc, dc in the last fsc. Turn.
Special Note : IF you’re working in the round, please start with a sc and the *to* pattern from the start. At the end of the round, join with a sl-st to the 1st sc. In the following round for you then, you will start with a sc in that 1st dc, and continue with the same pattern.
Rnd 3 : sc in the 1st dc ;
*(ch 5, sc in the next ch-5 sp) ; 5 dc in the next ch-5 sp ;
sc in the next ch-5 sp ; rep (to) once* ;
rep *to* till end. Turn.
Rnd 4 : dc in the 1st sc ; ch 2, sc in the 1st ch-5 sp ;
*dc in the next dc ; (ch 1, dc in the next dc) ;
rep (to) 3 times ; sc in the next ch-5 sp ; ch 5, sc in the next ch-5 sp* ;
rep*to* till end ;
ch 2, dc in the last sc. Turn.
In the following row, we’ll use our dc 3-tog. Check under “stitches used” for a “how to” if needed.
At the end of this following row, we will join with a sl-st and start working in rounds thereafter.
Rnd 5 : sc in the 1st dc ;
*ch 2, sk dc, dc 3-tog in the 1st ch-1 sp ;
(ch 3, sk dc, dc 3-tog in the next ch-1 sp) ;
rep (to) 2 times ; ch 2, sc in the next ch-5 sp* ;
rep*to* till end ;
Now if you’ve been working in rows, you have a ch-2 sp at the start and end of Row 5. So you will sl-st into that 1st ch-2 sp to start, and you will end with the last ch-2 sp, ignoring or skipping the dc in between.
Rnd 6 : sl-st past the 1st ch-2 sp and sc on top of the 1st dc 3-tog ;
*(ch 5, sc on top of the next dc 3-tog) ; rep (to) 2 times ;
ch 5, sk next sc, sc on top of the next dc 3-tog* ;
rep*to* till end ;
ch 2, dc and join to the last sc.
You are now in the centre of that last ch-5 sp, just where you need to be.
As I usually like to keep things simple, and I *think* that working a repeat till the end is the simplest, this is how I am going to write this out. You choose whatever ends suits you.
Rnd 7 : sc in the 1st ch-sp ;
*(ch 5, sc in the next ch-5 sp) ; 6 dc in the next ch-5 sp ;
sc in the next ch-5 sp ; rep (to) once* ;
rep *to* till end and join with a sl-st to the 1st st.
Rnd 8 : sl-st and sc in the 1st ch-5 sp ;
*dc in the next dc ; (ch 1, dc in the next dc) ;
rep (to) 4 times ; sc in the next ch-5 sp ;
ch 5, sc in the next ch-5 sp* ;
rep*to* till end and join with a sl-st to the 1st st.
Rnd 9 : sl-st in the 1st ch-1 sp ; dc 3-tog in the same 1st ch-1 sp ;
*(ch 3, sk dc, dc 3-tog in the next ch-1 sp) ; rep (to) 3 times ;
[ch 2, sc in the next ch-5 sp] ;
ch 2, sk next dc, dc 3-tog in the next ch-1 sp* ;
rep*to* till end ;
ch 2, sc in the last dc. Join with a sl-st to the 1st st.
Rnd 10 : sl-st and sc in the 1st ch-3 sp ;
*(ch 5, sc in the next ch-3 sp) ; rep (to) 2 times ;
ch 5, sk next sc, sc in the next ch-3 sp* ;
rep*to* till end ;
Rnd 11 : sl-st and sc in the 1st ch-sp ; *7 dc in the next ch-5 sp ; sc in the next ch-5 sp ; (ch 5, sc in the next ch-5 sp) ; rep (to) once* ; rep *to* till end and join with a sl-st to the 1st st.
Rnd 12 : *dc in the next dc ; (ch 1, dc in the next dc) ;
rep (to) 5 times ; sc in the next ch-5 sp ;
ch 5, sc in the next ch-5 sp* ;
rep*to* till end and join with a sl-st to the 1st st.
Round 13 : sl-st in the 1st ch-1 sp ; dc 3-tog in the same 1st ch-1 sp ;
*(ch 3, sk dc, dc 3-tog in the next ch-1 sp) ;
rep (to) 4 times ;
[ch 2, sc in the next ch-5 sp] ;
ch 2, sk next dc, dc 3-tog in the next ch-1 sp* ;
rep*to* till end ;
ch 2, sc in the last dc.
Join with a sl-st to the 1st st.
Rnd 14 : sc on top of the 1st dc 3-tog ;
*(ch 5, sc on top of the next dc 3-tog) ;
rep (to) 4 times ;
ch 5, sk next sc, sc on top of the next dc 3-tog* ;
rep*to* till end ;
ch 5, and join to the last sc.
At the end of the increase (Round 10), check circumference again, and then IF needed, increase again, by rep Rounds 11 – 14, once again adding one more dc in Round 11 (i.e working 9 dc in the ch-5 sp, which will also mean that each of your re (to) in the following rounds will increase by 1). This will all depend on how wide you want it.
Once you are happy with how wide the base of your work is stop increases and work with the repeats of the last set of four rounds you have worked.
So say you are happy with the width/circumference you have after working 9 dc in each ch-5 sp and that 4-round repeat, then you will continue working this pattern of 4-rounds all the way till your project is about 2” less than the child’s arm length, or the length you need for the poncho.
Collar idea :
For the collar, I’ve worked the same pattern, but from the fsc around the neck. All you do is re-attach your yarn back at the front placket and then work all around with the pattern.
