Elegant Vintage-Inspired Crochet Dress Pattern

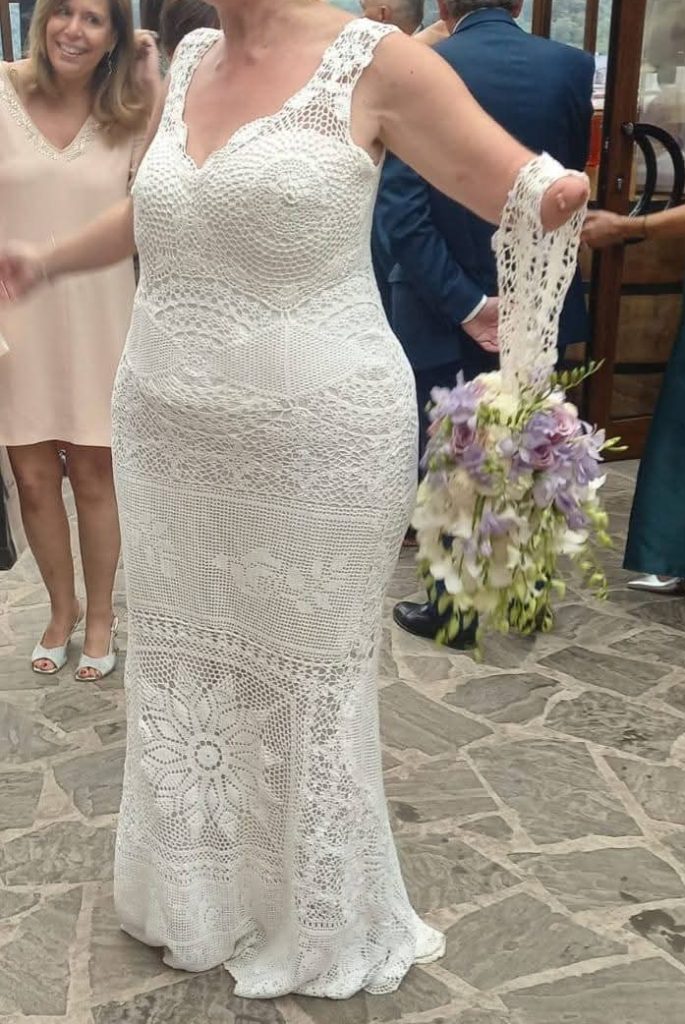
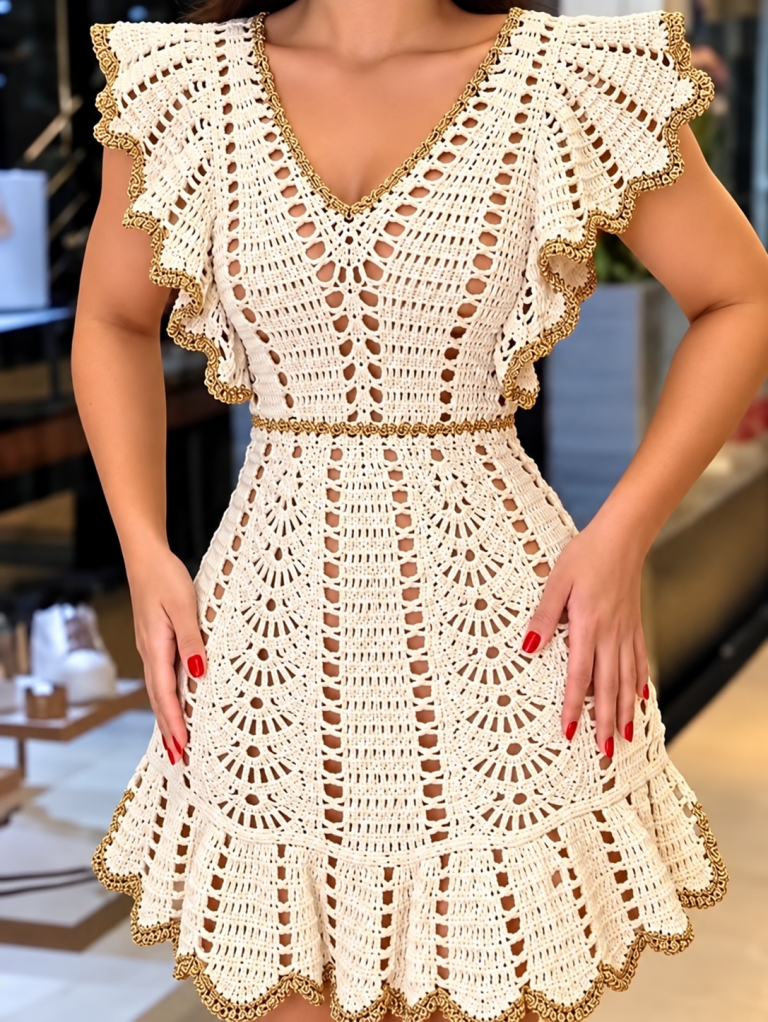
Create a timeless, romantic garment with this Vintage-Inspired Cream Crochet Dress. Inspired by the dress in our reference photograph, this design features a deep V-neckline, delicate openwork lace, fluttering ruffle sleeves, a fitted waist, and a beautifully flared skirt decorated with fan-shaped lace motifs.
The ivory or cream yarn gives the dress a sophisticated, vintage appearance, while a fine gold-colored edging adds a luxurious finishing touch. The skirt combines open mesh sections with decorative fan motifs to create the intricate, airy texture seen in the photograph.
This is a garment project for crocheters who enjoy working with lace patterns and shaping wearable pieces. Because crochet tension, body measurements, and yarn choice all affect the fit, the pattern is written as a customizable adult-size design.
Project details
The tutorial is an original interpretation of the photographed design, not an exact reproduction of an authenticated commercial pattern. The stitch counts below form a starting point for a medium-size sample; always check your gauge and adjust the foundation chains and shaping to your own measurements.
For a delicate, lightweight dress, choose mercerized cotton or a cotton blend that drapes well without stretching excessively.
| Material | Suggested quantity | Purpose |
|---|---|---|
| Cream or ivory fingering-weight cotton yarn | 1,800–2,400 yards | Main dress |
| Gold-colored fine crochet thread | 100–200 yards | Sleeve, neckline, waist, and hem edging |
| Optional matching lining fabric | 2–2.5 yards | Underlining the open lace |
| Matching sewing thread | 1 spool | Securing the lining |
Yarn quantities depend on the finished length, sleeve fullness, size, and yarn thickness. Purchase extra yarn if you plan to make a longer skirt or a fuller ruffle.
Use the hook size that produces a flexible fabric with clear lace openings. If your work feels stiff, try a larger hook; if it stretches excessively, try a smaller hook.
Important: The dress in the photograph is highly openwork. A lining or slip is recommended for comfortable everyday wear and coverage.
This pattern uses standard US crochet terminology.
| Abbreviation | Meaning |
|---|---|
| ch | Chain |
| sl st | Slip stitch |
| sc | Single crochet |
| hdc | Half double crochet |
| dc | Double crochet |
| tr | Treble crochet |
| sk | Skip |
| sp | Space |
| st(s) | Stitch(es) |
| rep | Repeat |
| rnd | Round |
| RS | Right side |
| WS | Wrong side |
| inc | Increase |
| dec | Decrease |
| FO | Fasten off |
| beg | Beginning |
| BLO | Back loop only |
Mesh stitch: Work 1 dc, ch 1, skip 1 stitch, then repeat across the row. On following rows, place the dc stitches into the previous row’s chain spaces.
Fan stitch: Work 5 dc into the same stitch or chain space. This creates a fan-shaped shell.
Picot: Ch 3, then sl st into the first chain made.
Decorative gold edging: Work a row of sc in the accent thread, followed by a repeating picot or scallop pattern.
Make a mesh swatch before starting.
Suggested gauge after light blocking:
Gauge varies substantially with openwork patterns. The most important measurements are the finished bust circumference, waist circumference, armhole depth, and skirt length.
For the medium-size sample, aim for a finished bust measurement of approximately 36–38 inches and a waist measurement of approximately 30–32 inches, allowing for the intended fit.
Before beginning the dress, work a small sample of the mesh stitch and fan stitch.
Use the swatches to determine whether your fabric has the drape and openness you want. Do not begin the full dress until you are satisfied with the result.
The front bodice is worked flat from the lower edge upward. Its V-neckline is created by dividing the upper section into two halves.
For the medium-size sample, the initial width is approximately 18 inches before joining. Adjust the starting chain to match your measured half-bust width and chosen gauge.
Foundation
Ch 73.
Row 1 (RS): Sc in the second ch from the hook and in each remaining ch across. Turn. [72 sc]
Row 2: Ch 3, dc in the first st, ch 1, sk 1 st, dc in the next st; repeat the mesh sequence across, keeping the edges even. Turn. [36 dc, 35 ch-1 sps]
Rows 3–24: Ch 3, dc in the first mesh space, ch 1, dc in the next mesh space, ch 1; continue the mesh pattern across. Work the final edge stitch consistently with Row 2. Turn. [Maintain the established mesh repeat]
Measure the panel. It should cover the front torso from the lower bust area to the natural waist, approximately 10–12 inches depending on your body measurements.
Place a marker at the center of the panel. The following instructions assume that the mesh is divided evenly into two halves.
Next row: Work the mesh pattern across the first half only. Turn. [Approximately 18 dc per half, adjusted to the established mesh repeat]
Following rows: Continue working the first half in mesh stitch, decreasing one mesh unit at the neckline edge every other row. Keep the outer edge straight until the panel reaches the shoulder.
Repeat the process on the opposite half, reversing the shaping so that both sides form a symmetrical V.
Fasten off after the shoulder sections reach the desired height. The neckline should form a smooth V rather than a sharp, narrow point.
Fit check: Before fastening off, hold the panel against your body or a well-fitting top. The neckline should sit comfortably without pulling, and the shoulder sections should be wide enough to support the sleeves.
The back bodice is similar to the front but has a shallower neckline.
Foundation: Ch 73.
Row 1: Sc in the second ch from the hook and across. Turn. [72 sc]
Row 2: Ch 3, dc in the first st, ch 1, sk 1 st, dc in the next st; repeat the mesh sequence across. Turn. [36 dc, 35 ch-1 sps]
Rows 3–24: Continue in mesh stitch, keeping the sides straight. Turn at the end of every row. [Maintain the established mesh repeat]
At the top of the back, continue working straight until the panel reaches the same height as the front shoulders.
For a higher back neckline, leave the top edge straight and do not divide it into two halves. If you prefer a small back opening, leave a short center gap and finish the edges separately.
Fasten off and weave in the loose ends.
Place the front and back bodice panels together with their right sides facing inward.
Do not make the side seams too tight. The lace needs enough room to move naturally without stretching the mesh openings out of shape.
Join the cream yarn at one shoulder.
Neckline Round 1: Ch 1, work sc evenly around the entire neckline, placing approximately 1 sc in each suitable edge stitch and 2 sc near the V point if needed to prevent puckering. Join with sl st. [Stitch count varies with neckline size]
Neckline Round 2: Ch 1, sc in each st around. At the V point, work a centered decrease or skip one stitch as needed to keep the point flat. Join with sl st. [Same general count, adjusted at the point]
Try the neckline on before adding decorative edging. It should lie flat without curling or flaring.
Gold trim: Join the gold thread and work sc around the neckline. For a delicate picot edge, repeat sl st in the next st, ch 3, sl st in the same st, sk 1 st around. Adjust the spacing to keep the edge even.
The photograph features broad, ruffled cap sleeves that frame the shoulders. Each sleeve is worked directly around the armhole.
With the dress right side facing, join cream yarn at the underarm.
Round 1: Ch 3, work dc evenly around the armhole, placing approximately 1 dc in each available edge stitch and distributing additional stitches evenly around curved sections. Join with sl st. [Stitch count depends on armhole circumference]
Round 2: Ch 3, dc in each st around. Join. [Same stitch count]
Round 3 (ruffle increase): Ch 3, work 2 dc in each st around. Join. [Twice the Round 2 stitch count]
Round 4: Ch 3, dc in each st around. Join. [Same stitch count as Round 3]
Round 5: Ch 1, sc in each st around. Join. [Same stitch count]
This creates a simple flutter sleeve base. If you want a more dramatic ruffle like the photograph, add another increase round by working 2 dc in every second stitch, followed by a round of dc.
Repeat for the second sleeve.
Join the gold thread at the sleeve edge.
Work sc in the next 2 sts, ch 3, sl st in the same st, sk 1 st around. Adjust the skipped stitches so the picots are evenly spaced.
Fasten off and weave in the ends.
The waist band separates the fitted bodice from the flared skirt.
With the dress right side facing, join cream yarn at one side seam along the lower edge of the bodice.
Round 1: Ch 1, sc evenly around the lower edge of the bodice. Join with sl st. [Count depends on the completed bodice circumference]
Rounds 2–5: Ch 1, sc in each st around. Join with sl st. [Same stitch count each round]
For a more structured waistband, work the sc stitches through the back loop only on Rounds 2–5.
Try on the dress before beginning the skirt. The waistband should sit at your natural waist without pulling the bodice out of shape.
The skirt is worked downward from the waistband in joined rounds. Its fullness comes from increases and repeated fan-lace motifs.
For the medium-size sample, aim for a foundation circumference of approximately 30–34 inches at the waist. The exact stitch count depends on your gauge.
Skirt Round 1: Ch 3, dc in each stitch around. Join with sl st. [Use a stitch count divisible by 12]
If your waistband stitch count is not divisible by 12, increase or decrease a few stitches evenly in this round to reach the nearest suitable multiple of 12.
Skirt Round 2: Ch 1, sc in each stitch around. Join with sl st. [Same stitch count as Round 1]
Skirt Round 3 (fan setup): Ch 3, sk 2 sts, work 5 dc in the next st, sk 2 sts, sc in the next st, ch 2; repeat around, adjusting the last repeat so the round joins neatly. Join with sl st.
This establishes the repeating shell-and-mesh texture. The shell groups create the fan-shaped motifs, while the chain spaces create the open lace between them.
Skirt Round 4: Ch 1, sc in the first stitch or designated anchor point, ch 3, sc in the center dc of the next fan, ch 3, sc in the next anchor point; repeat around. Join with sl st.
Skirt Round 5: Ch 3, work 2 dc in the first chain space, sc in the center of the next fan, ch 3, work 5 dc in the next chain space; repeat around, keeping the fan placement consistent. Join with sl st.
Skirt Round 6: Repeat the openwork arch round, working sc stitches into the centers of the fans and ch-3 spaces between motifs. Join with sl st.
Skirt Round 7: Repeat the fan round, placing the new fan groups into the designated chain spaces between the previous fans. Join with sl st.
Continue alternating the openwork arch round and the fan round until the skirt measures approximately 8–10 inches below the waistband.
Important construction note: Lace patterns require the anchor stitches and chain spaces to line up correctly. Before continuing around the entire skirt, make a small swatch of the fan sequence and confirm that the motif repeat joins cleanly. If the stitch count does not align with your waistband, adjust the number of repeats before proceeding.
To create the flared silhouette, increase the number of fan motifs gradually rather than adding large increases all at once.
At the next suitable setup round:
If the skirt hangs straight instead of flaring, add a few additional fan repeats evenly around the next setup round. If the fabric becomes wavy or excessively ruffled, reduce the increases.
Continue until the skirt reaches approximately 3–4 inches above your desired finished hem.
The reference dress has a fuller, scalloped lower section. A final flounce can be added to create a similar effect.
Flounce Round 1: Ch 3, work 2 dc in each selected chain space around the lower skirt edge, increasing evenly to create a gentle flare. Join with sl st. [Stitch count depends on the preceding skirt round]
Flounce Round 2: Ch 3, dc in each stitch around. Join. [Same stitch count]
Flounce Round 3: Ch 1, sc in each stitch around. Join. [Same stitch count]
Flounce Round 4 (fan edge): Ch 1, sc in the next anchor point, sk 2 sts, work 5 dc in the next st, sk 2 sts; repeat around, adjusting the final repeat so the pattern meets neatly. Join with sl st.
Flounce Round 5: Join the gold thread and work the picot edging used on the sleeves. Space the picots evenly around the hem.
If you prefer a shorter mini dress, begin the flounce earlier. For a longer dress, continue the main skirt pattern before adding the final ruffle.
The gold trim is an important visual feature of the photographed dress. Use it sparingly to highlight the lace rather than covering the delicate pattern.
Recommended placements:
For a fine, elegant line, work a row of sl sts or sc with gold thread. For a more decorative finish, add a small picot every few stitches.
Check that the gold edging does not pull the fabric inward. If the edge begins to curl, remove the trim and use a larger hook or fewer stitches per inch.
Before final blocking, try on the dress over the type of undergarment or slip you plan to wear with it.
Check the following:
To adjust the size, change the bodice foundation chain and the number of mesh repeats. To adjust the length, add or remove skirt rounds before the final flounce.
Because the mesh and fan stitches have different widths and stretch, use measurements rather than relying on stitch counts alone.
Use a tapestry needle to weave every loose yarn end through several stitches on the wrong side. Change direction at least once to help prevent the ends from working loose during wear.
Trim the excess yarn carefully without cutting into the fabric.
Wet-block or steam-block the dress according to the yarn manufacturer’s care instructions.
Avoid stretching the open mesh too aggressively. The goal is to reveal the lace pattern and improve the drape, not to distort the garment.
For comfortable wear, sew a lightweight lining or wear a separate slip underneath. A lining can be made from cotton voile, a lightweight woven cotton, or a suitable stretch lining.
Keep the lining separate from the decorative outer lace where possible so the crochet pattern remains visible. Secure the lining at the shoulders or waistband without pulling the crochet fabric out of shape.
The bodice is too wide.
Reduce the foundation chain by a complete mesh repeat on each side, then recheck the bust measurement before joining the panels.
The V-neckline curls.
Work an even row of sc around the edge before adding gold trim. Adjust the number of stitches at the point so the neckline lies flat.
The sleeves do not ruffle enough.
Add another increase round, working 2 dc in every second stitch, then work one plain dc round.
The skirt is too narrow.
Add fan repeats evenly around a setup round. Do not add increases in only one section, as this can make the skirt hang unevenly.
The hem becomes wavy.
Reduce the number of increase stitches in the flounce. Too many increases can make the hem look excessively gathered.
The gold edging pulls the lace.
Use a larger hook or a looser tension. Decorative thread should follow the shape of the garment rather than draw it inward.
This pattern is best for intermediate or advanced crocheters because it combines lace stitch repeats, neckline shaping, sleeve increases, and skirt flare adjustments. A confident beginner could attempt it by practicing the mesh and fan stitches first.
Yes. Cream and gold create the vintage-inspired look, but ivory with champagne, white with silver, dusty rose with gold, or black with metallic edging can also look beautiful.
Yes. Measure your bust and waist, then adjust the bodice foundation chain and the number of skirt repeats. Make a gauge swatch first and use the finished fabric measurements to determine the correct size.
A lining or separate slip is recommended because the mesh and fan motifs create open areas. The lining also improves comfort and makes the dress easier to wear.
Use stitch markers to identify the center of each fan and the spaces where the next motifs should be placed. Block the finished dress gently to help the lace settle into shape.
This vintage-inspired cream crochet dress brings together delicate lace, flutter sleeves, a fitted waist, and a beautifully flared skirt. The gold edging highlights the openwork without overwhelming it, creating a romantic handmade garment suitable for summer gatherings, special occasions, or a statement outfit.
Take your time with the gauge swatch, try on the bodice before adding the skirt, and adjust the lace repeats to achieve the fit and drape you love.
Have you made a lace crochet dress before? Leave a comment sharing your favorite yarn, color combination, or tips for shaping a flared crochet skirt. If you make your own version of this design, share your finished project and inspire other crocheters!