Crochet Floral Summer Dress Pattern Outline

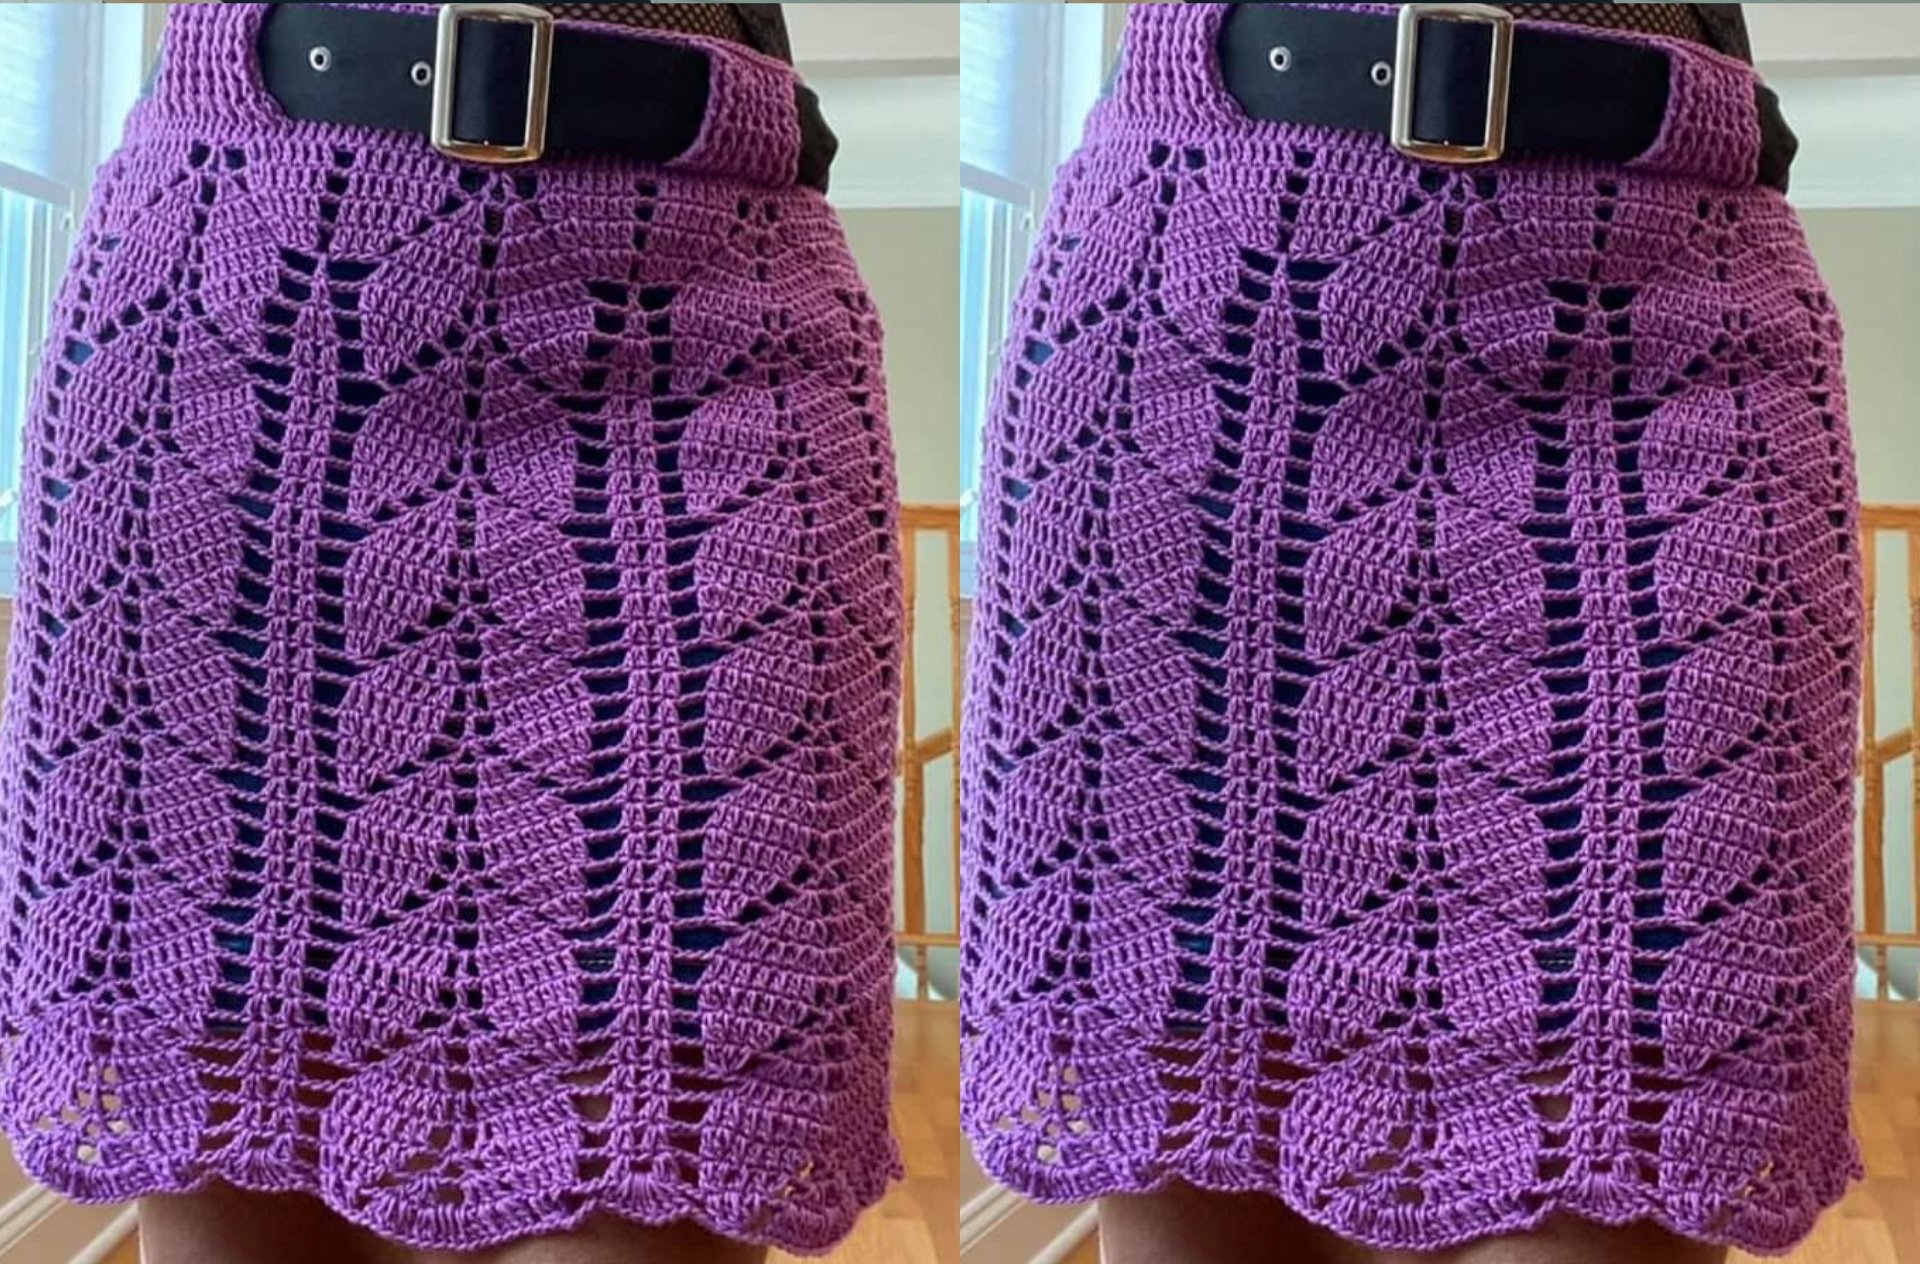
Crochet Flower Skirt, great piece to put together a beautiful look for walking. Beautiful for afternoon outings that we love so much with family and dear friends for putting together a wonderful look. This Crochet Flower Skirt is very versatile, light and loose, eventually, for many occasions, which is great and can help a lot when putting together your look to go out. Very simple to make, and above all, with a beautiful design and full of flowers that you will love. Light and loose will bring comfort and will certainly be very charming and with a beautiful style.
Separate all the material, as this makes the tutorial easier and faster too, which is great and helps a lot. Crochet Flower Skirt that brings a romantic and stylish look that only crochet has, enabling various productions with very beautiful elaborated pieces that always draw attention. This piece can be combined with others, which is even better!
This beautiful skirt is a delicate and well-crafted piece that will result in a beautiful work that everyone will love, believe me, you will love the result of this piece. Craftsmanship fills us with joy when we can produce pieces like this with our own hands. A perfect piece to leverage your sales for the beauty and elegance it has.
See Also:
➽ Crochet Strawberry Bag
➽ Granny Square Blanket
➽ Popcorn Blanket
Materials used :
Anchor knitting cotton about
200 gms (Shade 00119) ;
3.5 mm (US 6, G) crochet hook
Please note : Hook recommended for this yarn is 2 – 2.5 mm. I prefer the slight stretch offered with by using a larger hook size.
For Indians : You can use Red rose / White rose knitting cottons as well. Alize has a wonderful range of cotton yarns as well, which will give you a superb fall too.
International yarns : Among the international yarns I have used in this thickness, I’d suggest Aunt Lydia Cotton 10, Aunt Lydia Bamboo-Viscose 10, DMC Petra, Sullivans knitting cotton (Australia), Milford Soft, Hilaza Rustica Eclat , Alize cotton yarn and Alize bamboo yarn.
Size made : Waist 27″ ; Length ~ 18″
You can make this to any size, using any yarn with a suitable hook
Size given only for yarn estimation.
Gauge : I do not give a gauge as I like that my patterns can be used for any size and with any yarn / hook.
Skill level : Intermediate to Advanced.
The stitches used are basic, but there are calculations that need advanced skills.
There is also a slight mismatch between the chart and my pattern instructions, so you will need to pay attention to the pattern repeat
Stitches used :
Starting slip knot : Here’s how you start with a slip knot.
Starting slip knot 1 or the Sloppy Slip knot : This is a neat new way to start your work without a slip knot.
How to hold your yarn in crochet
Similar idea
Abbreviations used :
Sc : Single crochet
dc : Double crochet rep : Repeat
sp(s) : Space(s) sl-st : slip stitch
sk : Skip
fsc : Foundation Single Crochet
dc 3-tog : Double crochet 3-tog
dc 2-tog : Double crochet 2-tog
dc 4-tog : Double crochet 4-tog
Instructions : (Using U.S terminology)
Please note that I start all my rows with a ch 1, turning chain for ease.
Please check the top of this blog, as well as through the blog, for easy video tutorials on all stitches used in today’s pattern.
Please read through all my notes before you pick up your hook, so you know just where we’re heading in our pattern.
In my patterns I work with the principle of stitch count and body measurement. This means that you need to work the stitch count in pattern, till you get the measurement (length and/or width) that you need for your project.
Our stitch count for today’s pattern is in multiples of 18
In this pattern, 18 sts make one pattern rep, so work your start row accordingly ensuring that you have the number of stitches needed to go around your waist.
Remember the instructions for fitted and non-fitted waist.
As with all my patterns, you can make this skirt for any size, as long as you have the stitch count right.
Before you proceed any further – decide if you’re going to have a fitted waist or not.
If fitted waist, then work in rows for first few rows, and once you think project will slip over hips, join and start working in rounds.
You will then attach a zipper and button to that back after lining.
If not fitted waist, then please work in rounds from foundation row and ensure that the first row goes around your hips.
I worked in rows for the first few rows, as I wanted a zipper attached back.
I then started working in rounds once I had a waist and started the pattern lines below.
Even though I worked in rows initially, I worked for the round waist measure.
In case you do not want the flat waist portion, you could start the pattern right from the first row.
Foundation Single Crochet : fsc : To refresh your skill on the fsc,
Starting with fsc, (working with multiples of the stitch count)
The designer seems to have done a start row of sc / fsc, followed by a rows of sc till project = 3”.
I’ve worked in rows till my project was ~4” and then joined and worked in rounds.
If you want the roped finish like the designer, then as said before, you will work in rounds. So I’d suggest you start, and after a few rounds in sc, you do the ‘hole row’.
Double Crochet : dc : yo, insert hk into st ; yo (3 lps on hk); [yo, draw through 2 lps] twice. One dc made.
Chainless start for Double Crochet : I dislike the ch-2 / ch – 3 start, and this is what I do to start my row of dc.
Skirt pattern instructions
As indicated at the start of this blog, this is an intermediate to advanced pattern only because you will need to figure out part of the start/end of this pattern as per your work.
I have tried to make sense of the chart and coincide it with the project in hand… and I think I have written it correctly.
However, when I reached the border rounds (Rounds 20 on, I found that it was getting increasingly more and more difficult to get the start/end bits right).
That said, once you start working, you will get a hang of the pattern, and will know what you are meant to do. Fingers crossed and let’s start.
Right, so once you have made the flat waist band of sorts, we start on the leaf n floral pattern for the skirt body.
May I suggest that you work in rounds.
If you have worked a small zipper opening, join in the last ro
w and let’s work in rounds hereon.
dc 3-tog : Double crochet 3-tog : [yo, insert hk in stitch or ch-sp, yo and pull up lp, yo, draw through 2 lps] 3 times (4 lps on hk) ; yo, draw through all loops on hk. One dc 3-tog made
Round 1 : sc in 1st sc ;
ch 3, sk 2 sc, dc 3-tog in next sc ;
ch 3, sk next 2 sc, sc in the next sc ; ch 3, sk next 2 sc, dc 3-tog in next sc ;
rep to all around.
Join with a sl-st to the 1st sc.
Round 2 : sl-st onto the 1st dc 3-tog ;
(dc ; ch 1, dc) on the same dc 3-tog ;
ch 3, sc in the next sc ; ch 3, sc on dc 3-tog ; ch 5, sk next 2 ch-3 sps & sc , sc on the next dc 3-tog ; ch 3, sc in the next sc ; ch 3, rep (to) in next dc 3-tog ;
rep from to all around.
Join with a sl-st to the 1st st.
Round 3 : sl-st into the 1st ch-1 sp ;
2 dc in the same ch-1 sp ;
(ch 3, sc in ch-3 sp ; ch 3, sk sc, sc in the next ch-3 sp) ; ch 1, 7 dc in ch-5 sp ; ch 1, rep (to) once ; ch 3, sk next dc, 2 dc in the next ch-1 sp ;
rep from to till end.
Join with a sl-st to 1st st.
Round 4 : dc in 1st dc ;
2 dc in next dc ;
ch 3, sk next ch-3 sp, sc in next ch-3 sp ; (ch 1 , dc in next dc) ; rep from (to) 6 times ; ch 1, sc in next ch-3 sp ; ch 3, dc in the next dc ; 2 dc in the next dc ;
rep from to till end.
Join with a sl-st to 1st st.
Round 5 : dc in 1st 2 dc ; 2 dc in the next dc ;
ch 3, sk next dc, sc in next ch-1 sp ; (ch 4, sc in the next ch-1 sp) ; rep (to) 4 times ; [ch 3, 2 dc in the next dc ; dc in the next dc ; 2 dc in the next dc] ;
rep to till end ;
dc in the next dc (i.e the 1st dc you started with).
Join with a sl-st to 1st st.
Round 6 : dc in the 1st dc ; ch 1, 2 dc in next dc ;
ch 3, sk next dc, sc in next ch-4 sp ; (ch 4, sc in the next ch-4 sp) ; rep from (to) 3 times ; ch 3, sk next dc, 2 dc in the next dc ; [ch 1, dc in next dc ; ch 1, 2 dc in next dc] ;
rep to till end.
Join with a sl-st to 1st st.
Round 7 : dc in 1st dc ;
[ch 1 , 2 dc in the next ch-1 sp ;
ch 1, sk next dc , 2 dc in next ch-1 sp ;
ch 1, dc in next 2 dc] ;
ch 3 , sc in next ch-4 sp ; (ch 4, sc in the next ch-4 sp) ; rep (to) 2 times ; ch 3 , dc in the next 2 dc ; rep [to] once ;
rep * to * till end ;
dc in the next dc (i.e 1st dc you started with).
Join with a sl-st to 1st st.
Round 8 : dc in 1st dc ;
ch 1, sk next dc, dc in the next dc ; 2 dc in ch-1 sp ;
ch 1, 2 dc in same ch-1 sp ; dc in the next dc ;
ch 2 , sc in next ch-4 sp ; (ch 4, sc in the next ch-4 sp) ; rep from (to) once ; ch 2, [ {sk next dc, dc in the next dc ; 2 dc in the next ch-1 sp ; ch 1, 2 dc in same ch-1 sp ; dc in the next dc} ; dc in next ch-1 sp ; rep { to } once ] ;
rep * to * till end ;
dc in the next dc (i.e 1st dc you started with).
Join with a sl-st to 1st st.
Round 9 : dc in 1st dc ;
[ch 2, sk next dc, dc in next 2 dc ; 2 dc in ch-1 sp ;
ch 1, 2 dc in same ch-1 sp ; dc in next 2 dc] ;
ch 2, (sc in next ch-4 sp ; ch 4, sc in next ch-4 sp) ; ch 2, rep [to] once ; ch 2, dc in next dc ; rep [to] once ;
rep from to till end ;
dc in the next dc (i.e 1st dc you started with).
Join with a sl-st to 1st st.
Round 10 : 2 dc in 1st dc ;
[ch 3, sk next dc ; dc in next 3 dc ; 2 dc in ch-1 sp ;
dc in next 3 dc] ;
ch 3, sk next dc, sc in ch-4 sp ; ch 3, rep [to]once ; ch 3, sk next dc, 2 dc in next dc ; ch 3, rep [to] once ;
rep to till end and join with a sl-st to the 1st st.
Round 11 : 2 dc in 1st dc ; ch 1, 2 dc in next dc ;
ch 3, sk next dc , dc in the next 6 dc ; ch 2, sk next 2 dc , sk next ch-3 sps and sc , dc in the next 6 dc ; [ch 3, 2 dc in next dc ; ch 1, 2 dc in next dc] ;
rep to till end.
Join with a sl-st to 1st st.
Round 12 : dc in 1st dc ; ch 1, 2 dc in next dc ;
ch 1, 2 dc in next dc ;
ch 3, sk 1 dc, dc in next 4 dc ; ch 2, sk next dc , dc in ch-2 sp ; ch 2, sk next dc, dc in next 4 dc ; c h 3, sk next dc , 2 dc in next dc ; (ch 1, 2 dc in the next dc) ; rep (to) 2 times ;
rep to till end.
Join with a sl-st to 1st st.
In our next round, we will work a dc 3-tog.
dc 3-tog : Double crochet 3-tog : [yo, insert hk in stitch or ch-sp, yo and pull up lp, yo, draw through 2 lps] 3 times (4 lps on hk) ; yo, draw through all loops on hk. One dc 3-tog made
Round 13 : dc in 1st dc ;
[ch 1, sk 1 dc, dc in next dc ; 2 dc in ch-1 sp ;
ch 1, 2 dc in same ch-1 sp ; dc in next dc] ;
ch 3, dc 3-tog over the next 3 dc ; ch 3, sk next dc, 2 dc in next dc ; ch 2 , dc 3-tog over the next 3 dc ; ch 3, rep [to] once ; ch 1, sk next dc, dc in next ch-1 sp ; rep [to] once ;
rep to till end.
Join with a sl-st to 1st st.
Round 14 : 2 dc in the 1st dc ; ch 1, sk next dc,
[dc in next dc ; 2 dc in the next ch-1 sp ;
ch 1, 2 dc in the same ch-1 sp]
(ch 3, sk dc 3-tog ; rep [to] once ; dc in the next 2 dc) ; ch 2, sk next dc, 2 dc in the next dc ; ch 2, sk next dc , rep [to] once ;
rep to till end.
Join with a sl-st to the 1st st.
Now here’s where calculations come in.
We have kind-of reached the end of a pattern repeat.
We now have about 9 rounds left to reach the end of the pattern along
with the border.
So here’s what you gotta do. Check gauge.
I do not give a gauge as I like that my patterns can be used for any size and with any yarn / hook as I’ve mentioned right at the start, but this means you gotta figure this bit out.
So if you think that adding the last 9 rounds will give you the length needed, then you will go straight to Round 19.
Else continue with Round 15 on, to extend the length of your skirt.
Round 15 : 2 dc in 1st dc ; ch 1, 2 dc in next dc ;
[ch 3, sk next dc , dc in the next 6 dc] ; (ch 3, sk next 2 dc , sk next dc, dc in the next dc ; dc in the next ch-1 sp ; ch 1, dc in the same ch-1 sp ; dc in the next dc) ; rep [to] once ; {ch 3, 2 dc in the next dc ; ch 1, 2 dc in the next dc} ;
rep to till end.
Join with a sl-st to 1st st.
Round 16 : dc in 1st dc ;
ch 1, 2 dc in next dc ;
ch 1, 2 dc in next dc ;
ch 3, sk 1 dc, dc in next 4 dc ; ch 2, sk next dc , dc in ch-2 sp ; ch 2, sk next dc, dc in next 4 dc ; (ch 3, sk next 2 dc , sk next dc, dc in the next dc ; dc in the next ch-1 sp ; ch 1, dc in the same ch-1 sp ; dc in the next dc) ; ch 3, sk next dc , 2 dc in next dc ; (ch 1, 2 dc in the next dc) ; rep (to) 2 times ;
rep to till end.
Join with a sl-st to 1st st.
Round 17 : dc in 1st dc ;
[ch 1, sk 1 dc, dc in next dc ; 2 dc in ch-1 sp ;
ch 1, 2 dc in same ch-1 sp ; dc in next dc] ;
ch 3, dc 3-tog over the next 3 dc ; (ch 3, sk next 2 dc , sk next dc, dc in the next dc ; dc in the next ch-1 sp ; ch 1, dc in the same ch-1 sp ; dc in the next dc) ; ch 3, rep [to] once ; ch 1, sk next dc, dc in next ch-1 sp ; rep [to] once ;
rep to till end.
Join with a sl-st to 1st st.
Round 18 : 2 dc in the 1st dc ; ch 1, sk next dc,
[dc in next dc ; 2 dc in the next ch-1 sp ;
ch 1, 2 dc in the same ch-1 sp]
(ch 3, sk dc 3-tog & dc, dc in the next 2 dc ; 2 dc in the next ch-1 sp ; ch 1, 2 dc in the same ch-1 sp ; dc in the next dc) ; ch 1, sk next dc, dc in the next ch-1 sp ; ch 1, sk next dc, rep [to] once ;
rep to till end.
Join with a sl-st to the 1st st.
Your pattern repeat rounds to increase length are Rounds 15 – 18.
So here’s another calculation.
Once again, you will need to calculate gauge.
See how many inches you are gaining with these four repeat rounds.
Then you need to decide if you are going to end with the large border round, which is a total of 9 rounds.
Once you have all these measurements in hand, go ahead and work repeats of rounds 15-18, ending with a Row 15.
You may have repeated your pattern once, which means that you will actually be on Round 22 when you come back for the last few border rounds.
However as this pattern can be made for any length (including a full length down to floor level), I am just going to continue numbering the rounds from 18.
So technically Round 19 may not be your round count, but we’ll keep it this way for continuity.
Round 19 : dc in 1st 2 dc ;
[ch 3, dc in next 2 dc ; 2 dc in the next ch-1 sp ;
ch 1, 2 dc in the same ch-1 sp ;
dc in the next 2 dc] ;
(ch 3, sk next 2 dc , sk next dc, dc in the next dc ; dc in the next ch-1 sp ; ch 1, dc in the same ch-1 sp ; dc in the next dc) ; rep [to] once ; {ch 2, dc in the next dc ; ch 5, dc in the same dc} ; ch 2, rep [to] once ;
rep to till end.
Join with a sl-st to 1st st.
Right at the start I told you about the worries I had with the chart and how I was interpreting it. You have figured it out thus far, so here’s when it gets tricky again.
Let me explain what we’re trying to do now.
We are ending the two leaf-like patterns and are going to work a lovely flower-like pattern in the middle of the two leaves.
When we start, we start somewhere in that centre bit which is why it’s so confusing.
Now our centre bit, where we will start our flower, is the ch-5 sp, and that’s what we have right at the start. Got it?
Place a marker here if needed, as most of our work will now be centered here.
Round 20 : dc in the 1st dc ; ch 3, 2 dc in the next dc ;
[ch 3, sk next dc, dc in next 3 dc ;
dc in the next ch-1 sp ; dc in the next 3 dc] ;
(ch 3, sk next 2 dc , sk next dc, dc in the next dc ; dc in the next ch-1 sp ; ch 1, dc in the same ch-1 sp ; dc in the next dc) ; rep [to] once ; ch 3, 2 dc in the next ch-5 sp ; ch 3, 2 dc in the same ch-5 sp ; rep [to] once ;
rep to till end.
Join with a sl-st to 1st st.
Double crochet 2-tog : dc 2-tog : [yo, insert hk in st or ch-sp, yo and pull up a lp ; yo and draw through 2 lps] 2 times (3 lps on hk) ;
{yo, draw through 2 lps on hk} 2 times. One dc 2-tog made.
Round 21 : dc in 1st dc ; 8 dc in ch-3 sp ; dc in next 2 dc ;
ch 3, [sk next dc, dc 2-tog over the next 2 dc ; dc in next dc ; dc 2-tog over the next 2 dc] ; (ch 3, sk next 2 dc , sk next dc, dc in the next dc ; dc in the next ch-1 sp ; ch 1, dc in the same ch-1 sp ; dc in the next dc) ; ch 3, rep [to] once ; ch 3, {dc in next 2 dc ; 8 dc in the ch-3 sp, dc in next 2 dc} ;
rep to till end.
Join with a sl-st to 1st st.
In our next round, we will work a dc 2-tog.
Round
22 : dc in 1st dc ;
(ch 1, dc in next dc) ;
rep (to) 9 times ; dc in the next dc ;
ch 3, [dc 2-tog over the next 2 dc] ; (ch 3, sk next 2 dc , sk next dc ; dc in the next dc ; dc in the next ch-1 sp ; ch 1, dc in the same ch-1 sp ; dc in the next dc) ; ch 3, rep [to] once ; ch 3, sk next dc, dc in the next dc ; rep (to) 11 times ;
rep from to till end.
Join with a sl-st to 1st st.
Round 23 : sl-st into the 1st ch-1 sp ;
sc in same 1st ch-1 sp ;
{ch 4, sc in next ch-1 sp} ;
rep from {to} till the last ch-1 sp ;
ch 3, sc on next dc (top of dc 2-tog) ; (ch 3, sk next dc , dc in the next dc ; dc in the next ch-1 sp ; ch 1, dc in the same ch-1 sp ; dc in the next dc) ; ch 3, sk next dc, sc on next dc ; ch 3, sc in the next ch-1 sp ; rep from {to} 10 times till last ch-1 sp ;
rep to till end.
Join with a sl-st to 1st st.
Round 24 : sl-st into the 1st ch-4 sp ;
sc in same 1st ch-4 sp ;
{ch 4, sc in next ch-4 sp} ;
rep from {to} till last ch-4 sp ;
ch 3, sc on next sc ; (ch 3, sk next dc , dc in the next dc ; dc in the next ch-1 sp ; ch 1, dc in the same ch-1 sp ; dc in the next dc) ; ch 3, sc on next sc ; ch 3 , sc in the next ch-4 sp ; rep from {to} 9 times till last ch-4 sp ;
rep from to till end.
Join with a sl-st to 1st st.
Round 25 : sl-st into the 1st ch-4 sp ;
3 dc in same 1st ch-4 sp ;
(ch 1, 3 dc in the next ch-4 sp) ;
rep (to) till last ch-4 sp ;
ch 2, (ch 3, sk next dc , dc in the next dc ; dc in the next ch-1 sp ; ch 1, dc in the same ch-1 sp ; dc in the next dc) ; ch 2, 3 dc in the next ch-4 sp ; rep from (to) 8 times till last ch-4 sp ;
rep from to all around.
Join with a sl-st to 1st st.
Round 26 : (dc in 1st dc, 2 dc in next dc, dc in next dc) ;
ch 1, rep from (to) till last 3-dc group of this set ;
ch 1, sk next 2 dc, 2 dc in ch-1 sp ; ch 1, sk next 2 dc, rep (to) once ; {ch 1, rep (to) once} ; rep {to} 7 times ;
rep from to till end.
Join with a sl-st to 1st st.
Round 27 : dc in 1st 4 dc ; (ch 1, dc in next 4 dc) ;
rep from (to) till last 4 dc group ;
ch 1, dc 2-tog over 2 next 2 dc ; rep (to) 9 times ;
rep to till end.
Join with a sl-st to 1st st.
In our final round, we will work a dc 4-tog.
dc 4-tog : Double crochet 4-tog : [yo, insert hk in st or ch-sp, yo and pull up a lp ; yo and draw through 2 lps] 4 times (5 lps on hk) ; yo, draw through all lps on hk. One dc 4-tog made.
Round 28 : sl-st into the 1st ch-1 sp , sc in the same 1st ch-1 sp ;
ch 3, dc 4-tog over the next 4 dc ; ch 3, sc in ch-1 sp ;
rep from to till end.
Join with a sl-st to 1st st.
Fasten off and weave in ends.

Crochet Flower Skirt, wanting to change your look? This skirt we brought today will certainly give you a new and stylisj look!! You can use it to go out with your friends, your family or even alone too, have fun wiht yourself!! This amazing skirt is very beautiful and easy to do, the colors can be changed and it can be used with other clothes, this will surely make your customers want one like it, which will help you in sales!!
Want to make this amazing Crochet Flower Skirt? Then set aside all your material and tools before starting your piece so that you already have everything close at hand, this way it’ll be easy to carry out this project, follow the tutorial carefully, make your piece while following the tutorial and I’ m sure that you will be able to make this amazing work easily.