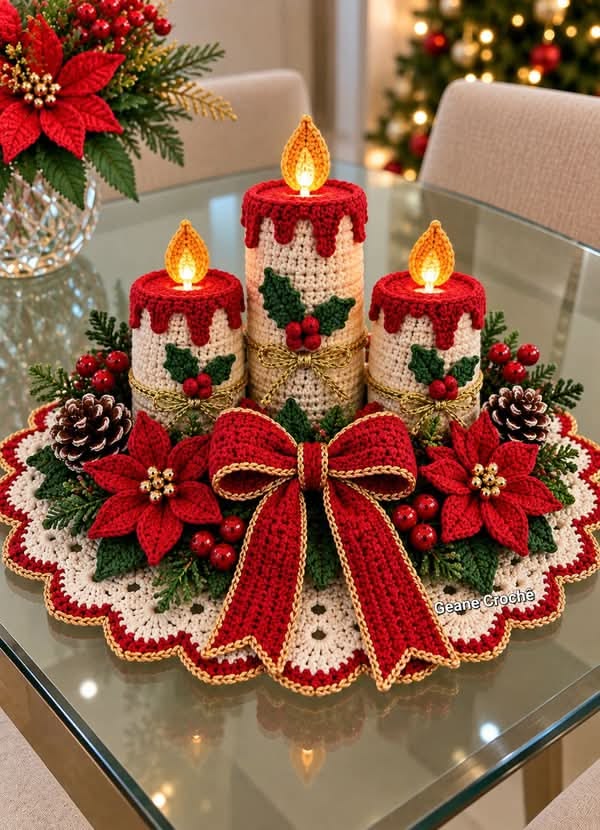
Crochet Christmas Candle Centerpiece

Create a beautiful DIY crochet Christmas centerpiece with this festive candle arrangement, featuring crocheted candles, poinsettias, holly leaves, berries, pine branches, and a large decorative bow.
This elegant handmade centerpiece is perfect for decorating a Christmas dining table, coffee table, sideboard, entryway, or holiday dinner setting. The combination of traditional red, green, cream, and gold creates a classic Christmas look while the crochet texture gives the decoration a warm handmade feel.
This project can also be adapted into smaller individual candle holders, a Christmas table runner centerpiece, or a matching set of holiday decorations.
Before starting, gather your crochet supplies and decorative materials.
You will need:
Medium-weight cotton yarn works particularly well because it produces a firm, defined crochet fabric.
For the Christmas colors, a combination of deep red, ivory, forest green, and gold gives a traditional appearance.
For the finished centerpiece, you can use:
Safety note: For a crochet centerpiece, use battery-operated LED candles rather than real flames. Yarn is flammable and should never be placed around an open flame.
Before crocheting, decide how large you want your arrangement to be.
The inspiration design features:
You can recreate the entire arrangement or make a simpler version with only one candle and a few flowers.
The classic Christmas palette works beautifully for this project.
Use:
Red + cream + green + gold
The cream yarn forms the candle bodies.
Red is used for the candle wax, poinsettias, berries, and bow.
Green creates the holly leaves and greenery.
Gold adds elegant decorative accents.
You can also customize the palette:
Use burgundy, cream, olive green, and brown.
Use burgundy, ivory, forest green, and metallic gold.
Use white, silver, pale blue, and icy green.
The candles are essentially small cylindrical crochet pieces.
Start with cream-colored yarn.
Create a foundation chain long enough to fit around the LED candle insert you plan to use.
Join the chain to form a ring.
Work in rounds using single crochet.
Continue crocheting until the tube reaches your desired height.
For the three-candle arrangement, create three different heights.
For example:
The exact dimensions can be adjusted according to your LED candle size.
Once the candle body reaches the desired height, finish the upper edge.
Leave the opening large enough to accommodate the LED light.
You can create a slightly raised rim by adding one or two additional crochet rounds.
This gives the candle a more finished appearance.
Do not make the opening too tight if you need to remove the LED insert later.
One of the most recognizable details in the inspiration image is the red crochet wax dripping over the top of each candle.
Switch to red yarn.
Attach the yarn around the upper edge of the candle.
Crochet a few rounds around the top.
To create the dripping effect, vary the length of the stitches or create small sections that extend downward.
For example:
This irregularity makes the crochet wax look more realistic.
Insert a small battery-operated LED candle light into the top of the crochet candle.
The flame should be visible above the red wax.
Choose LED lights with a warm white or yellow glow for a cozy Christmas effect.
Make sure the light can be easily removed for storage and battery replacement.
The candle bodies can be decorated with small crochet or embroidered details.
The inspiration design features:
You can make tiny leaves and berries separately and sew them onto the candle.
Use green yarn.
Chain a small number of stitches to create the center of the leaf.
Work around the chain using single crochet or slip stitches.
Create pointed edges to form the characteristic holly-leaf shape.
Make several leaves in different sizes.
For a more detailed appearance, embroider a center vein using a darker green yarn.
Create small red crochet balls.
One simple method is to crochet a tiny sphere using single crochet and a small amount of stuffing.
You can also use red beads if you want a smaller and more precise detail.
Group three berries together to create a traditional holly cluster.
Sew the berries securely to the candle or centerpiece.
Wrap a thin gold crochet cord or decorative trim around the candle.
The gold accent creates a beautiful contrast against the cream background.
You can make:
Secure the cord carefully so that it doesn’t become loose.
The poinsettias are one of the main decorative elements of the centerpiece.
Use red yarn to create several layered petals.
Start with a small center.
Then crochet several pointed petals around it.
You can make:
Layering different petal sizes gives the flowers a fuller appearance.
For the flower centers, use:
Make several small stitches or tiny crochet balls in the center of each flower.
This creates the characteristic poinsettia center.
The candles and flowers sit on a decorative round crochet base.
Start with cream yarn.
Crochet a flat circular motif using basic increases.
Continue increasing evenly so the circle remains flat.
The final diameter depends on the size of your arrangement.
For a table centerpiece, approximately 35–50 cm can work well.
The inspiration centerpiece has a decorative scalloped border.
Once the base reaches the desired size, add a decorative edging.
You can use:
A shell stitch is particularly effective for creating the soft wavy edge.
Switch to red yarn for the final edging.
Work one or two rounds around the outer edge.
This creates a strong contrast with the cream center.
You can also add a thin gold thread alongside the red border for an elegant finish.
Place the three crocheted candles on the center of the crochet base.
Position the tallest candle in the middle.
Place the smaller candles on either side.
Keep enough space between them for the flowers and greenery.
If necessary, sew small loops underneath the candles so they can be attached securely to the base.
Place artificial pine branches around the candles.
You can also crochet your own pine branches using green yarn, although artificial greenery is easier and creates a more realistic effect.
Arrange the greenery so that it fills the spaces between the candles.
Allow a few branches to extend beyond the edge of the centerpiece.
Place clusters of green leaves and red berries around the base.
Try to distribute them evenly.
You can create larger clusters near the front and smaller clusters around the sides.
This helps frame the candles and creates visual balance.
The large red bow is the centerpiece’s main decorative feature.
Use red yarn or wide decorative ribbon.
Create two large loops.
Tie the center securely.
Then add two long tails.
For a crochet bow, you can make two rectangular crochet panels and fold them into loops.
Use gold cord or metallic yarn to outline the bow.
You can:
The gold detail gives the arrangement a more elegant Christmas appearance.
Place the crocheted poinsettias around the bow.
You can add:
Sew the flowers securely to the crochet base.
Small pine cones can add a wonderful natural element.
You can use:
If using real pine cones, make sure they are completely dry and clean before incorporating them into the centerpiece.
Attach them securely using floral wire or strong thread.
Step back and look at your centerpiece.
If you see large empty areas, add small decorative elements.
You can use:
Try not to overcrowd the center.
The candles should remain the main focal point.
Once you are satisfied with the arrangement, secure the decorative elements.
Use:
Make sure the decorations won’t easily move when the centerpiece is transported or stored.
Check all of the crochet pieces for loose yarn ends.
Weave in any remaining tails.
Trim excess yarn.
Straighten the scalloped border.
Make sure the LED candle lights are positioned correctly.
Turn the lights on and check the overall effect.
Using yarns with similar thicknesses will help the individual elements look cohesive.
A tight stitch is useful for the candle bodies because it helps them maintain their cylindrical shape.
This is especially important when using yarn and other textiles around candles.
Layering petals creates much fuller and more realistic poinsettias.
Combining crochet, ribbon, pine branches, beads, and fabric can make the centerpiece much more visually interesting.
If you don’t want to crochet all of the individual elements, simplify the project.
Make:
Then use artificial poinsettias, berries, and pine branches to complete the decoration.
This gives you the same overall effect with considerably less crochet work.
You can easily change the design for different Christmas themes.
Use red, green, cream, and gold.
Use burgundy, ivory, dark green, and metallic gold.
Use red, beige, brown, forest green, and natural pine cones.
Use white, silver, pale blue, and icy green.
Use only cream, red, and green with fewer decorative elements.
Once you’ve created the crochet poinsettias, leaves, berries, and bow, use the same motifs for other Christmas projects.
You can make:
Creating matching pieces can give your home a coordinated handmade Christmas theme.
This DIY crochet Christmas centerpiece is a beautiful combination of crochet, traditional holiday colors, and festive decorative elements. The three glowing candles create a warm focal point, while the crocheted poinsettias, holly leaves, berries, pine branches, and oversized bow complete the classic Christmas look.
The project can be made as elaborate as the inspiration image or simplified for beginners. You can crochet every component from scratch or combine handmade pieces with artificial greenery and ready-made decorations.
Because the individual motifs are relatively small, this is also an excellent project for using up leftover red, green, cream, and gold yarn from previous crochet projects.
With a little creativity, you can turn a simple crochet base into a beautiful centerpiece that becomes part of your holiday décor year after year.