Crochet Santa Gnome Wall Hanging

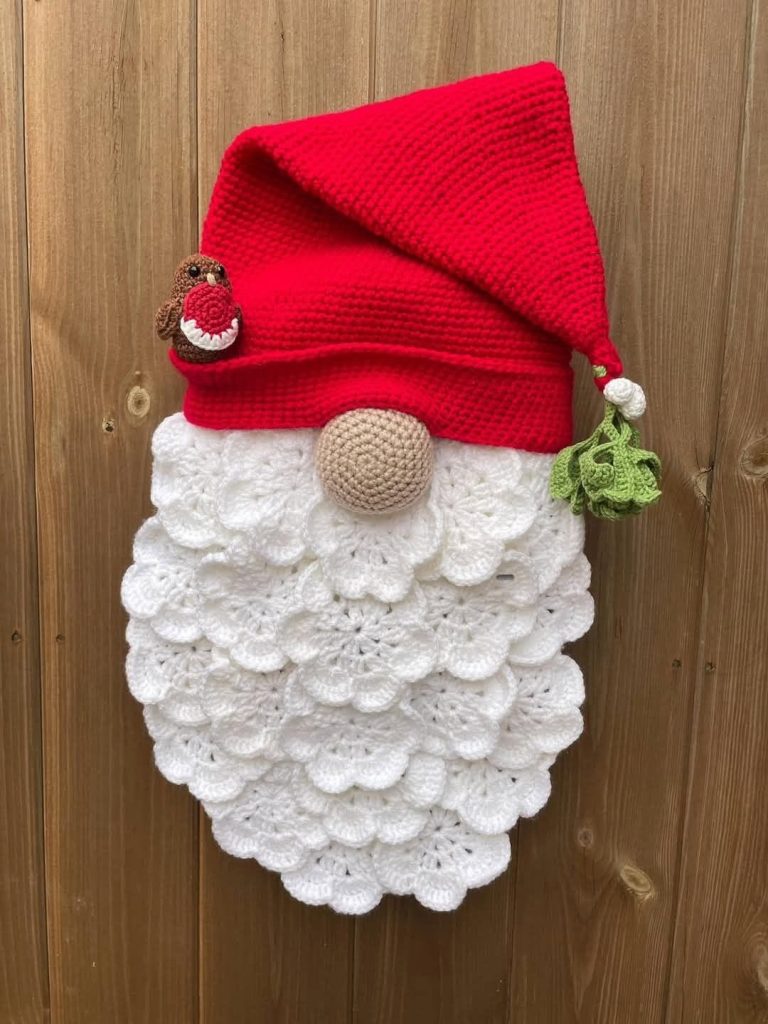
Bring a little handmade magic to your holiday decorating with this adorable crochet Santa gnome wall hanging! Featuring a tall red hat, a fluffy-looking beard made from layered crochet snowflakes, a round stuffed nose, and charming Christmas embellishments, this project makes a beautiful statement piece for your front door or holiday display.
Unlike traditional amigurumi gnomes, this decoration is assembled from individual crocheted motifs. The overlapping snowflakes create a dimensional beard with scalloped edges, giving the finished piece a beautiful lace-like texture.
This tutorial explains how to make the snowflakes, crochet the hat, shape the nose, and assemble the entire decoration.
Skill level: Intermediate
Crochet terminology: US terms
Finished size: Approximately 24–27 inches tall, depending on your yarn, hook, and assembly.
For a decoration similar to the reference image, choose a bright Christmas red and a soft white yarn with good stitch definition.
The beard is created by layering white crochet snowflakes. Each motif has six main branches and decorative loops that overlap the surrounding snowflakes.
Make 13 white snowflakes for the beard and 1 smaller white snowflake for the hat.
Using white yarn and a 5.0 mm hook, make a magic ring.
Ch 3 (counts as the first dc), then work 1 dc into the ring. Ch 2.
Repeat the following sequence five times:
Pull the magic ring closed and join with a sl st to the top of the beginning ch-3.
Stitch count: 12 dc and 6 ch-2 spaces.
Sl st into the next ch-2 space.
Ch 3 (counts as the first dc), work 2 dc into the same space, ch 2, then work 3 dc into that same space. Ch 1.
Repeat the following sequence in each of the remaining five ch-2 spaces:
Join with a sl st to the top of the beginning ch-3.
Stitch count: 36 dc, 6 ch-2 spaces, and 6 ch-1 spaces.
You should now see six distinct clusters around the center.
Sl st into the first ch-2 space.
In that space, work the following sequence:
Sl st into the next ch-1 space to move toward the following branch.
Repeat this sequence around all six branches, creating three chain loops of graduated lengths at each branch.
Join securely and FO, leaving a tail for weaving in.
Finishing note: This is a simplified, original snowflake motif designed for the layered effect. The exact appearance will depend on your tension and how you shape the loops.
Before assembly, gently spread each snowflake on a flat surface. Pull the six main points outward and adjust the chain loops until the motif lies evenly.
If necessary, dampen the motifs and pin them into shape until dry. Avoid excessive stretching, which can distort the center.
Repeat the same three rounds with white yarn using a 4.0 mm hook.
The smaller hook creates a more compact motif that sits neatly on the red hat.
The hat is worked as a shaped panel that can be folded and arranged into the tall, floppy silhouette shown in the reference image.
Using red yarn and a 5.0 mm hook, ch 3.
Row 1: Sc in the second ch from the hook and in the next ch. (2 sc)
Row 2: Ch 1, turn, 2 sc in the first st, sc in the next st. (3 sc)
Row 3: Ch 1, turn, 2 sc in the first st, sc across to the last st, 2 sc in the last st. (5 sc)
Row 4: Ch 1, turn, 2 sc in the first st, sc across to the last st, 2 sc in the last st. (7 sc)
Continue in this manner, increasing by 2 sc per row until you reach approximately 51 sc.
Next 12 rows: Ch 1, turn, sc in each st across. (51 sc per row)
This creates the main hat panel. For a taller or wider decoration, add rows before fastening off.
Lay the panel flat with the narrow end pointing upward.
Fold the panel lengthwise and seam the two long edges together using a tapestry needle and red yarn. The narrow end forms the tip of the hat, while the wider end forms the opening.
Turn the piece right side out. Arrange the hat into a gentle curve, allowing the upper portion to bend over naturally.
Because the hat is a decorative panel rather than a fitted garment, the precise amount of folding and draping can be adjusted to achieve the look you prefer.
With the hat opening facing you, attach red yarn to the lower edge.
Round 1: Ch 1, work sc evenly around the opening, distributing the stitches evenly across the row ends. Join with a sl st.
Round 2: Ch 1, sc in each st around. Join with a sl st.
Repeat Round 2 until the brim is approximately 1–1.5 inches deep.
FO and weave in the ends.
Position the brim so it forms a broad horizontal band above the beard. The red brim in the reference image has a clean finish without a separate white trim.
Using beige yarn and a 5.0 mm hook, work in continuous rounds. Use a stitch marker to identify the beginning of each round.
Round 1: 6 sc in MR. (6)
Round 2: Inc in each st around. (12)
Round 3: (Sc in next st, inc) 6 times. (18)
Round 4: (Sc in next 2 sts, inc) 6 times. (24)
Round 5: (Sc in next 3 sts, inc) 6 times. (30)
Rounds 6–9: Sc in each st around. (30 per round)
Round 10: (Sc in next 3 sts, dec) 6 times. (24)
Round 11: (Sc in next 2 sts, dec) 6 times. (18)
Stuff the nose firmly with fiberfill.
Round 12: (Sc in next st, dec) 6 times. (12)
Round 13: Dec 6 times. (6)
FO, leaving a long tail. Thread the tail through the remaining front loops and pull closed.
Shape the nose gently with your fingers until it forms a rounded dome.
The small robin attached to the left side of the hat is an optional embellishment that adds a sweet, traditional Christmas detail.
Using brown yarn and a 4.0 mm hook:
Round 1: 6 sc in MR. (6)
Round 2: Inc in each st around. (12)
Round 3: (Sc in next st, inc) 6 times. (18)
Rounds 4–6: Sc in each st around. (18 per round)
Round 7: (Sc in next st, dec) 6 times. (12)
Stuff lightly.
Round 8: Dec 6 times. (6)
FO, leaving a tail to close the opening.
Using red yarn, make a small flat oval:
Round 1: Ch 5. Work 2 sc in the second ch from the hook, sc in the next 2 ch, and 3 sc in the final ch. Working along the opposite side of the foundation chain, sc in the next 2 ch and work 1 sc in the final remaining stitch. Join with a sl st.
FO, leaving a sewing tail.
Position the red oval on the front of the bird’s body and sew it securely in place. Add a tiny cream or white curved section along its lower edge if desired.
Make two small brown wing shapes by chaining 5, then working sl sts and sc along the chain to create a narrow oval. FO and sew one wing to each side of the body.
Use black yarn to embroider two small eyes. Add a tiny cream-colored beak using a few stitches of yarn.
Attach the finished bird to the left side of the hat brim.
Safety note: If the decoration will be accessible to small children, embroider the eyes instead of using small plastic safety eyes.
The green embellishment near the tip of the hat can be made from three small leaves and a white pom-pom.
Make three leaves using green yarn.
For each leaf, ch 8.
Starting in the second ch from the hook, work:
Now work along the opposite side of the foundation chain:
FO, leaving a long tail.
Repeat until you have three leaves. Arrange them around a short green yarn stem and sew them together at their bases.
Attach the leaves near the end of the hat so they hang downward, as in the reference image.
Wrap white yarn around two or three fingers approximately 40–60 times. Carefully remove the loops and tie the bundle tightly in the center with a separate piece of yarn.
Cut the loops and trim the ends into a round, fluffy shape.
Sew the pom-pom to the end of the hat beside the holly leaves.
This step creates the most distinctive feature of the decoration.
Arrange your 13 white snowflakes in six overlapping rows:
This arrangement creates a tapered beard with a wide upper section and a pointed lower end.
Alternate which snowflake sits on top at each intersection. This gives the beard a fuller, layered appearance rather than a flat, uniform surface.
Secure the overlaps with small stitches of white yarn or a minimal amount of hot glue. Sewing is preferable if you want the decoration to remain flexible and easier to repair.
Place the upper edge of the assembled beard underneath the red hat brim.
Position the top row so that only the upper portions of the snowflakes are concealed by the brim. Secure the beard to the hat using several stitches across the top.
Next, center the beige nose at the junction between the hat and the beard.
Sew the nose securely to the hat brim and the upper snowflake layer. The lower part of the nose should overlap the beard slightly, matching the look of the reference image.
Before fastening everything permanently, check that the nose is centered and that the beard hangs evenly on both sides.
Place the smaller white snowflake on the left side of the red hat, above the brim and near the robin.
Rotate the snowflake until its points sit neatly against the hat. Sew it in place using white yarn or secure it with a small amount of fabric-safe adhesive.
Keep the motif slightly raised so that it remains visible against the red background.
Weave in all remaining yarn ends and trim any loose fibers.
Lay the completed gnome flat and inspect the overall silhouette:
To hang the decoration, sew a strong yarn loop or attach a small hanging ring to the back of the hat. If you prefer a flatter display, sew a short fabric loop to the back and hang it from a hook.
Allow any adhesive to dry completely before hanging the finished piece.
Choose yarn with good stitch definition. Smooth acrylic or cotton yarn makes the snowflake shapes easier to see.
Keep your motifs consistent. Use the same hook and tension for all 13 beard snowflakes so the layers fit together naturally.
Test the layout before attaching anything. Arrange all the motifs first and adjust the spacing until you achieve the desired beard shape.
Avoid excessive glue. Too much adhesive can flatten the lace and make the beard stiff. Small, discreet attachment points are sufficient.
Customize the proportions. More snowflakes create a longer beard, while fewer motifs produce a smaller wall decoration.
This crochet Santa gnome wall hanging is a wonderful Christmas project for crocheters who enjoy combining small motifs into a larger decorative piece. Its bright red hat, dimensional snowflake beard, rounded nose, and optional robin and holly details create a charming handmade ornament.
Display it on a door, hang it on a wall, or make one as a special holiday gift. You can also experiment with different shades of red, cream, and green to create your own seasonal variation.
Have you made a crochet Christmas gnome before? Share your favorite colors and embellishments in the comments, and save this tutorial for your next holiday crochet project!