Christmas Cat Quilt Tutorial

Create a charming Christmas cat quilt featuring a black cat, a festive red-and-green present, and a cozy winter background. This delightful patchwork design combines seasonal fabrics, geometric shapes, and simple quilting techniques to create a unique handmade decoration for the holidays.
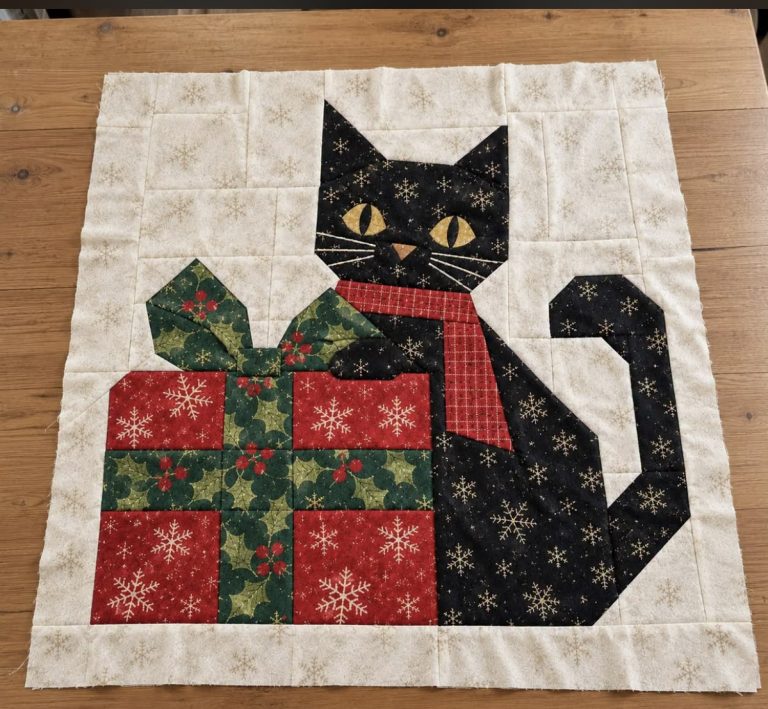
The quilt shown in the photograph features a black cat with golden eyes, a curved tail, and a red plaid scarf. The cat sits beside a Christmas present decorated with holly, berries, and snowflakes. A cream-colored background printed with delicate snowflakes completes the winter-inspired design.
This Christmas cat quilt is a wonderful project for cat lovers, quilters, and anyone who enjoys making handmade holiday decorations. You can use it as a wall hanging, a festive table topper, a decorative throw, or the centerpiece of a seasonal quilting collection.
In this tutorial, you will learn how to plan the design, choose fabrics, prepare the pattern pieces, assemble the cat and gift, add the background, and finish the quilt.
Please note: The instructions below describe a construction method inspired by the photograph. The exact original pattern and templates are not available, so the measurements are suggested starting points rather than verified dimensions for reproducing the pictured quilt exactly.
Before beginning, gather the following materials:
You may also use embroidery floss for the cat’s whiskers and other small details.
The combination of fabrics is what makes this quilt special.
Choose a black or very dark charcoal fabric for the cat’s body. A subtle winter print, such as tiny snowflakes or stars, adds texture without distracting from the silhouette.
The background in the photograph is a warm ivory fabric decorated with small snowflakes. A cream-on-cream print is ideal because it provides contrast while maintaining a soft, snowy appearance.
Use red fabric with white snowflakes for the main sections of the gift. Green fabric with holly leaves and red berries creates the ribbon and decorative accents.
Golden yellow or mustard fabric makes the cat’s eyes stand out against its dark face. A small amount of black fabric can be used for the pupils.
A red plaid fabric adds a cozy winter detail. If you cannot find plaid fabric, use solid red cotton or create a simple plaid effect with thin stitched lines.
Start by deciding how large you want your finished quilt to be.
For a small wall hanging, a finished size of approximately 24 x 24 inches works well. You can enlarge the design by adding more background blocks or wider borders.
The design can be divided into five main sections:
Draw a simple sketch on paper before cutting your fabric. Mark the approximate position of each section and decide where the cat’s head, body, tail, and present will sit.
The cat should occupy the right side of the central composition, while the Christmas present sits to the left. Leave enough space above and around the cat for the background to remain visible.
Tip: Arrange fabric scraps on a table before sewing. This makes it easier to check the balance of the colors and adjust the composition.
Cut cream background fabric into squares and rectangles to build the base of the quilt.
For a 24-inch finished project, you can begin with a layout approximately 24½ inches square before adding borders, depending on your chosen construction method.
The exact sizes of the background pieces will depend on the shape of your cat and present.
Place the background pieces around the planned design area, using a combination of rectangles and squares to create a patchwork surface.
Sew the pieces together using a ¼-inch seam allowance. Press the seams carefully after each seam is completed.
Try to keep the snowflake prints running in a consistent direction, especially if the fabric has a noticeable pattern.
Do not sew every background section together immediately. Leave the central area open if you plan to use traditional piecing for the cat and present, or prepare a complete background panel if you are using appliqué.
The cat’s head is one of the most recognizable elements of the quilt.
Cut a black fabric shape for the head. A rounded rectangular shape with a slightly wider lower section works well.
For the pointed ears, prepare two black triangular pieces. These can be sewn directly into the head shape or constructed separately and attached afterward.
If you are using raw-edge appliqué, apply fusible web to the back of the black fabric, position the ears on the background, and secure them with stitching.
The ears should point upward and outward to create the classic cat silhouette.
Position the head in the upper-right area of the quilt composition.
The lower edge of the head should align with the neck and scarf area. Check the placement before permanently attaching the pieces.
The golden eyes provide a striking contrast against the black fabric.
Cut two small almond-shaped pieces from yellow or gold fabric.
If cutting precise almond shapes is difficult, use narrow ovals and trim the corners slightly to create a more pointed appearance.
Position the eyes symmetrically on the cat’s face.
For each eye:
You can use black embroidery thread to add fine details around the eyes.
Check that the eyes are aligned before sewing them permanently. Even a small change in placement can give the cat a different expression.
The nose is a small triangular detail placed between and slightly below the eyes.
Cut a tiny triangle from orange, rust, or mustard fabric. Attach it to the face using appliqué or small stitches.
For the whiskers, use white, ivory, or pale gray embroidery floss.
Make three thin lines extending outward from each side of the nose. Use straight stitches and keep the lines relatively short and evenly spaced.
You can also embroider a small vertical line from the nose toward the lower face.
If you prefer a simpler project, the whiskers can be omitted or made with narrow strips of pale fabric.
The cat’s body is formed from larger black fabric pieces below the head.
The photograph shows the cat sitting upright, with its body extending downward along the right side of the quilt.
You can create this shape using traditional patchwork or appliqué.
This method is especially useful for curved shapes and an uninterrupted cat silhouette.
Construct the body from black rectangles and angled pieces.
Sew the pieces together carefully, matching the edges and trimming excess fabric as needed. Use cream background pieces to shape the outer contours of the body.
Traditional patchwork requires more planning but produces a design in which the shapes are formed entirely from joined fabric pieces.
Choose whichever method best suits your quilting experience.
The curled tail adds movement to the design.
In the photograph, the tail rises along the right side of the cat and curves inward.
To create a similar shape, draw the tail on paper first. Aim for a broad curved shape rather than a narrow strip, which may be difficult to sew accurately.
If using appliqué:
If using piecing, divide the tail into several manageable sections. Use angled pieces and small background triangles to build the curve gradually.
For a more defined outline, add a narrow line of quilting around the tail after the quilt sandwich has been assembled.
Check that the tail remains visually separate from the body so that the curved silhouette is easy to recognize.
The Christmas present is the colorful focal point on the lower-left side of the quilt.
The version shown in the photograph uses red fabric with white snowflakes and green fabric decorated with holly and berries.
Begin by drawing a rectangular gift shape. You can use a simple patchwork rectangle with horizontal and vertical strips to represent the ribbon.
Prepare the following fabric sections:
The dimensions depend on the size of your overall quilt. For a design similar to the photograph, make the gift large enough to balance the cat’s body.
To achieve the patchwork appearance in the photograph, you can alternate red and green rectangles instead of using one large red rectangle.
The holly print gives the green sections a festive appearance, while the snowflake print helps the red sections coordinate with the background.
The red plaid scarf wraps around the cat’s neck and hangs down over the body.
Cut a narrow strip of red fabric for the collar. Position it across the lower part of the head.
Cut a second, longer strip for the hanging end of the scarf.
The hanging section should extend downward over the cat’s body.
If you are using appliqué, prepare the scarf shapes separately and secure them to the cat with stitching.
Choose red plaid fabric to recreate the look of the photograph. A red fabric with a subtle gold or cream grid pattern also works beautifully.
Now it is time to bring all the pieces together.
Arrange the cat’s head, body, tail, scarf, and Christmas present on the background.
Check the spacing between the elements. The present should sit to the left of the cat, while the tail curves upward on the right.
Make sure the head, body, and scarf align naturally.
If using appliqué, secure all the shapes before moving on to the borders.
If using traditional piecing, sew the individual units together according to your layout plan. Add background rectangles and triangles as needed to fill the spaces between the shapes.
Press the seams carefully and trim the central panel to a neat rectangular shape.
Important: Curved shapes and angled sections may require custom templates. Test the placement with paper pieces before cutting your final fabric.
The photograph shows a wide cream border decorated with snowflakes.
This border frames the cat and present while reinforcing the winter theme.
Measure the completed central panel before cutting the border strips.
Cut two strips for the left and right sides, then two strips for the top and bottom. The width of each strip can be adjusted to achieve your preferred finished size.
For a small wall hanging, a border approximately 2–3 inches wide can provide a balanced frame.
Sew the side borders first. Press the seams outward toward the border.
Next, attach the top and bottom borders. Press the seams flat.
Trim the quilt top to ensure that the corners are square.
If your central panel is not perfectly rectangular, make small adjustments before adding the border rather than stretching the fabric to fit.
Once the quilt top is complete, prepare the layers for quilting.
You will need:
Lay the backing fabric on a flat surface with the wrong side facing upward.
Place the batting on top, smoothing out any wrinkles.
Position the quilt top over the batting with the right side facing upward.
Smooth all three layers carefully.
Baste the layers together using safety pins, temporary basting spray, or hand-basting stitches.
Keep the layers flat and avoid stretching the quilt top.
Quilting stitches hold the three layers together and add texture to the finished project.
For this design, simple quilting lines work well.
You can quilt around the cat’s silhouette, follow the outline of the Christmas present, or add straight lines through the background.
Choose thread that complements the fabric. Cream thread blends into the background, while black thread works well on the cat.
Avoid excessive quilting over the small facial details, as this may make the eyes and whiskers less distinct.
After quilting, place the project on your cutting mat.
Use a ruler and rotary cutter to trim the excess batting and backing fabric.
Square the corners and make sure the edges are even.
Measure the quilt again to confirm its final dimensions.
If you plan to use the project as a wall hanging, check that the top edge is straight so it will hang neatly.
Binding covers the raw edges of the quilt and gives the project a polished finish.
Choose cream fabric for a subtle frame, red fabric for a festive edge, or green fabric to coordinate with the Christmas present.
Cut binding strips according to your preferred binding method. A common choice is 2½-inch-wide strips.
Join the strips together diagonally to reduce bulk, then press the binding in half lengthwise with the wrong sides together.
Align the raw edges of the binding with the raw edge of the quilt top.
Sew the binding around the quilt using a ¼-inch seam allowance. Miter the corners carefully.
Fold the binding over the raw edges to the back of the quilt and stitch it in place by hand or machine.
Inspect the corners and edges to ensure that all raw edges are enclosed.
Give the finished quilt a final inspection.
Check that all seams are secure, the binding is neatly attached, and there are no loose threads.
If you used appliqué, make sure the cat’s eyes, nose, ears, tail, and scarf are securely stitched.
Press the quilt lightly if the fabric care instructions allow it.
Your Christmas cat quilt is now ready to display!
Although black creates a dramatic contrast with the cream background, you can make the cat in gray, brown, orange, or white fabric.
Use blue and silver fabrics for a winter-inspired present, or combine pink and cream for a softer holiday look.
Small embroidered snowflakes can be added to the background or the cat’s body. Use white, gold, or silver embroidery thread.
Repeat the central design or combine it with coordinating Christmas patchwork blocks to create a larger seasonal quilt.
Add a hanging sleeve to the back of the finished quilt. This allows you to display it as seasonal wall art.
The project is best suited to confident beginners or intermediate quilters. Straight-line patchwork is relatively simple, but the cat’s ears, face, curved tail, and other shaped elements require careful planning.
Yes. You can use traditional patchwork techniques to construct the cat and gift from smaller fabric pieces. This requires more precise cutting and additional seams.
Quilting cotton is an excellent choice because it is easy to handle and suitable for both piecing and appliqué.
A standard quilting ruler with clear inch markings is helpful for cutting accurate strips and squaring the block.
Yes. The central design can be adapted to a cushion front. Adjust the overall dimensions to fit your cushion insert and add backing fabric or a closure of your choice.
This Christmas cat quilt combines the charm of a black cat with the warmth of traditional holiday colors. The red-and-green present, golden eyes, plaid scarf, and snowflake background create a festive design that is perfect for seasonal decorating.
By working carefully through each stage, from fabric selection to binding, you can create a personalized quilt that celebrates both quilting and the magic of Christmas.
Feel free to experiment with colors, prints, and decorative details to make the design your own.
Happy quilting, and enjoy your handmade Christmas creation!