Log Cabin Quilt Block Tutorial

The Log Cabin quilt block is a timeless quilting design that transforms simple fabric strips into a beautiful patchwork pattern. This version features a small center square surrounded by progressively longer strips of coordinating fabrics, creating a modern log cabin design with a beautiful mix of colors and prints.
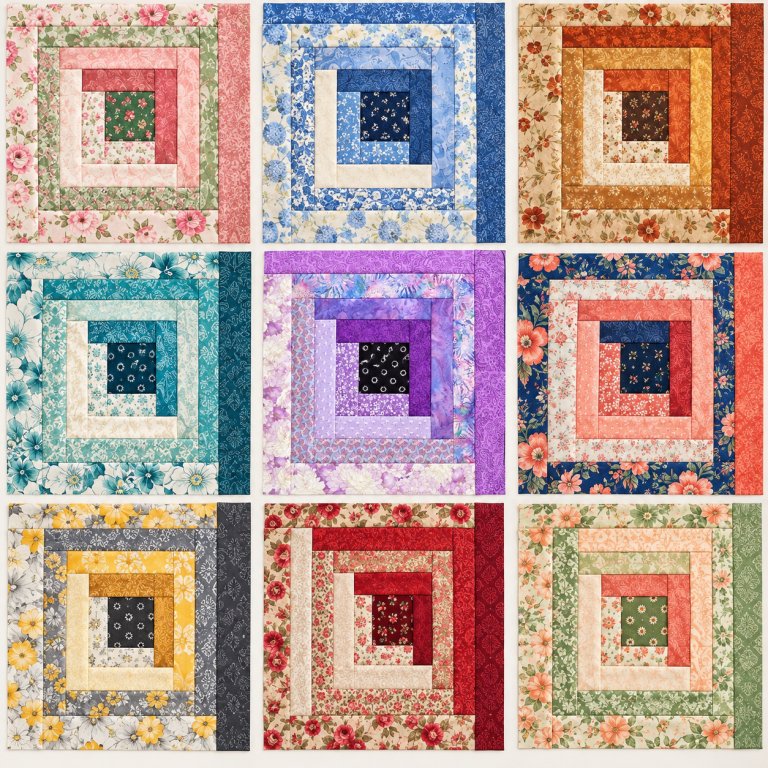
Inspired by the purple and lavender quilt block shown in the photograph, this tutorial explains how to create a similar block using floral fabrics, batiks, tonal prints, and contrasting colors. The design is ideal for quilters who want to experiment with fabric combinations while practicing accurate strip piecing.
Although the traditional Log Cabin block is often made with narrow strips, this version uses wider strips to create a bold, contemporary appearance. The finished block can be used in a quilt, cushion cover, table runner, wall hanging, or other patchwork project.
The finished size can be adjusted by changing the center square, strip widths, or number of rounds.
To make this Log Cabin quilt block, you will need:
Quilting cotton is recommended because it is easy to cut accurately, holds its shape, and is suitable for precise patchwork piecing.
The beauty of this block comes from the contrast between the center square and the surrounding strips.
For a look similar to the original photograph, choose a dark center fabric and combine it with several shades of purple, lavender, lilac, and pink. Floral prints, watercolor-style fabrics, batiks, and tone-on-tone designs work particularly well.
Try to include a combination of light, medium, and dark fabrics. This variation helps each round remain visible and gives the block depth.
You can use a different fabric for every round, or repeat selected fabrics to create a more coordinated appearance.
The following cutting guide is designed for a block measuring approximately 12½ inches square before joining it to other blocks. All measurements include a ¼-inch seam allowance.
For this version, use a 2½-inch-wide strip throughout the construction.
| Piece | Cut size | Quantity |
|---|---|---|
| Center square | 2½ x 2½ inches | 1 |
| Round 1 strips | 2½ x 4½ inches | 2 |
| Round 2 strips | 2½ x 6½ inches | 2 |
| Round 3 strips | 2½ x 8½ inches | 2 |
| Round 4 strips | 2½ x 10½ inches | 2 |
| Round 5 strips | 2½ x 12½ inches | 2 |
| Optional outer border | 2½ x 14½ inches | 2 |
Important measurement note: The cutting guide above is a starting point for a conventional, alternating Log Cabin construction. Because the exact seam placement and dimensions of the pictured block cannot be confirmed from the photograph alone, measure your assembled block after each round and adjust the strip lengths as necessary. The optional outer border is intended to be added only after the main block has been checked for size.
Begin by washing and pressing your fabrics if that is part of your usual quilting preparation.
Lay each fabric flat on the cutting mat and use a rotary cutter and quilting ruler to cut the strips to the required width.
Keep the pieces organized by round so that you can easily identify which strips belong in each part of the block.
For a color arrangement similar to the photograph, you could organize the fabrics as follows:
These colors are suggestions rather than a requirement. The same block works beautifully in many different palettes.
Place the 2½-inch center square on your work surface.
This square is the starting point for the entire Log Cabin block. A dark, contrasting print makes a strong focal point, while a light center creates a softer appearance.
Press the square flat and check that all four edges are straight.
The center square should measure 2½ x 2½ inches before sewing.
Choose the fabric for your first round.
Place one 2½ x 4½-inch strip against the right side of the center square, with the right sides of the fabrics facing each other.
Sew along the edge using a ¼-inch seam allowance.
Open the strip and press the seam toward the new fabric strip.
Next, attach the second strip to the opposite side of the center square. Align the edges, sew with a ¼-inch seam allowance, and press the fabric open.
At this stage, the center square should have a strip attached to each side.
Tip: Pressing after each seam is important. It keeps the block flat and helps you maintain accurate measurements as the rounds become larger.
Choose the next fabric in your color sequence.
Place one strip along the top edge of the assembled piece, with right sides together. Sew, open, and press.
Attach the second strip along the bottom edge in the same way.
After completing this round, your center should be surrounded by two additional strips.
Check the block for square corners and smooth edges before continuing.
If the block begins to twist or ripple, recheck the seam allowance and make sure the fabric is not stretching as you sew.
Continue adding strips around the center, alternating between the sides and the top and bottom edges.
For a traditional Log Cabin arrangement, each new strip should be long enough to cover the edge of the block plus the seam allowance at both ends.
A practical method is to measure the current block after pressing and cut the next strip approximately ½ inch longer than the edge to which it will be attached. Sew the strip in place, press it open, and trim the excess fabric flush with the block.
Repeat the process on the opposite side.
Continue adding strips in this order:
This alternating construction produces the characteristic spiral effect of the Log Cabin pattern.
For the color arrangement shown in the photograph, use a different fabric for each round to emphasize the individual bands.
As you add each new round, consider how the colors work together.
The original block combines small-scale prints, floral designs, abstract watercolor patterns, and tonal fabrics. This variety gives the piece a rich, layered appearance without relying on complicated shapes.
To create a similar result, alternate busy prints with simpler fabrics.
For example, place a small floral print beside a solid-looking batik, then follow it with a larger multicolored print. This allows each fabric to stand out without making the block look too crowded.
You can also create a light-to-dark progression by starting with darker fabrics near the center and gradually moving toward lighter fabrics.
Alternatively, place the darkest strips on one side of the block and lighter strips on the other for a more dramatic design.
Once the main Log Cabin section is complete, you can add wider strips around the outside to create a framed appearance similar to the photograph.
Choose two coordinating fabrics for the outer border. For example, use a large lavender floral print on two opposite sides and a darker purple ornamental fabric on the remaining sides.
Measure the current block before cutting the border strips.
For a balanced result, cut the first two strips to match the measured edge length, including the additional length needed for the seam allowance. Sew them to opposite sides, press, and trim if necessary.
Then measure the new block and attach the remaining two strips to the other sides.
If you want to reproduce the asymmetrical arrangement in the photograph, use different prints on adjacent sides rather than repeating the same fabric all the way around.
Note: The photograph shows an outer frame made from large floral and purple patterned fabrics. You can recreate this effect by adding a separate border after the central Log Cabin section is complete.
Pressing is one of the most important steps in patchwork quilting.
After every seam, open the newly attached strip and press it flat. You may press seams toward the darker fabric to help reduce the visibility of seam allowances through lighter fabrics.
Avoid dragging the iron across the block, as this can stretch the bias edges and distort the square.
Instead, lift and lower the iron gently.
When the block is complete, press the entire surface once more and check that it lies flat on your cutting mat.
Place the completed block on your cutting mat.
Align your quilting ruler with the center and outer edges, checking that the corners are square.
Trim the sides evenly to create a uniform block.
For a block intended to finish at 12 inches square, the unfinished block should measure 12½ x 12½ inches before it is sewn into a quilt, assuming a ¼-inch seam allowance on each side.
If your block is larger, trim it carefully to the required size.
If it is smaller than the intended unfinished measurement, do not trim it further. Instead, consider adding a narrow border or adjusting the dimensions of the other blocks in your project.
Once your block is complete, there are many ways to use it.
Create several Log Cabin blocks using the same color palette. Arrange them in rows and columns, alternating the direction of the blocks to create different visual effects.
Use one large block for the front of a decorative cushion. Add batting and backing fabric, quilt the layers if desired, and finish the cushion with a zipper or envelope-style closure.
Make a series of coordinating blocks and arrange them in a long row. A consistent palette will help the runner look cohesive.
Choose fabrics with a strong contrast between the center and outer rounds. Add batting, backing, and a hanging sleeve to display the finished block as decorative textile art.
The Log Cabin design is highly adaptable. Here are three palettes that work particularly well with this wide-strip version.
Use a navy or dark blue center, followed by medium blue prints, pale blue fabrics, and cream floral strips.
This combination creates a fresh, traditional look that works well in bedrooms and living rooms.
Choose a dark green center or a small floral center print, then combine blush pink, rose, cream, and sage green fabrics.
The result is soft and romantic, especially when using delicate floral cotton prints.
Start with a dark brown or rust-colored center. Add terracotta, burnt orange, beige, ivory, and muted brown strips.
This palette is ideal for a warm, rustic quilt or a modern farmhouse-inspired project.
Uneven seam allowances, inaccurate cutting, or stretching during pressing can cause the block to become distorted.
Use a consistent ¼-inch seam allowance, press after each round, and measure the block frequently.
The strips may not include enough extra length for the seam allowance at both ends.
Measure the actual assembled block before cutting the next strip. It is safer to cut slightly longer pieces and trim the excess after sewing.
Too many thick seams meeting in the same area can create bulk.
Press seams carefully and avoid using fabrics that are much heavier than the others. Cotton quilting fabrics of similar weight usually work best.
Yes. The Log Cabin block is excellent for using fabric scraps.
As long as each piece is wide enough for the intended strip and long enough to cover the required edge, you can combine different prints and colors.
Yes. Add more rounds using the same construction method. Measure the block after every round and cut the next strips according to the current dimensions.
You can also increase the strip width to create a larger, bolder design.
This wide-strip Log Cabin quilt block is a wonderful way to combine beautiful fabrics into a striking patchwork design. By beginning with a small center square and building outward one strip at a time, you can create a block that looks complex while relying on simple straight seams.
Experiment with different colors, prints, and border arrangements to make each block unique. Whether you use it in a quilt, cushion, table runner, or wall hanging, the Log Cabin pattern offers endless possibilities for creative quilting.
Take your time with accurate cutting, consistent seam allowances, and careful pressing. These small details make a big difference in the final result.
Happy quilting!