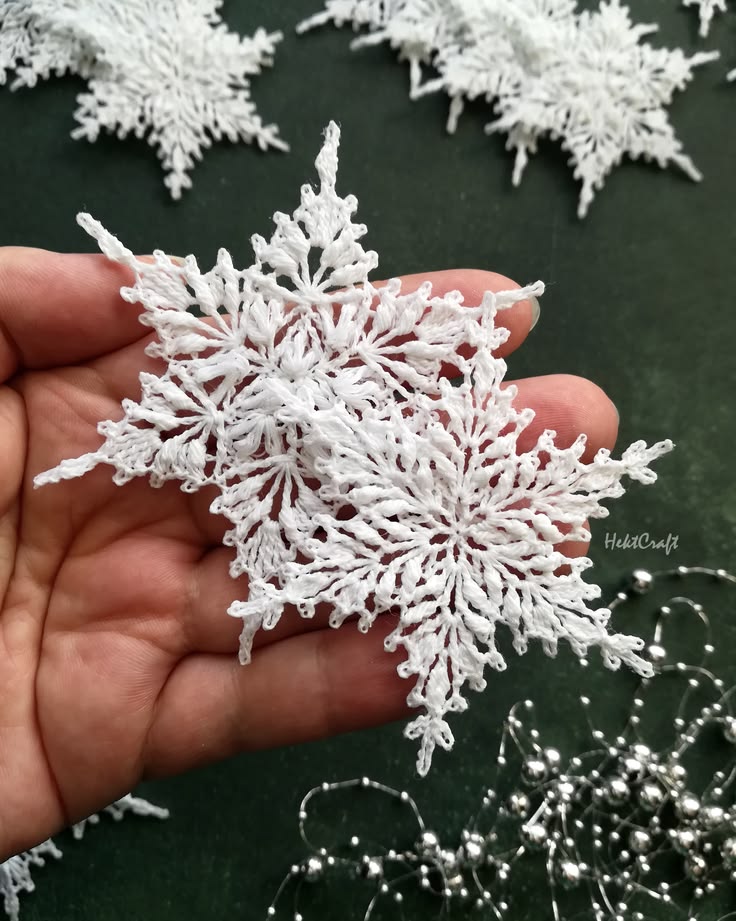
Delicate Crochet Snowflake Tutorial

Create a beautiful, intricate crochet snowflake with fine white thread, delicate openwork, and decorative pointed branches. Inspired by the look of traditional lace snowflakes, this handmade ornament is perfect for Christmas trees, winter garlands, window decorations, and thoughtful handmade gifts.
The secret to achieving that crisp, delicate appearance is using fine thread, keeping your stitches consistent, and carefully blocking the finished snowflake so every point and loop stands out.
Skill level: Intermediate
Finished size: Approximately 3–5 inches (7.5–12.5 cm), depending on your thread and hook
US crochet terminology: Used throughout this pattern
Begin with a magic ring.
Round 1: Ch 3 (counts as the first dc), then work 1 dc into the ring. Ch 2.
Work 2 dc into the ring, ch 2.
Repeat the instructions between asterisks four more times. You should have six groups of 2 dc, separated by six ch-2 spaces.
Join with a sl st to the top of the beginning ch-3. Pull the magic ring tight.
You now have the foundation for the six main branches of your snowflake.
Round 2: Sl st into the next ch-2 space. Ch 3 (counts as the first dc), then work 3 dc into the same space. Ch 2.
Work 4 dc into the next ch-2 space, then ch 2.
Repeat around until all six spaces contain a group of four dc separated by a ch-2 space. Join with a sl st to the top of the beginning ch-3.
This round creates the fuller inner structure that helps the snowflake look delicate without becoming too fragile.
This is where your snowflake begins to take shape.
Round 3: Sl st into the next ch-2 space.
In the same space, work the following sequence:
This creates a graduated cluster of chain loops, with the longest loop forming the central point of the branch.
Move to the next ch-2 space with a sl st and repeat the entire sequence.
Continue until you have created six matching branches. Join securely, fasten off, and weave in all loose ends.
Pattern note: This is a simplified lace-inspired interpretation of the reference image, not an exact stitch-for-stitch reconstruction. The resulting motif has six main points and layered chain-loop details. For a denser, more elaborate lace effect, add fine picot edging to selected loops before fastening off.
For extra definition, you can decorate the outer chain loops with small picots.
To make a picot, ch 3 and sl st into the first chain you made.
You can add a picot at the tip of each main branch or at selected smaller loops. Keep the placement symmetrical so the snowflake retains its balanced appearance.
Avoid adding too many decorative loops if you want the open, airy look of delicate thread crochet.
Blocking is essential if you want the finished ornament to resemble the crisp, open lacework in the reference photo. Crochet snowflakes often look uneven immediately after the final stitch, but careful shaping helps reveal their full design. <Cite refs={[“turn375044view2″,”turn621453search0”]}/>
Take your time with this step. The way you arrange the loops determines the final shape of the ornament.
If you want your snowflake to hold its shape when hanging on a Christmas tree, you can stiffen it after blocking.
Mix equal parts clear-drying craft glue and water in a small container. Test the mixture on a spare piece of thread first.
Lightly apply the mixture to the snowflake, making sure the chain loops are coated without filling the open spaces. Pin the snowflake back into shape and let it dry thoroughly.
A commercial fabric stiffener is another option. Follow the product’s instructions and allow the piece to dry completely before handling it. <Cite refs={[“turn375044view2″,”turn621453search0”]}/>
Cut a short length of white thread or narrow ribbon. Thread it through one of the outer points and tie the ends securely to form a loop.
For a more decorative finish, you can add a tiny silver bead or a small pearl at the center. These details are optional; the white lacework is beautiful on its own.
These delicate ornaments can be used in many creative ways:
A delicate crochet snowflake is a lovely way to turn a small amount of white thread into a timeless winter decoration. The combination of open chain spaces, pointed branches, and careful blocking creates an elegant lace effect that looks especially beautiful when several snowflakes are displayed together.
Experiment with the length of the chain loops, the placement of the picots, and the final blocking to create your own collection of unique snowflake ornaments.
These resources provide additional examples of snowflake construction, decorative chain loops, and finishing methods.