Crochet Chicken Keychain Pattern

If you love cute crochet accessories, this little crochet chicken keychain is a fun and colorful project to add to your handmade collection! These adorable chickens feature a rounded body, a scalloped edge, a tiny beak, and a decorative comb. You can make them in bright colors, soft pastels, or beautiful multicolored yarn combinations.
This crochet chicken keychain is perfect for using up leftover yarn and creating handmade gifts for friends, family members, teachers, and craft lovers. Attach one to your keys, backpack, purse, or zipper for a charming handmade touch.
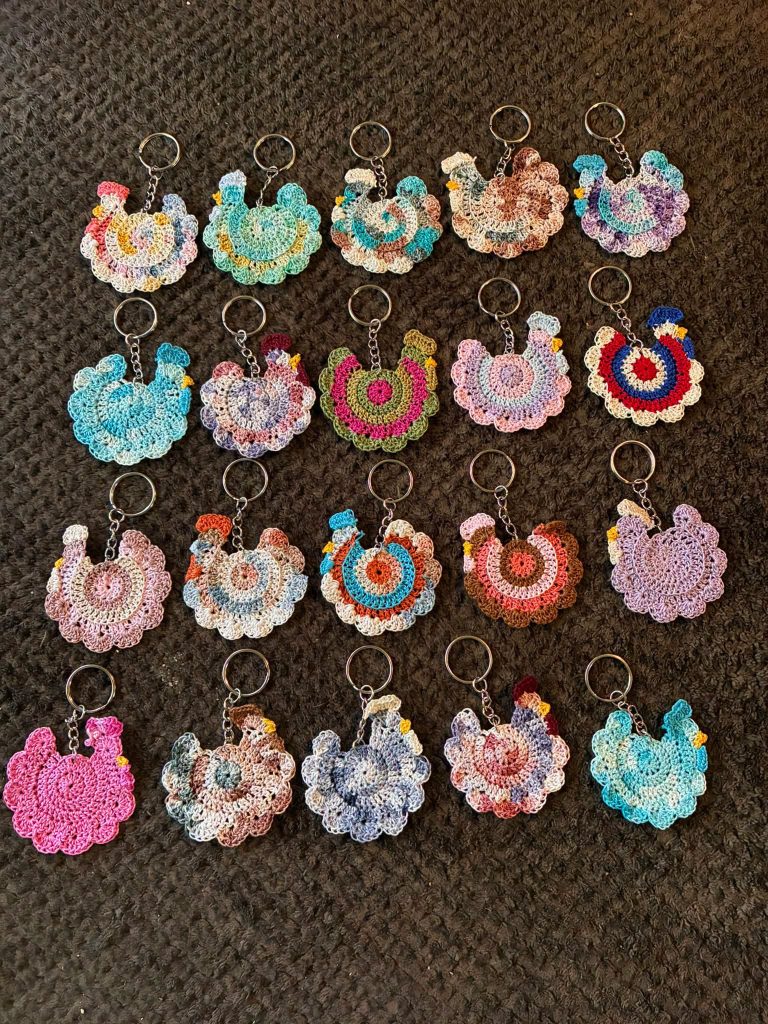
The design in this tutorial is inspired by the colorful chicken keychains shown in the photograph. The instructions describe a simple flat crochet version with decorative details and a scalloped border.
The finished size will depend on your yarn, hook, and tension. With fine cotton yarn and a small crochet hook, the chicken will usually be approximately 2.5–3.5 inches tall, excluding the keychain hardware.
To make this crochet chicken keychain, gather the following supplies:
One of the best things about this pattern is that you can customize every chicken.
Try these color combinations:
For a neat finish, use cotton yarn that holds its shape well. Very soft or fuzzy yarn may make the small decorative details harder to see.
This pattern uses US crochet terminology.
Important: A US single crochet is called a double crochet in UK terminology. Make sure you are following the US stitch names used in this tutorial.
This chicken keychain is worked in rounds to create a flat circular body. Decorative stitches are then added around the edge to form the scalloped feathers. The comb, beak, and tail details are attached afterward.
Keep your stitches fairly tight so the finished motif is firm enough to hold its shape. However, avoid pulling the yarn so tightly that the center curls or becomes difficult to work into.
If you are new to crochet, practice the magic ring and increase stitches before starting the project.
Choose the main color for the body.
Round 1: Make a magic ring and work 6 sc into the ring. Pull the ring closed and join with a sl st to the first sc. (6 sts)
Round 2: Ch 1. Work 2 sc in each stitch around. Join with a sl st. (12 sts)
Round 3: Ch 1. Repeat 1 sc in the next stitch, 2 sc in the next stitch around. Join with a sl st. (18 sts)
Round 4: Ch 1. Repeat 1 sc in each of the next 2 stitches, 2 sc in the next stitch around. Join with a sl st. (24 sts)
Round 5: Ch 1. Repeat 1 sc in each of the next 3 stitches, 2 sc in the next stitch around. Join with a sl st. (30 sts)
You should now have a small, flat crochet circle.
If the circle begins to curl upward, check your stitch count and tension. If the edge becomes wavy, make sure you have not accidentally worked too many increases.
For a multicolored design, change yarn at the end of any round.
To make a clean color change, begin the final stitch of the old color and complete the last yarn-over with the new color. Join the round using the new color.
You can use one color for the center and another for the outer body, as seen in several of the colorful examples in the photograph.
The next round creates a slightly fuller outline for the chicken.
Round 6: Ch 1. Repeat 1 sc in each of the next 4 stitches, 2 sc in the next stitch around. Join with a sl st. (36 sts)
Fasten off if you want to use a different color for the scalloped border.
At this stage, you should have a flat circular motif approximately 2–2.5 inches wide, depending on your yarn and hook.
The original photo shows variations in body shape, so you can make the circle slightly larger or smaller to suit your preferred keychain size.
The scalloped edge gives the chicken its decorative, feather-like appearance.
Join your border color to any stitch around the body.
Border round: Ch 1. Repeat the following sequence around the circle:
Sk 1 st, work 5 dc in the next st, sk 1 st, sl st in the next st.
Continue repeating this sequence around the edge.
If the final repeat does not fit evenly, adjust the spacing slightly or use a smaller number of stitches in the last shell.
Fasten off and weave in the ends.
The chicken keychains in the image have small rounded scallops around their lower edges and sides. To create a similar effect:
For a more delicate finish, use 4 dc stitches per shell. For a fuller, more pronounced border, use 5 or 6 dc stitches.
The comb is the small decorative section at the top of the chicken’s head.
Choose red, pink, orange, or another contrasting color.
Join the yarn near the upper edge of the body, slightly to one side of the center.
Comb instructions:
This creates a small, three-lobed comb.
For a smaller chicken, use ch 2 and 2 hdc for each raised section. For a more prominent comb, use ch 3 and 2 dc.
The comb can be made in one color or in several colors for a playful, handmade look.
The beak is a tiny detail, but it makes the chicken instantly recognizable.
Using yellow or orange yarn:
Adjust the position so the beak points outward from the head.
If you prefer a more subtle beak, embroider a small triangular shape using yellow or orange thread instead.
The tail can be made from two or three small raised sections at the opposite side of the head.
Join the yarn near the upper edge of the body, opposite the beak.
You can use the same color as the comb or choose a contrasting color.
Some chickens in the photograph have longer, more prominent tail feathers. To imitate that appearance, use ch 3 and 2 dc in each selected stitch.
For a more durable keychain, crochet a second body using the same instructions.
Repeat Steps 1–3 to make another circular motif. You may use the same colors or create a contrasting reverse side.
You do not need to add a comb, beak, and tail to both sides if you prefer a simpler finish. However, adding the details to both sides makes the keychain look attractive when it turns around.
Before joining the two pieces, check that their edges line up evenly.
Place the two crochet motifs together with the wrong sides facing inward and the decorative sides facing outward.
Join the yarn at the edge and work sc stitches through both layers around the circumference.
Stop when you have crocheted approximately three-quarters of the way around. Check that the pieces are aligned, then continue to the end.
If your yarn is very fine and the motif feels too delicate, you can use a yarn needle to sew the pieces together instead.
Keep the joining stitches even to create a neat outline.
Tip: Do not pull the joining yarn too tightly. Tight stitches can make the edges curl and cause the finished keychain to lose its round shape.
Once the chicken is finished, attach the metal keychain hardware.
There are two simple ways to do this.
Method 1: Attach the chain to the crochet fabric
Method 2: Make a small crochet loop
For everyday use, the first method is often more secure when the metal connector is properly closed and attached through sturdy stitches.
Avoid attaching the hardware to a loose decorative shell. Choose a firm stitch close to the main body instead.
Before using the keychain, take a moment to finish the details.
If desired, lightly block the crochet piece according to the yarn manufacturer’s care instructions. Allow it to dry completely before attaching it to keys or a bag.
Your crochet chicken keychain is now ready to use or give as a handmade gift!
One of the most enjoyable parts of making these crochet chicken keychains is experimenting with colors and details.
Use a different color for each section of the body. Try pink, yellow, turquoise, lavender, and blue. A contrasting scalloped edge helps each layer stand out.
Choose pale pink, mint green, baby blue, cream, and lilac. This combination creates a soft, delicate accessory that works well as a small handmade gift.
Use white, cream, beige, or light brown for the body. Add a red comb, an orange beak, and a cream border for a traditional chicken-inspired look.
This is an excellent project for leftover crochet thread. Use small amounts of different colors for the center, border, comb, and tail. Every finished keychain will have its own personality.
Make several chickens in different color combinations and attach each one to a keychain ring. They make charming gifts for birthdays, craft fairs, party favors, and handmade gift baskets.
Your stitches may be too tight, or you may have missed increases. Check the stitch count at the end of each round and try a slightly larger hook if necessary.
Too many stitches or shells can make the border ruffle excessively. Check your spacing and make sure each repeat follows the same pattern.
Use a smaller crochet hook or finer cotton thread. You can also stop increasing one round earlier, but remember that this changes the finished proportions.
Use tighter stitches and shorter chains. You can also embroider a small comb directly onto the body instead of making it with raised stitches.
Use cotton yarn, secure all loose ends, and attach the metal hardware through firm stitches in the main body. For a two-sided design, joining two motifs together can help make the finished piece sturdier.
Yes. Beginners who know how to make a magic ring, single crochet, increases, and slip stitches can follow the basic construction. The small decorative details may require a little practice.
Yes. Chain 2 and work the first round of stitches into the second chain from the hook. Pull the yarn tail to close the center as much as possible.
Cotton yarn or crochet thread is a good choice because it provides stitch definition and helps the finished motif hold its shape.
You can make finished keychains for personal use or as gifts. If you plan to sell them, check the terms of any separate pattern or design you use and follow applicable rules for handmade products.
A simple flat version may take around 30–60 minutes, depending on your experience, yarn thickness, and the number of decorative details.
This crochet chicken keychain is a cheerful little project that combines simple crochet techniques with colorful details. By changing the yarn colors, experimenting with scalloped borders, and adding different comb and tail shapes, you can create a whole collection of unique chicken accessories.
Whether you make one for yourself or several as handmade gifts, these tiny crochet chickens are a lovely way to use leftover yarn and enjoy a creative afternoon.
Happy crocheting!