Granny Square Crochet Poncho

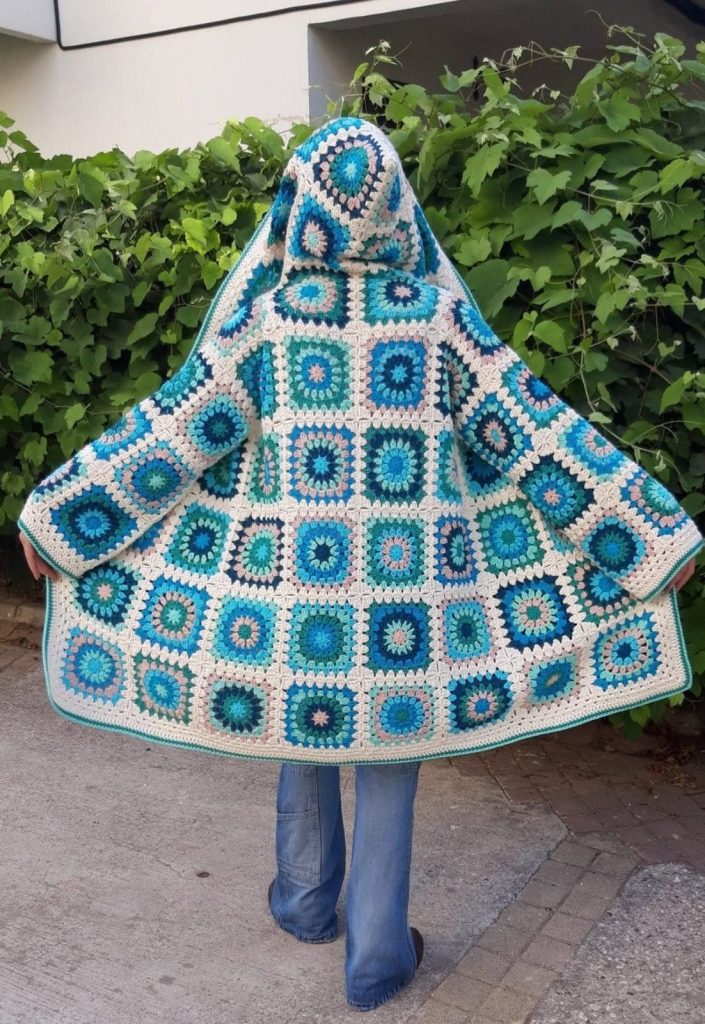
Create a beautiful DIY granny square crochet poncho inspired by this colorful oversized design. Made from individual floral granny squares in shades of blue, teal, cream, and soft pink, this cozy crochet garment combines a classic patchwork technique with a modern, relaxed silhouette.
The poncho is made by joining multiple crochet granny squares into a large wearable piece, then adding a hood, sleeves, and a finished border. It is an excellent project for crocheters who love colorful blankets but want to transform the classic granny square into a practical piece of clothing.
Choose a medium-weight yarn that is comfortable against the skin.
For a look similar to the inspiration piece, use:
Acrylic, cotton, or acrylic-cotton blends can all work well.
Because this is an oversized garment, you have plenty of flexibility when choosing the finished dimensions.
Measure from the top of your shoulder to where you want the poncho to end.
For a design similar to the inspiration photo, the poncho should extend well below the hips.
You will also need to determine:
A good starting point is to make the body large enough to drape comfortably over your shoulders without pulling.
The main body is made from floral granny squares.
The squares shown in the inspiration design have a flower-like center surrounded by several rounds of crochet.
You can use a traditional granny square or choose a floral variation.
A typical square can contain:
Using cream as the final round helps visually connect all the squares.
To create a coordinated appearance, establish a basic color sequence before crocheting.
For example:
Round 1: Dark blue
Round 2: Turquoise
Round 3: Teal
Round 4: Light blue
Round 5: Cream
Another square could reverse the colors.
This creates variety while keeping the entire poncho cohesive.
Don’t be afraid to make some squares different.
The slightly varied colors are part of the charm of a handmade granny square garment.
Begin with your first color.
Make a magic ring or chain several stitches and join them into a ring.
Work the first round into the center.
Depending on your chosen flower granny square pattern, you can use:
Puff or cluster stitches are particularly useful for creating a raised floral center.
Continue adding rounds around the center.
Change colors when desired.
The goal is to create a flower-like circular motif in the center of the square.
Use contrasting colors to make the petals visible.
For example:
Repeat the process for each square.
Once the flower center is complete, use a granny-square arrangement to create four corners.
The stitches around the corners should gradually transform the circular motif into a square.
Continue working rounds until the square reaches your desired size.
A square approximately 15–20 cm wide is a practical size for a wearable poncho.
However, the exact size can be adjusted according to your yarn and gauge.
The cream border is important because it separates the colorful motifs.
Work one or two final rounds in cream.
This creates a consistent frame around each square.
Make sure every square is approximately the same size.
If some squares are slightly different, blocking can help bring them to a uniform measurement.
The number of squares required will depend on the size of your poncho.
For a smaller garment, you may need approximately:
30–40 squares
For a larger oversized poncho:
40–60+ squares
The exact number isn’t fixed because you can arrange the squares in different configurations.
The best approach is to make several squares first and use them to determine the final dimensions.
Blocking is especially useful for granny square garments.
Lightly dampen the squares.
Gently stretch each one into a square shape.
Pin the corners and edges to the desired dimensions.
Allow them to dry completely.
This will make the squares easier to join and will give the finished poncho a much neater appearance.
Lay all your squares on a large flat surface.
Arrange them into the shape of your poncho before joining anything.
The body should create a broad, cape-like silhouette.
You can arrange the colors randomly or create a repeating pattern.
For a look similar to the inspiration photo, mix the blue and turquoise squares throughout the body rather than grouping identical colors together.
The poncho can be constructed from two large sections:
Arrange the granny squares into rectangles.
Join enough squares together to create the desired width and length.
The front and back should be approximately the same size.
There are several ways to join granny squares.
Place two squares together and work slip stitches through the corresponding stitches.
Crochet the squares together using single crochet.
This creates a slightly raised seam.
Use a yarn needle to sew the squares together.
This is simple and produces a relatively flat seam.
For a smoother appearance, use a carefully worked invisible crochet or sewing join.
For this poncho, a cream-colored join helps maintain the continuous light-colored grid between the colorful squares.
Once the squares have been joined into the front and back panels, place the two panels together.
Align the side and shoulder edges.
Join the shoulders while leaving the desired neckline opening.
Then join the side sections.
Leave openings for the arms.
The result should begin to resemble a large poncho.
Try the poncho on before finishing the neckline.
The opening should be large enough to comfortably pass over your head.
You can create:
The inspiration piece has a generous neckline that works well with the hood.
The hood is one of the most distinctive features of this poncho.
Create the hood using additional granny squares or a rectangular crochet panel.
For a granny-square hood, arrange several squares into a hood-shaped section.
Join the back edge.
Attach the lower edge of the hood around the neckline.
The hood should be large enough to sit comfortably over the head.
If you want a roomy hood, add additional squares or crochet extra rounds around the opening.
Try it on before finishing the edges.
Check that the hood doesn’t pull backward or feel too tight around the neck.
The inspiration design has wide, cape-like sleeves.
You can create these by leaving large arm openings in the side seams.
If you want more defined sleeves, add additional granny squares around the openings.
Arrange them in rows extending from the shoulders toward the wrists.
For a more finished appearance, add a border around the sleeve openings.
You can crochet several rounds using cream yarn.
A contrasting blue or turquoise border also works beautifully.
For a fitted cuff, gradually reduce the circumference.
For the loose style shown in the image, keep the opening wide.
The inspiration poncho has a clean light-colored border around the bottom edge.
Work one or more rounds around the entire lower edge.
Use cream yarn to create a unified finish.
You can add a final round in turquoise for a subtle contrast.
Work several rounds around the hood opening.
A simple single crochet border provides a neat finish.
For a more decorative edge, try:
Keep the border relatively simple so that it doesn’t compete with the colorful granny squares.
A granny square garment can have a large number of yarn tails.
Take the time to weave each end securely into the back of the crochet fabric.
Use a yarn needle.
Weave each tail through several stitches in different directions.
Trim only after the yarn is secure.
This step may take some time, but it will make the finished poncho much more durable.
Once the entire garment is assembled, block it again.
Lay it flat and gently shape the:
Allow it to dry completely.
Blocking helps the garment hang properly and gives the granny squares a more uniform appearance.
If your hood is very large, you can add a crochet drawstring.
Make a long chain or crochet cord.
Thread it around the hood opening.
Add small crochet balls or tassels to the ends.
This allows you to adjust the hood and adds another decorative detail.
If you want a more bohemian appearance, add fringe around the bottom.
You can use:
Cut several equal lengths of yarn and attach them along the bottom edge.
However, if you prefer the clean appearance shown in the inspiration image, leave the bottom edge without fringe.
Put the poncho on and check the fit.
Make sure:
Granny square garments can become surprisingly heavy, especially when made with dense yarn.
If your poncho feels too heavy, consider using a lighter-weight yarn for future projects.
Try to maintain the same tension throughout the project.
Uniform squares are much easier to assemble.
Lay everything out before sewing to avoid accidentally placing too many similar squares together.
A cream or neutral border helps connect the individual motifs.
Don’t leave all the finishing work until the end if you can avoid it.
If making dozens of individual squares feels overwhelming, you can simplify the project.
Instead of making floral squares, use traditional granny squares with only three or four rounds.
Create a simple:
front panel + back panel + hood
and join them together.
You can then add a decorative border around the entire garment.
This creates the same basic silhouette with much less work.
The blue and cream palette is beautiful, but this poncho can be customized in many ways.
Use:
Try:
Use:
Use a different color combination for every flower.
Keep the outer round in cream to maintain visual consistency.
An oversized granny square poncho works especially well with simple clothing underneath.
Try wearing it with:
Because the poncho is already visually detailed, neutral clothing underneath can help balance the outfit.
This DIY granny square crochet poncho is a beautiful way to transform a classic crochet technique into a colorful wearable garment. The combination of floral motifs, turquoise and blue tones, cream borders, wide sleeves, and an oversized hood creates a cozy bohemian piece with plenty of personality.
The construction is also highly customizable. You can make the poncho shorter or longer, use larger or smaller granny squares, change the color palette, add fringe, or create a completely different hood.
For beginners, the project can be simplified using traditional granny squares and a basic rectangular construction. More experienced crocheters can experiment with floral motifs, intricate color changes, decorative joins, and custom shaping.
The result is a one-of-a-kind handmade garment that combines the nostalgic charm of granny square crochet with a modern oversized silhouette.