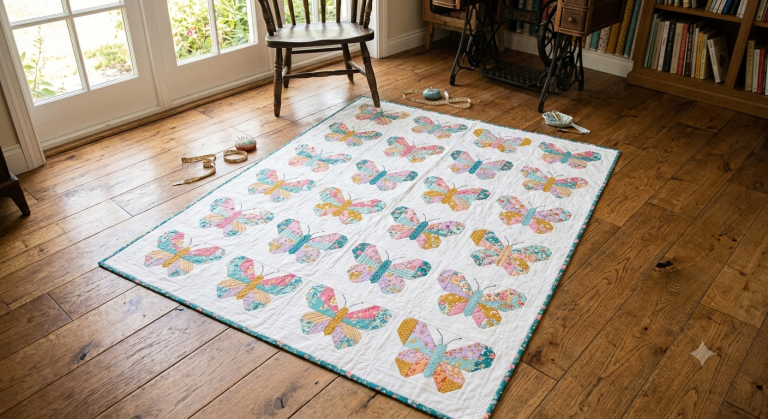
Butterfly quilts are a timeless favorite in the quilting world. They offer the perfect canvas to play with vibrant colors, scrap fabrics, and whimsical designs. Whether you are making a sweet baby quilt or a stunning throw for your living room, this step-by-step guide will help you create a gorgeous, modern butterfly quilt using a simple Half-Square Triangle (HST) method.
Let’s get your creativity fluttering!
Materials and Tools Needed
Before you begin, gather your supplies. For a standard lap-sized quilt, you will need:
- Assorted Fabric Scraps: For the butterfly wings (bright, vibrant prints work best!).
- Background Fabric: 3 to 4 yards of a solid, neutral fabric (white, cream, or light gray) to make the butterflies pop.
- Body Fabric: 1/2 yard of a dark solid fabric (charcoal or black) for the butterfly bodies.
- Backing Fabric: 4 yards.
- Batting: Lap size (approx. $60″ \times 60″$).
- Binding Fabric: 1/2 yard.
- Tools: Rotary cutter, cutting mat, quilting ruler, sewing machine, iron, and neutral thread.
Step-by-Step Instructions
Step 1: Cutting Your Fabric
Each butterfly block is made up of wings (using Half-Square Triangles) and a central body. For one butterfly block, cut the following:
- From your wing fabric: Cut four $5″ \times 5″$ squares.
- From your background fabric: Cut four $5″ \times 5″$ squares, two $4.5″ \times 4.5″$ squares, and two $2.5″ \times 4.5″$ rectangles.
- From your body fabric: Cut one $2.5″ \times 10.5″$ rectangle.
Step 2: Making the Wing Components (HSTs)
We will use the background and wing squares to create the angled look of the upper and lower wings.
- Pair a $5″$ wing square with a $5″$ background square, right sides together.
- Draw a diagonal line from corner to corner on the back of the background square.
- Sew a $1/4$-inch seam on both sides of the drawn line.
- Cut directly along the drawn line to create two Half-Square Triangles (HSTs).
- Open and press the seams toward the darker fabric. Trim the HSTs to measure exactly $4.5″ \times 4.5″$.
- Repeat this process with the remaining squares until you have 4 HSTs for your wings.
Step 3: Assembling the Butterfly Block
Now, lay out your pieces on a flat surface to form the butterfly shape:
- Left Column (Left Wings): Place two HSTs angled outward, with a $4.5″$ background square at the top corner and bottom corner to round out the block.
- Center Column (Body): Place the dark $2.5″ \times 10.5″$ rectangle in the middle. Use the $2.5″ \times 4.5″$ background rectangles at the top and bottom to center it.
- Right Column (Right Wings): Mirror the left column using your remaining two HSTs and background squares.
Tip: Double-check the orientation of your triangles before sewing to ensure the wings point outward!
Sew the components of each column together first, press the seams, and then sew the three columns together to complete your block.
Step 4: Sashing and Quilt Top Assembly
Once you have made your desired number of butterfly blocks (e.g., 9 blocks for a $3 \times 3$ layout):
- Cut sashing strips from your background fabric (usually $2.5″$ wide) to place between the blocks.
- Sew the blocks into rows with sashing in between, then sew the rows together.
- Add a $3.5″$ border around the entire quilt top to frame your butterflies beautifully.
Step 5: Basting, Quilting, and Binding
- Make the Quilt Sandwich: Layer your backing fabric (wrong side up), the batting, and your finished quilt top (right side up). Pin or spray baste the layers together.
- Quilt it: Quilt as desired. A wavy line or a whimsical “loop-de-loop” free-motion quilting pattern mimics the flight of a butterfly perfectly!
- Bind it: Cut your binding strips, sew them into a continuous loop, and attach them to the edges of your quilt to finish it securely.


