Quilted Christmas Tree Skirt

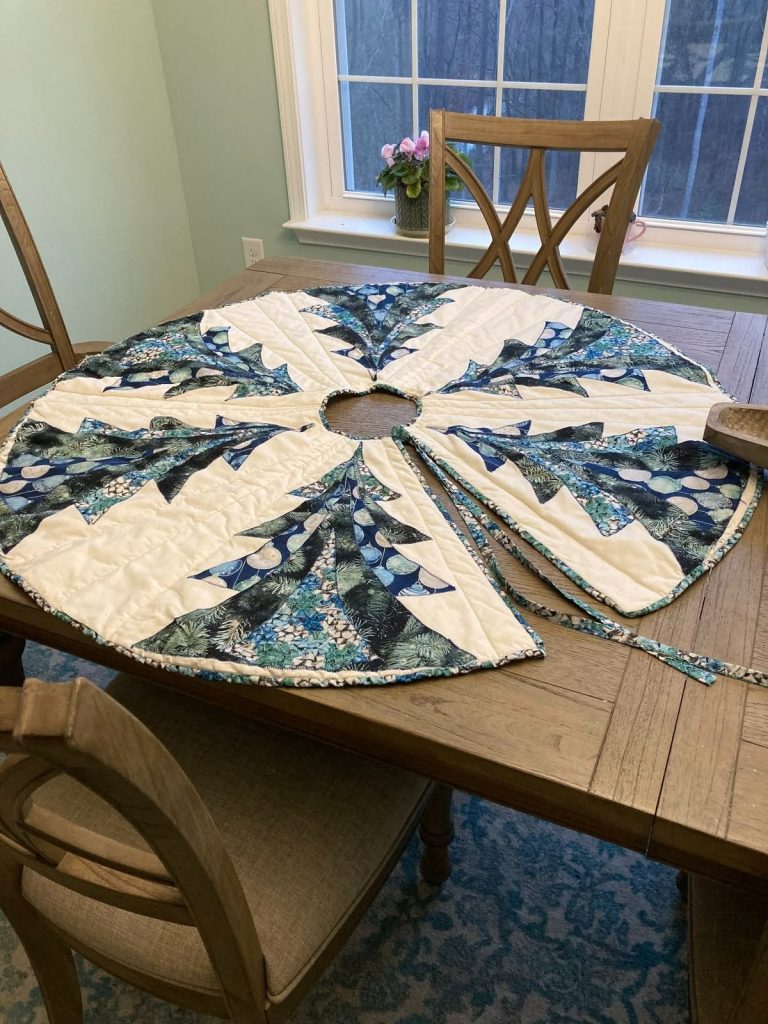
Create a beautiful quilted Christmas tree skirt featuring cream-colored panels and intricate blue and green patchwork. The radiating design gives the finished piece a starburst effect, while the circular shape and center opening allow it to fit neatly around the base of a Christmas tree.
Skill Level: Intermediate
Project Type: Patchwork and quilting
Finished Size: Approximately 48 inches in diameter
Construction Method: Foundation-free patchwork, panel assembly, quilting, and binding
Note: The original measurements of the pictured quilt are unknown. The measurements below provide a practical example for recreating a similar design.
Fabric quantities are estimates and may vary depending on the width of the fabric, pattern placement, and the amount of patchwork used.
For this example, the finished Christmas tree skirt will measure approximately 48 inches across.
The design consists of a large circle with a small opening in the center and a straight cut extending from the outer edge to the center opening.
Suggested dimensions:
You may increase or decrease these measurements to suit your tree.
Fold a large sheet of paper in half and then in half again.
Measure 24 inches from the folded corner and mark an arc to create a quarter-circle pattern. Cut along the curved line and unfold the paper.
Mark a smaller circle in the center with a diameter of approximately 4 inches.
Draw a straight line from the outer edge to the center opening. This will become the opening used to wrap the skirt around the tree trunk.
Use this paper pattern to cut the backing fabric and batting. The top patchwork layer will be assembled separately.
Study the reference image and notice how the cream-colored sections radiate outward from the center.
The dark blue, turquoise, and green fabrics form irregular triangular shapes between these cream sections.
To recreate this effect, divide the skirt into eight main wedge-shaped sections.
Alternate the cream panels with patchwork sections, arranging the printed fabrics so that their points and angled edges create a starburst effect.
Before sewing, lay the pieces on a large flat surface and rearrange them until the colors are balanced.
Cut eight elongated wedge-shaped panels from the cream fabric.
Each panel should have a narrow inner end and a wider outer end. The exact dimensions depend on the paper template and the finished size.
For a 48-inch skirt, each main wedge covers approximately 45 degrees of the circle.
Add a ¼-inch seam allowance along every edge that will be sewn.
Keep the outer edges slightly oversized if necessary. The circle can be trimmed to its final shape after the top is assembled.
Cut triangles, narrow strips, and irregular angled pieces from the blue, teal, and green fabrics.
Use a combination of dark and light prints to imitate the layered botanical appearance in the reference.
For each patchwork wedge:
The patchwork does not need to be perfectly symmetrical. Slight variations in the printed sections will create a more natural, handcrafted appearance.
Place two patchwork pieces right sides together and sew along the edge using a ¼-inch seam allowance.
Press the seam allowances to one side.
Continue adding triangles and angled strips until each patchwork wedge reaches the required size.
Trim the completed wedge to match the corresponding section of the paper pattern.
Repeat this process until you have enough patchwork wedges to alternate with the cream panels.
Tip: Press every seam before joining the next piece. Accurate pressing helps prevent bulky intersections and keeps the finished skirt flat.
Arrange the eight cream panels and patchwork wedges in a circular layout.
Match the narrow inner ends carefully so that the points converge around the center opening.
Sew the sections together one at a time using a ¼-inch seam allowance.
Press the seams toward the darker fabrics whenever possible to reduce their visibility through the cream sections.
Continue joining the panels until the entire circular top is assembled.
Check that the fabric lies flat and that the center opening remains reasonably even.
Place the assembled top on a large flat surface.
Use the original paper pattern to mark the outer circle. Trim away any excess fabric.
Mark the center opening and carefully cut it out.
Then cut a straight line from the outer edge to the center opening.
This creates the wraparound shape that allows the Christmas tree skirt to be placed around the trunk without lifting the tree.
Lay the backing fabric on a flat surface with the wrong side facing up.
Place the batting on top, smoothing away wrinkles.
Center the patchwork top over the batting with the right side facing up.
Smooth all three layers carefully and secure them with safety pins or temporary quilting spray.
Make sure the layers remain flat around the center opening and along the radial cut.
Machine-quilt the three layers together.
For a design similar to the reference photo, use straight quilting lines that follow the direction of the cream panels.
Quilt along the length of each cream section, beginning near the center and moving toward the outer edge.
Add quilting lines to the patchwork sections as needed.
Use a walking foot if available to help feed the layers evenly through the machine.
Remove the pins as you approach them and avoid stretching the fabric while sewing.
After quilting, place the skirt on a flat surface.
Trim the backing and batting so that all three layers have matching edges.
Carefully follow the outer circle, the center opening, and the straight radial cut.
Check that the edges are smooth before attaching the binding.
Cut fabric strips approximately 3½ inches wide.
Join the strips diagonally to create one continuous length of binding.
Press the seams open and fold the binding in half lengthwise, wrong sides together, pressing to create a long double-layered strip.
For a 48-inch skirt, prepare approximately 180 inches of binding to allow for the outer circumference, center opening, radial cut, and finishing allowance. Measure the actual perimeter of your assembled skirt before cutting the final length.
Begin with the outer curved edge.
Align the raw edges of the binding with the raw edges of the quilt and sew using a ¼-inch seam allowance.
Ease the binding gently around the curves without stretching the fabric.
Next, bind the center opening and the two straight edges of the radial cut.
Fold the binding neatly at the corners and intersections. Join the ends with a diagonal seam or another clean finishing method.
Fold the binding over the raw edges to the back of the skirt and stitch it down by hand or machine.
Give the completed Christmas tree skirt a gentle final press.
Check that the circular edge is smooth, the center opening is neatly finished, and the radial opening lies flat.
Trim any loose threads and inspect the quilting for skipped stitches.
Your handmade quilted Christmas tree skirt is now ready to decorate the base of your Christmas tree.
Important: This tutorial recreates the overall appearance of the reference image. The exact original cutting layout and construction method cannot be confirmed from the photograph alone.