Purple Windmill Star Quilt Block

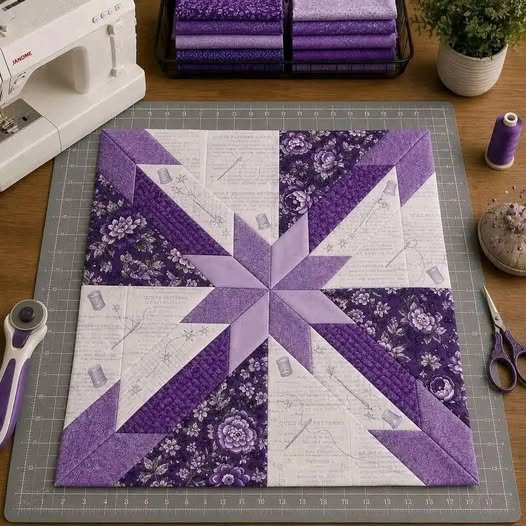
Create a striking Purple Windmill Star Quilt Block inspired by the beautiful patchwork design in our reference image. This project combines deep purple florals, lavender solids, and pale vintage-inspired prints to create a geometric star with a spinning, windmill-like appearance.
The contrast between dark floral fabric and light text-print fabric gives the block a romantic, antique look. It is ideal for a cushion cover, a quilt sampler, a wall hanging, or a larger patchwork quilt.
Craft: Traditional machine piecing and half-square triangles
An original adaptation inspired by the photograph
Skill level: Intermediate
Requires accurate cutting, diagonal seams, and careful alignment
Finished block size: 16 × 16 inches
Unfinished block size: 16½ × 16½ inches
Important pattern note: The reference photograph does not provide a cutting chart or original pattern. The instructions below use a practical, measured patchwork variation rather than claiming to reproduce every seam in the photograph exactly.
Choose four coordinating quilting cottons to reproduce the rich purple palette.

Fabric A — Vintage background print
Pale ivory or cream fabric printed with delicate text, sewing notions, or faded illustrations.
Cut 4 squares, each 5 × 5 inches.

Fabric B — Dark floral purple
A deep purple floral print that provides contrast and visual depth.
Cut 4 squares, each 5 × 5 inches.

Fabric C — Medium purple
A medium or royal purple solid for strong geometric accents.
Cut 4 squares, each 5 × 5 inches.

Fabric D — Soft lavender
A light lavender solid to soften the contrast between the prints.
Cut 4 squares, each 5 × 5 inches.
Fabric allowance: The quantities above make one 16-inch finished block. They do not include extra fabric for mistakes, borders, or finishing a complete quilt.
| Abbreviation | Meaning |
|---|---|
| HST | Half-square triangle |
| RST | Right sides together |
| WST | Wrong sides together |
| SA | Seam allowance |
| WOF | Width of fabric |
| H | Horizontal |
| V | Vertical |
Half-square triangles (HSTs): Square patchwork units made from two triangles, usually created by sewing two squares together diagonally and cutting them apart.
Quarter-inch seam allowance: All piecing seams use a consistent ¼-inch allowance. This is essential for keeping the finished block square.
Pressing seams: Press the seam allowances after each sewing step. Pressing toward the darker fabric can help prevent dark colors from showing through lighter prints.
Directional layout: The orientation of each HST determines whether the purple sections form a coordinated geometric pattern or an unintended checkerboard.
Wash and press your cotton fabrics if necessary. Square up the edges before measuring.
Cut the following pieces:
| Fabric | Quantity | Cutting size |
|---|---|---|
| A — Vintage background print | 4 squares | 5 × 5 in |
| B — Dark floral purple | 4 squares | 5 × 5 in |
| C — Medium purple | 4 squares | 5 × 5 in |
| D — Soft lavender | 4 squares | 5 × 5 in |
You will have 16 squares in total.
Keep the fabrics in separate piles and label them A, B, C, and D. This makes it easier to follow the color arrangement later.
Create two contrasting pairs of fabric:
Place each pair right sides together, aligning all four edges.
You should have eight paired square sets: four A/B pairs and four C/D pairs.
Take one paired set and use a ruler to draw a diagonal line from one corner to the opposite corner on the wrong side of the lighter fabric.
Sew a straight line ¼ inch away from the marked diagonal on one side.
Sew a second line ¼ inch away from the opposite side of the same diagonal.
Repeat for all eight paired sets.
Tip: A consistent seam allowance is more important than sewing speed. Use a quilting foot or seam guide if you have one.
Using your rotary cutter and ruler, cut each paired square precisely along the marked diagonal line.
Each pair produces two HST units.
Repeat for all eight pairs. You should now have:
Open each unit carefully and press it flat. Press toward the darker fabric where practical.
Measure each HST and trim it to 4½ × 4½ inches unfinished.
Align the ruler’s diagonal marking with the diagonal seam before trimming. Trim a little from each edge rather than removing too much from just one side.
This step is important: all 16 units must be the same size for the rows to align correctly.
When sewn together, each HST will measure 4 inches square in the finished block.
Clear a large flat surface and arrange the 16 HSTs into a 4 × 4 grid.
Use the following principles to create the image-inspired look:
Before sewing, photograph your arrangement or place small numbered labels beside the rows. This will help you restore the layout if the pieces are moved.
Design note: The exact diagonal arrangement in the photograph uses more complex piecing than this 4 × 4 HST adaptation. This layout creates a coordinated geometric windmill effect using straightforward, measurable units.
Take the four HSTs in the first row.
Place the first two units RST and align their edges. Sew along the joining edge with a ¼-inch seam allowance.
Press the seam flat, then join the third unit to the second and the fourth unit to the third.
Repeat this procedure until the row contains all four units.
The row should measure approximately 16½ × 4½ inches before it is joined to the other rows.
Repeat Step 7 for the second, third, and fourth rows.
Keep each row in its original orientation. Check the arrangement before sewing each pair of units, especially where the diagonal seams meet.
After sewing, place all four rows on your work surface in order and confirm that the diagonal lines still create the intended windmill effect.
Place the first and second rows RST, matching the vertical seams between the units.
Pin at each intersection. If the seam allowances nest together, the intersections will be easier to match.
Sew the rows together using a ¼-inch seam allowance.
Repeat with the third and fourth rows, then join the two larger sections to complete the block.
Press the horizontal seam allowances carefully. You can press them toward alternating directions to reduce bulk, or press them open if that works better with your fabric thickness.
Place the block on your cutting mat and use a large quilting ruler to check its edges.
Trim only enough to make the edges straight and the corners square. Avoid trimming away too much of the outer triangles.
The block should measure approximately 16½ × 16½ inches unfinished, giving a finished size of 16 × 16 inches after it is joined to another block or border.
If your block is slightly smaller, do not stretch it to fit. Check your seam allowances and measure again before trimming.
Give the completed block a final press from the wrong side first, followed by a light press from the right side. Lift and lower the iron instead of dragging it across the diagonal seams.
If the center becomes bulky, carefully redistribute the seam allowances where the construction allows. Avoid pulling or distorting the central intersections.

Decorative cushion
Add a border if needed, then sew the block into a cushion cover. A plain lavender backing complements the floral patchwork.

Mini quilt or wall hanging
Layer the block with batting and backing fabric, baste the layers, and quilt around the geometric shapes.

Larger quilt
Make additional blocks in coordinating purple prints. Use consistent finished block sizes and add sashing or borders to create a larger quilt top.
For a clean finish, stitch in the ditch along selected piecing seams. Alternatively, use gentle diagonal quilting lines to emphasize the movement of the windmill design. Free-motion stippling can work well in the lighter background areas, while straight-line quilting keeps the overall look crisp.
Choose a thread that blends with the lighter fabric for subtle quilting, or use a coordinating purple thread if you want the stitching to become part of the design.
The Purple Windmill Star Quilt Block is a lovely way to combine floral cottons, soft lavender solids, and vintage-inspired prints in a geometric patchwork design. Careful cutting, consistent seam allowances, and thoughtful fabric placement will help you achieve a neat, balanced result.
Have you tried a purple patchwork project like this? Leave a comment with your favorite fabric combinations, or share your finished block with other quilting enthusiasts. We’d love to see how you make this design your own!
SEO title: Purple Windmill Star Quilt Block Tutorial: Step-by-Step Patchwork Pattern
Meta description: Learn how to make a purple windmill star quilt block with lavender solids, floral cottons, and vintage prints. Includes cutting measurements, HST instructions, and assembly tips.
Suggested URL slug: purple-windmill-star-quilt-block
Focus keyphrase: purple windmill star quilt block
Related keywords: purple quilt block pattern, half-square triangle tutorial, lavender patchwork block, floral quilting cotton, geometric star quilt, beginner-friendly HST tutorial.