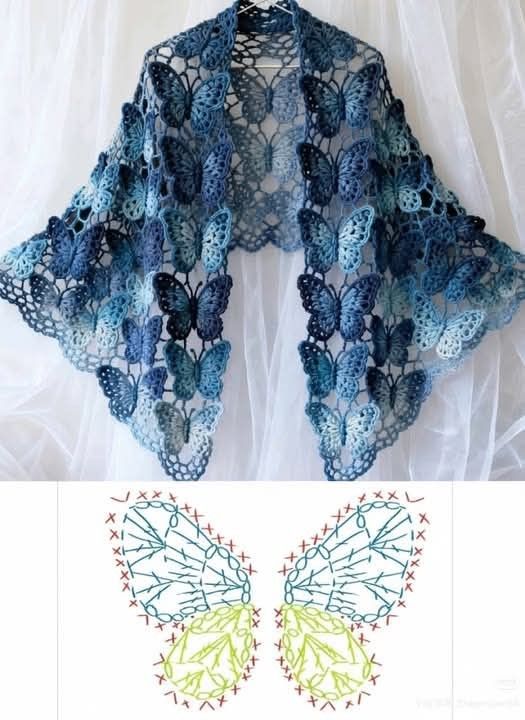
How to Crochet a Wedding Dress with Lace Motifs

advertising

Materials


Step 1: Bodice (Top Part)

  1. Measurements: Take bust, waist, and hip measurements.
  2. Foundation: Work a chain long enough to fit around the bust. Use filet crochet (double crochet + chain spaces) to create a mesh-like fabric.
  3. Shaping the bust and waist: Decrease slightly at the sides as you go down toward the waist to achieve a fitted silhouette.
  4. Straps: Create two wide straps (using shells or solid double crochet rows) and attach them at the front and back. Adjust length for comfortable shoulders.

Step 2: Skirt Panels

  1. Continue from the bodice: Work downward from the waist, increasing slightly to follow hip curves.
  2. Filet crochet base: Maintain filet mesh as the main body of the skirt for breathability and drape.
  3. Motifs: Incorporate large lace motifs (like a flower or mandala) into the skirt. You can crochet these motifs separately and join them as panels into the filet base.
  4. Length: Continue working until you reach floor length. Add extra rows at the back if you want a small train.

Step 3: Decorative Panels & Motifs


Step 4: Finishing

  1. Edging: Work a delicate lace edging (shells, picots, or fans) along the hem and neckline.
  2. Seams: Sew side seams neatly with matching thread.
  3. Lining: Add a fabric lining inside the dress for modesty and comfort. Stretch lining works best so the crochet can hug the body naturally.
  4. Blocking: Gently wash and block the dress to open up lace patterns and ensure even shaping.

Step 5: Styling


✨ This design combines the elegance of filet crochet with the richness of lace motifs, creating a unique and timeless wedding dress. Each motif and stitch adds personality, making the gown one of a kind.

advertising