How to Crochet a Dog Sweater

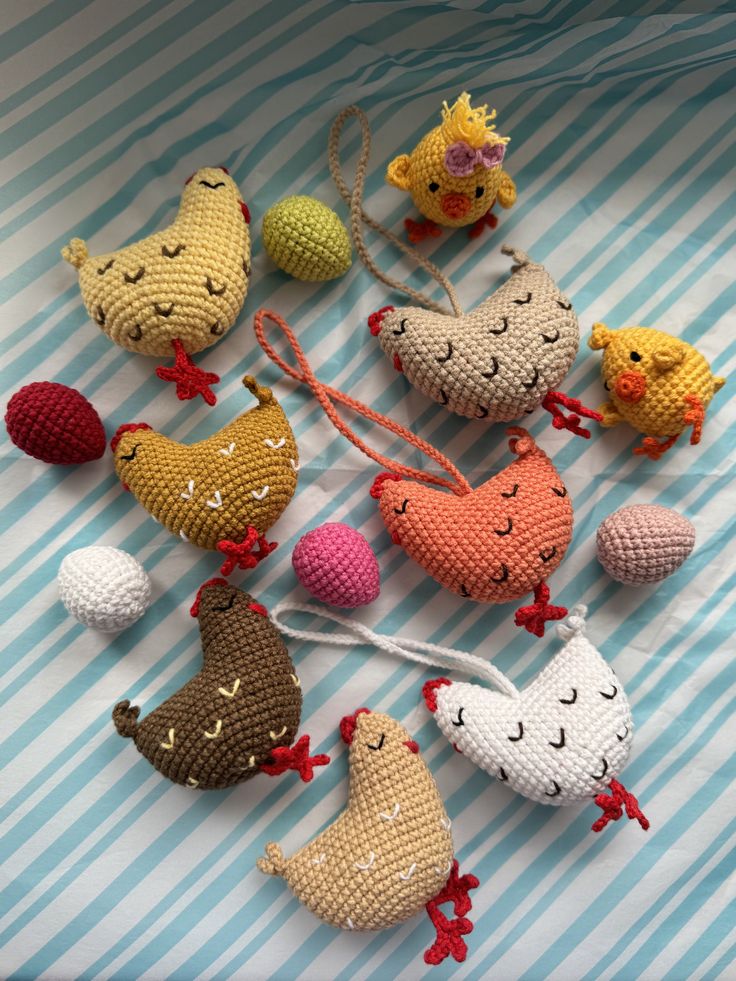
If you’re looking for a cute crochet chicken ornament with a cozy handmade feel, this little hen is perfect. It’s an amigurumi-style body with a simple head shape, bright dangling legs, and easy embroidery that turns each chicken into a tiny piece of folk art—great for Easter décor, farmhouse kitchens, baby mobiles, gift toppers, or Christmas tree ornaments (yes, chickens belong on trees too).
This tutorial is written so you can confidently recreate the chicken in the photo: a rounded “pear” body, small head, red comb, yellow beak, red tail tip, and long cord legs/loop. You can keep the chicken plain or decorate it with embroidered wildflowers like the examples.
Easy / Easy-Intermediate (basic amigurumi + simple embroidery)
About 10–12 cm (4–5 in) tall (not counting hanging loop), depending on yarn and tension.
SEO note for your site keywords: crochet chicken ornament, amigurumi chicken pattern, hanging hen crochet, farmhouse crochet decor, Easter crochet chicken, embroidered amigurumi.
Tip: Work in continuous rounds unless stated. Use a stitch marker in the first stitch of each round.
R1: MR, 6 sc (6)
R2: inc x6 (12)
R3: (sc, inc) x6 (18)
R4: (2 sc, inc) x6 (24)
R5: (3 sc, inc) x6 (30)
R6: (4 sc, inc) x6 (36)
Now you’ll build the rounded belly. If you want a slightly plumper chicken, add 1 extra increase round to 42 sts, but the photo style works great with 36.
R7–R11: sc around (36) for 5 rounds
R12: (4 sc, dec) x6 (30)
R13: sc around (30)
R14: (3 sc, dec) x6 (24)
R15: sc around (24)
R16: (2 sc, dec) x6 (18)
At this point, stuff the body firmly. The chicken looks best when it’s well-stuffed and rounded. Keep adding stuffing as you go.
R17: sc around (18)
R18: (2 sc, inc) x6 (24)
R19: sc around (24)
R20: (3 sc, inc) x6 (30)
R21–R23: sc around (30) for 3 rounds
R24: (3 sc, dec) x6 (24)
R25: sc around (24)
R26: (2 sc, dec) x6 (18)
R27: (sc, dec) x6 (12)
R28: dec x6 (6)
Fasten off, weave tail through final 6 stitches, pull tight to close. Add a little extra stuffing to the head right before the final decreases if needed (a small, rounded head looks cutest).
The photo shows a small red “cap” at the tail end. We’ll make a tiny triangle/leaf and sew it to the back of the body.
R1: MR, 4 sc (4)
R2: (sc, inc) x2 (6)
R3: sc around (6)
Fasten off leaving a tail for sewing.
Attach: Sew to the back/top of the body near the widest part, slightly toward one side, like a little tail accent.
This comb is a small scalloped strip sewn on top of the head.
Ch 7
Starting in 2nd chain from hook:
Fasten off with a long sewing tail.
Attach: Sew along the top of the head, slightly toward the back. If you want it chunkier like the photo, you can stitch it with a tiny pinch at the base so it stands up.
A tiny beak makes a big difference. This simple mini-cone is fast and secure.
R1: MR, 3 sc (3)
R2: (sc, inc) x1, sc (4)
R3: sc around (4)
Fasten off leaving a tail.
Attach: Sew centered on the face, about 2–3 rounds below the top closure, with the point facing outward.
These chickens have long dangling legs made from chains, with three little toes at the bottom.
Ch 18–24 (choose length you like; the photo has long legs)
Sl st back down the chain to thicken it slightly (optional, but it gives a sturdier cord).
At the bottom end of the leg cord, make:
Fasten off leaving a tail for sewing.
Attach legs: Sew both legs to the underside of the body near the front third, spaced about 1–1.5 cm apart. Stitch through several body stitches so they won’t pull out—these get tugged a lot when used as ornaments.
Ch 20–30 (depending on how long you want the loop).
Sl st into the first chain to form a loop, fasten off leaving a tail.
Attach: Sew the loop to the top of the head, slightly behind the comb, with several passes for strength.
Use black yarn or embroidery floss.
Tip: A sweet expression usually comes from eyes that are slightly higher than you think and not too far apart.
These chickens look special because of the “hand-stitched garden” on the body. You can do this with leftover yarn strands or embroidery floss.
Placement tip: Embroider on the “side belly” of the chicken, not dead center—slightly forward looks more natural and matches the folk-art vibe.