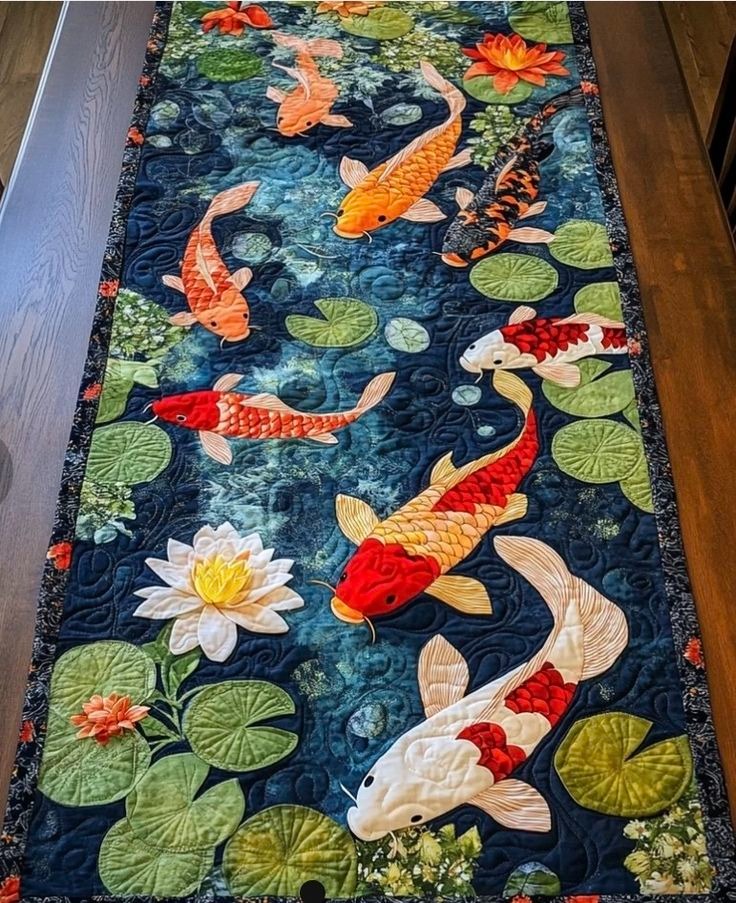
Fabric Selection: Choose a batik or hand-dyed fabric for the background. The mottled colors of batiks perfectly mimic deep, moving water.
Quilting the Water: Before adding the fish, quilt the background fabric to a layer of batting (manta) and backing. Use Free Motion Quilting (FMQ) with a swirling “swirl” or “pebble” pattern to create water ripples.
2. Creating the Appliqué Pieces (Koi & Lilies)
Tracing: Trace the shapes of the Koi fish, lily pads, and lotus flowers onto paper-backed fusible web (like HeatnBond or Steam-A-Seam).
Fusing: Iron the fusible web onto the back of your colored fabrics (oranges, reds, whites, and greens).
Cutting: Carefully cut out each element. For the scales, you can use fabrics that already have a scale-like print or layered small fabric circles.
3. Layering and Composition
Layout: Position the lily pads and the Koi fish on your quilted “water” background.
Creating Depth: Overlap some fish under lily pads and others over them to create a sense of depth (the “3D effect”).
Ironing: Once you are happy with the arrangement, iron them in place to fuse them to the background.
4. Stitching the Details (The “Quilting” part)
Appliqué Stitch: Use a blanket stitch or a very tight zigzag stitch (satin stitch) around the edges of every piece to secure them.
Adding Texture: * Fins and Tails: Use straight line quilting to define the rays in the fins.
Scales: Use a gold or metallic thread to quilt “U” shapes over the bodies of the fish to represent scales.
Flowers: For the lotus, quilt individual petals and perhaps add a bit of extra batting underneath (trapunto technique) to make them “pop” off the table.
5. Finishing Touches
Border: Add a dark, themed border (the image shows a black fabric with small floral or oriental motifs).
Binding: Finish the edges with a double-fold binding in a dark color to frame the piece.
