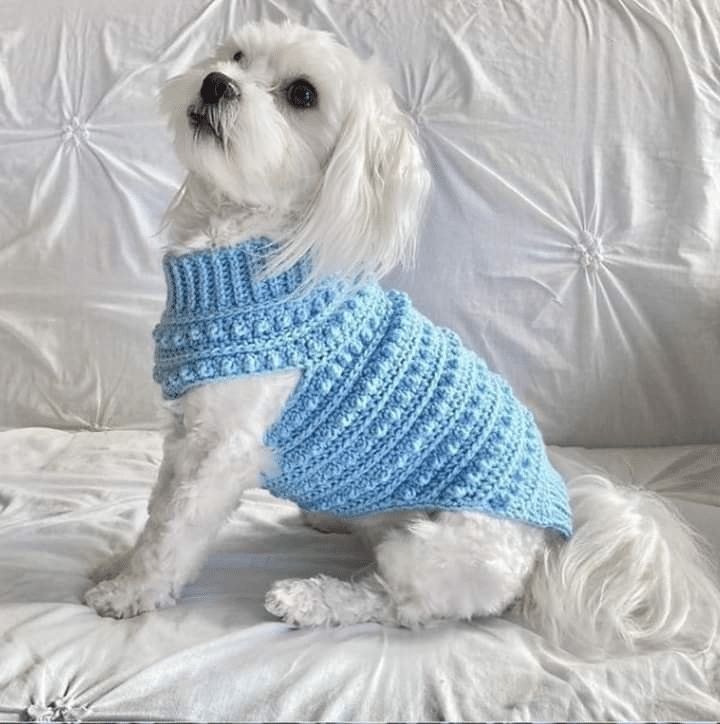
Classic Men's Crochet Cardigan

advertising

Classic Men’s Crochet Cardigan

This pattern is designed to be worked in flat panels (Back, Fronts, Sleeves) and then seamed together.

I. Materials & Gauge

II. The Back Panel

The back piece is a simple rectangle.

advertising
  1. Chain: Chain a number that matches the width of your back (shoulder to shoulder) plus a few inches for ease, or use a stitch count that matches your gauge for your desired size (e.g., M, L, XL).
  2. Row 1: Half Double Crochet (HDC) in the 2nd chain from the hook and in each chain across. Chain 2 (counts as first HDC). Turn.
  3. Row 2 (Ribbed Texture): Work HDC in the Back Loop Only (HDC BLO) across the row. Chain 2. Turn.
  4. Repeat: Repeat Row 2 until the piece reaches your desired length, from the bottom hem to the nape of the neck.
  5. Finish: Fasten off and weave in the ends.

III. The Two Front Panels

The front pieces should be half the width of the back piece, allowing for the button/opening gap. They must be mirror images of each other.

  1. Chain: Chain a number that equals about half the width of your back panel.
  2. Row 1: HDC in the 2nd chain from the hook and in each chain across. Chain 2. Turn.
  3. Rows 2 – Neckline: Continue working HDC BLO (Ribbed Texture) until the panel reaches the height where you want the neckline to start (usually about 2/3 of the total back length).
  4. Shape the Neckline (Optional): To create a deeper V-neck, decrease one stitch (HDC2tog) at the beginning of every row (the inner edge) for the next 5-8 rows. Continue without decreasing until the panel is the same length as the back panel.
  5. Repeat: Repeat all steps to create the second front panel (the mirror image).

IV. The Sleeves (Two Pieces)

The sleeves are worked flat and then seamed.

advertising
  1. Chain (Cuff): Chain a number that matches the circumference of your wrist.
  2. Row 1: SC in the 2nd chain from the hook and in each chain across. Chain 2. Turn.
  3. Rows 2 – Armhole: Continue working HDC BLO. You will need to increase 1 stitch evenly across the row every 3 or 4 rows to gradually widen the sleeve toward the shoulder.
  4. Finish: Continue until the piece reaches your desired length from the wrist to the armpit. Fasten off and make a second identical sleeve.

V. Assembly and Finishing

  1. Seam Shoulders: Place the front panels over the back panel, matching the tops. Sew the shoulder seams together using a mattress stitch or whipstitch. Leave a gap in the center for the neck opening.
  2. Seam Sides: Sew the front panels to the back panel along the sides, from the bottom hem up to where the armhole starts.
  3. Attach Sleeves: Fold the sleeves in half lengthwise and sew the side seam. Pin the top of the sleeve evenly to the armhole opening and sew it in place.
  4. The Front Edging/Button Band:
    • Attach the yarn to the bottom corner of one front panel.
    • Work several rounds of SC or HDC BLO evenly along the entire front opening (up one side, around the back of the neck, and down the other side) to create a neat border.
    • Buttonholes (If Desired): On the final pass of the edging, create buttonholes by chaining 2 or 3 stitches, skipping the corresponding stitches below, and continuing your SC/HDC. Place the buttons on the opposite edge.
  5. Final Touches: Weave in all remaining ends and block the cardigan (lightly wetting and shaping the garment) to set the stitches and ensure the panels lie flat.