Classic Textured Crochet Throw Blanket Pattern

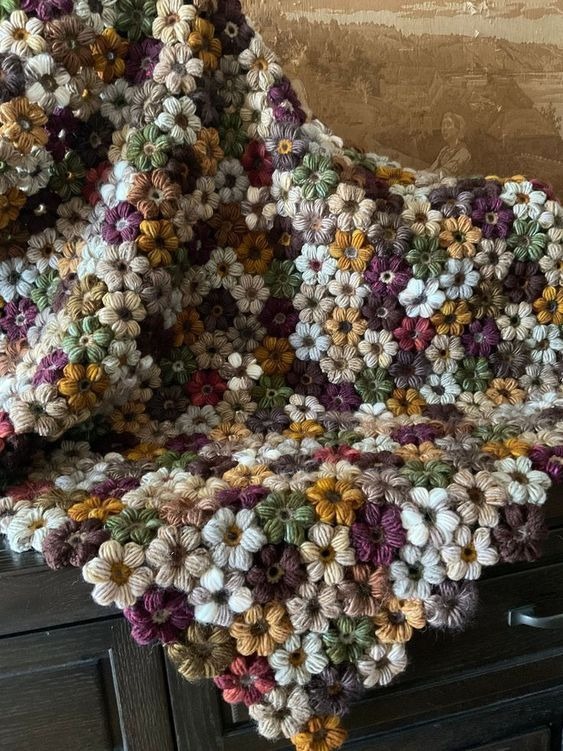
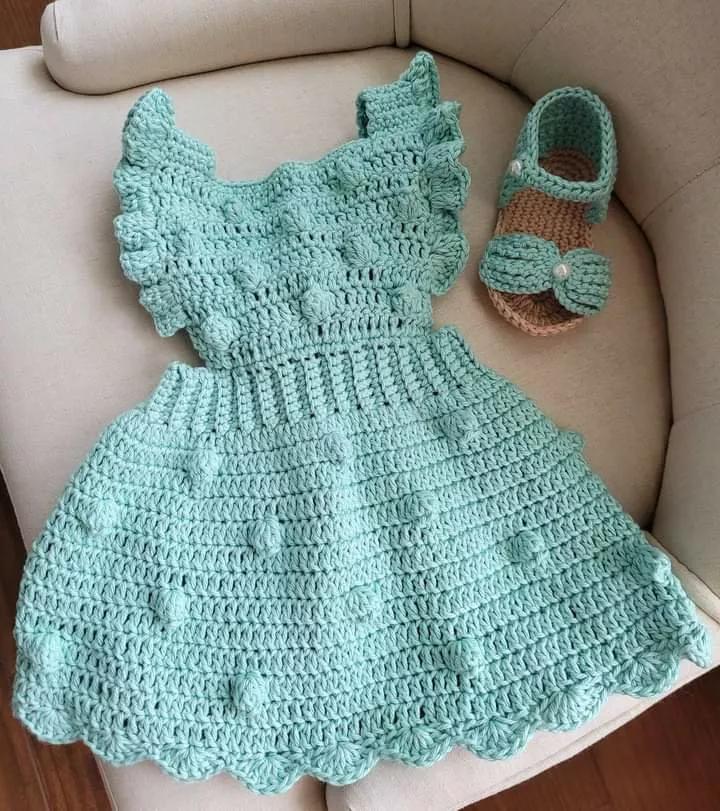
A puff flower blanket is made from many small “puffy daisy” motifs that are joined together into rows, then finished with a neat border. The texture comes from creating petal-like loops that sit on top of the round, giving each flower a raised, cushiony look. You can make this blanket as large or small as you want by repeating the same motif and changing your layout. The photo you shared shows a classic puff-flower style with earthy, vintage colors and a soft, slightly wavy drape from the thickness of the motifs.
Choose a yarn that feels soft against the skin and has good stitch definition. Worsted/Aran weight yarn is common for puff flowers because it gives plump petals without being too stiff, but you can also use DK for a lighter blanket or chunky for a bold, heavy throw. You will need at least two colors (one for the flower center and one for the petals), but most puff flower blankets use many colors for a scattered, floral “meadow” look. Pick a crochet hook that matches your yarn label, then consider going up 0.5 mm if your motifs feel tight or don’t lie comfortably. You’ll also need scissors, a yarn needle for weaving ends, and optionally stitch markers to mark corners and row ends while assembling.
Most puff flowers are built in three layers: a small center ring, a round that creates spaces/anchors for petals, and then a petal round where each petal is made from elongated loops (often worked as repeated partial double crochets gathered together). After the flower is made, it’s often “squared up” by adding a joining round or corner stitches, or it’s joined to other flowers by connecting at the edges between petals. Some designs include small “spacer” motifs or half motifs at the edges to keep the blanket straight; others rely on a border to even everything out. Don’t worry if your first few flowers look odd—puff flowers get prettier once they’re blocked lightly and stitched together.
Start with a slip knot and chain 4, then join with a slip stitch to form a ring (or use a magic ring if you prefer a tighter center). Chain 1 to begin. Work a set number of single crochets into the ring—commonly 6, 8, or 10 depending on your pattern style. If you’re not following a specific pattern, 8 single crochets is a good general base for a medium puff flower. Join with a slip stitch to the first single crochet. Fasten off if you want a different color for the petal base round, or continue if you want the center and base round the same color.
Attach the next color (often the same as your petal color) with a slip stitch into any stitch of the center. Chain 2–3 (this depends on whether the next stitches are half double or double based). The goal of this round is to create evenly spaced chain loops around the center so each petal has its own space. A common method is: make a chain loop, then anchor it with a stitch into the next center stitch and repeat. For example, you might chain 3, then slip stitch into the next center stitch; repeat all the way around. Another common method is chain 2–3 and use single crochet anchors instead of slip stitches. What matters is consistency: you want the same number of loops as petals. If you had 8 stitches in the center, you can make 8 loops and therefore 8 petals. Join to the first loop/anchor and do not fasten off unless your pattern requires a different petal color.
Now you’ll build the raised petals into each loop. There are many versions, but the classic puff petal uses repeated “yarn over, insert, pull up a long loop” steps, then gathers them together. Here’s a reliable approach for a plush petal using double crochet-height loops: enter the first chain loop, yarn over, pull up a long loop to about the height of a double crochet. Repeat that in the same loop multiple times (commonly 4 to 6 times) so you have many loops on your hook. Then yarn over and pull through all loops to close the puff, and chain 1 to lock it (that locking chain is important so the puff doesn’t loosen). After locking, you usually slip stitch or single crochet into the next anchor point to separate petals, then move to the next loop and repeat. As you work, keep the height of your pulled loops consistent—if one petal is taller than the others, the flower will look uneven. If your petals are too skinny, add one more pull-up repetition; if they’re too bulky and hard to close, reduce the repetitions by one.
After all petals are made, you’ll join the round and you’ll have a circular flower with puffy petals. Some puff-flower blankets join flowers directly as circles, but many blankets look cleaner if you “square up” the motif. Squaring can be done by working stitches into the gaps between petals and adding corners at four evenly spaced points. A simple squaring idea is: work a round of single crochets around the flower, placing (single crochet, chain 2, single crochet) at four corner points to create a square, and using fewer stitches between corners as needed to avoid ruffling. If you prefer the very puffy, organic look like in your photo, you can skip squaring and join the flowers at the sides between petals, letting the blanket have a soft, floral edge.
Decide on your blanket dimensions before you commit to a layout. A typical puff flower motif in worsted yarn might measure around 8–10 cm (3–4 inches) across depending on hook size and puff height. For a baby blanket you might need roughly 40–60 motifs; for a throw, 120–180; for a bed-size blanket, often 250+ motifs. The easiest way is to crochet 5–10 motifs, measure the average width, then calculate: motifs per row = blanket width ÷ motif width, and number of rows = blanket height ÷ motif height. It doesn’t have to be perfect—borders can adjust a lot—but having a rough plan keeps you from stopping short.
If you want a smooth, sturdy blanket, join-as-you-go (JAYG) is excellent. With JAYG, you crochet the last round of a motif and replace some chain spaces or stitches with slip stitches/single crochets that connect to the neighboring motif. It’s neat and avoids sewing later, but it requires planning your layout as you go. If you already have a pile of completed flowers, whipstitch or mattress stitch joining with a yarn needle is the most controlled method; it creates a strong seam and you can align petals carefully. For a more decorative join, you can crochet motifs together using slip stitches or single crochet through both motif edges, which creates a visible ridge line between motifs and adds structure. Whichever method you choose, be consistent across the whole blanket so the tension stays even.
Lay your motifs out on a bed or floor and step back to check the color balance. The prettiest puff flower blankets usually have a “scattered garden” look: avoid clustering the same color too much unless you’re intentionally making stripes or a gradient. Take a quick photo of the layout with your phone; photos often reveal weird color clumps your eyes miss in person. When you’re happy, join motifs row by row so you don’t lose your plan.
A border makes the blanket look intentional and helps flatten any wavy edges created by thick motifs. Start with a foundation round of single crochet around the entire blanket, placing (single crochet, chain 2, single crochet) in each corner if the blanket is squared, or using a few extra stitches around “tight” turns to prevent curling. If the edge ruffles, you’re adding too many stitches—skip stitches occasionally; if the edge pulls inward, add a few increases. After the foundation round, you can do a simple border (a few rounds of half double crochet) for a clean frame, or a scalloped edge for a floral finish. Puff-flower blankets often look best with a calmer border so the flowers remain the star.
Puff flowers create a lot of yarn tails if you change colors often. Weave in ends as you go if possible, because doing them all at the end can be overwhelming. Use a yarn needle and weave through multiple stitches in different directions to lock the tail. For blocking, you usually don’t need aggressive pinning—just gently steam-block or mist with water and pat into shape, especially at the joins and border. Don’t crush the puffs; shape them with your fingers so they stay dimensional.
If your petals look flat instead of puffy, you may be pulling loops too short; pull them up to an even tall height before closing the puff. If closing the puff is difficult, reduce the number of pull-ups by one or use a slightly larger hook. If the flower twists, your anchor round might be too tight; increase the chain length of loops or loosen tension. If the finished blanket waves, it’s usually a join tension issue (too tight) or border stitch count issue (too many or too few stitches). Adjust the border first—it solves most edge problems without having to redo motifs.