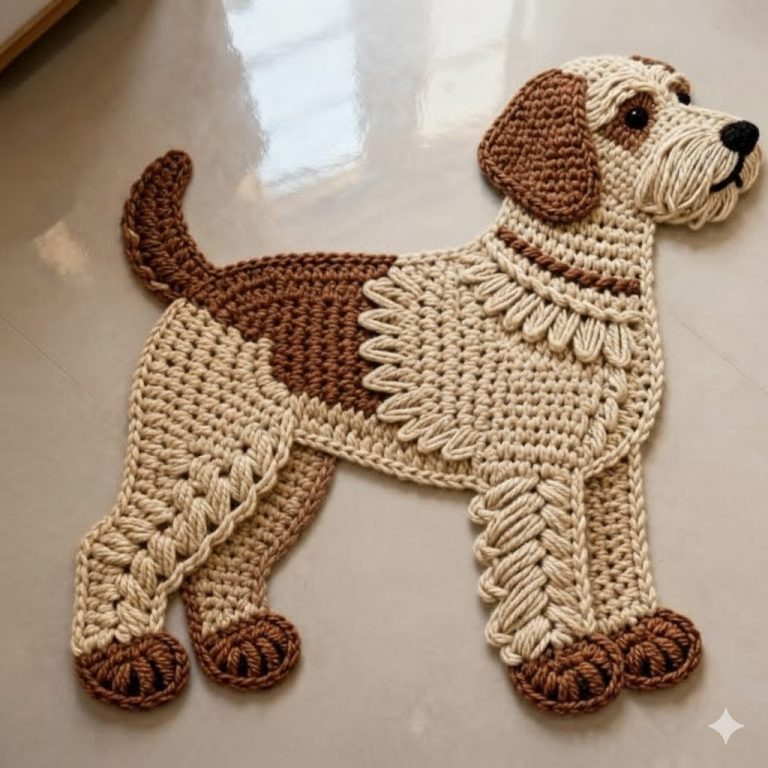
Crochet Dog Rug Pattern

To make a blanket like the one in your photo, you’ll be crocheting a graphghan: a blanket where the picture is created by changing yarn colors stitch by stitch, usually in single crochet (US terms) so the “pixels” look crisp. The horse is worked as color blocks using intarsia (separate yarn bobbins for each area of color) or, if you prefer, by carrying yarn for short distances. The sample looks like a fairly dense single-crochet fabric with a clean background and a bold outline, plus a chunky border, so we’ll build it in three big phases: (1) plan size + chart, (2) crochet the picture panel, (3) add the border and finish.
Start by choosing your finished size and yarn. A very common throw size is about 50 x 60 in (127 x 152 cm), but you can go smaller (lap blanket) or larger (bed). Pick a medium yarn like worsted weight (Category 4) for a classic look, or bulky if you want it faster and chunkier. You’ll need a main background color (cream), several browns for the horse (light, medium, dark), black or very dark brown for the outline and muzzle, and white/cream for the mane and highlights. For worsted, a 5.0 mm (H) hook is a good starting point, but you can go down to 4.5 mm if you want tighter, sharper pixels. Plan on a lot of yarn for the background (usually the majority), and smaller amounts for each horse shade. If you want the blanket to drape nicely and not feel stiff, choose a yarn that isn’t too splitty; smooth acrylic, acrylic/wool blends, or cotton-acrylic blends work well for colorwork.
Before you commit, make a gauge swatch in single crochet because the chart depends on the stitch size. Crochet a square swatch at least 4 x 4 inches in single crochet, then measure how many stitches and rows fit in 4 inches. For example, you might get 16 stitches x 18 rows = 4 inches with worsted yarn and a 5.0 mm hook (your numbers may differ). This gauge tells you how wide and tall your “pixels” will be. Now decide your stitch count: if you want roughly 50 inches wide and your gauge is 16 stitches per 4 inches, that’s 4 stitches per inch, so you’d need about 200 stitches for width (50 x 4). Rows are similar: if you’re getting 18 rows per 4 inches (4.5 rows per inch) and you want 60 inches tall, you’d aim around 270 rows (60 x 4.5). These numbers don’t have to be perfect, because borders and blocking can adjust slightly, but having a plan prevents the horse from looking stretched.
Next, you need the horse image turned into a crochet chart. Since you asked for no images here, I’ll explain the process clearly: take a clear horse head image (or a photo of this blanket) and use any “image to pixel grid” method—many crafters use graph paper or a digital pixel/knitting chart tool—to convert it into a grid with a limited color palette. The most important part is limiting colors: choose 5–7 colors total (background + outline + 3 browns + mane highlight), otherwise the chart becomes chaotic. Make sure the horse fits your stitch count: if you’re doing 200 stitches wide, you might allocate something like 20–25 stitches for margins on both left and right, leaving around 150–160 stitches for the design area so it’s centered and not cramped. The horse in your photo is placed slightly left of center and large, with the mane sweeping; you can mimic that by giving extra empty background on the right side.
Once the chart is ready, set up your yarn management before crocheting the first design row. Graphghans look best with intarsia, meaning you use separate little yarn balls (“bobbins”) for each color section instead of dragging yarn across large empty areas (which can show through). Wind small bobbins for each brown and for the outline color, and keep a larger ball for the background. The trick that makes the back neat is this: when two colors meet, you twist the yarns around each other at the color change so there are no holes. In single crochet, you change color on the last yarn over of the previous stitch: insert hook, yarn over and pull up a loop (two loops on hook), then yarn over with the new color and pull through both loops. Drop the old color to the back, pick up the new, and continue.
Now you’re ready to start crocheting the main panel. With background yarn, chain the number of stitches needed for your width (for example, ch 201 for 200 single crochets, because single crochet uses one less stitch than the chain count). Work Row 1: single crochet in the second chain from hook and across. Chain 1, turn. Work a few rows (like 8–15 rows) entirely in background to create a clean top margin before the horse begins. From there, follow your chart row by row. Each square on the chart equals one single crochet stitch. Read right-to-left on one row, then left-to-right on the next (because you turn your work). If the chart was made as a front-view chart, you may need to mirror it depending on how it’s charted; a safe approach is to label your chart edges and keep track of row direction so the horse faces the way you want.
As you crochet the horse area, focus on crisp outlines first. The blanket in your photo has a strong dark outline that defines the face, jaw, and mane edges, which makes the design readable even from across the room. When you come to outline stitches in the chart, treat them like any other color block—change color cleanly and keep the outline yarn bobbin near that region. For long stretches of background between horse sections, do not carry the brown across; instead, end the brown bobbin and restart it when needed, or float it only a few stitches if it’s truly short (like 2–3 stitches). When ending a bobbin, leave a tail of about 6 inches (15 cm) and weave it in later; for a design blanket, weaving in ends is unavoidable, but it’s what gives the cleanest look.
To keep the horse shading smooth, use at least three browns: a medium main coat color, a darker brown for shadows (neck folds, jaw underside), and a lighter brown for highlights (cheek and shoulder area). You’ll see on the photo that the neck has dimensional folds and the shoulder has gentle transitions; you recreate that by placing the darker shade where the chart indicates shadow lines and using the lighter shade sparingly, so the horse doesn’t look “striped.” If your chart has too many tiny single-stitch color changes that feel messy, simplify them: replace isolated single pixels with the nearest dominant color, and keep the outline continuous. Crochet pictures often look better with slightly simplified shading because yarn texture already adds visual noise.
For the mane and forelock, you’ll mostly use white/cream with occasional outline stitches. The mane in your photo has dark outline strokes that suggest strands; in crochet, that effect is usually achieved by alternating mane color with outline pixels in thin lines. This part is fiddly because it creates many small color changes. A practical method is to keep the mane as one larger white/cream block and place outline stitches only where it matters most: around the outer mane edge, along a few interior “strand” lines, and around the ear edges. Keep your tension steady at color changes; if you pull too tight, the blanket will pucker, and if you leave loops too loose, the picture will look blurry. Every 10–20 rows, lay the blanket flat to check that the fabric remains square and the design is not warping.
Continue crocheting until the horse is complete and you have a bottom margin similar to the top—typically 10–20 rows of background after the last design row. This framing space is what makes the horse feel centered and “finished.” Fasten off the panel and take time to weave in ends on the wrong side. For weaving, use a blunt tapestry needle and run tails through the backs of the stitches in the same color area so they disappear. Change direction once or twice while weaving (like a small “S” path) to lock the tail. Do not knot bulky knots if you can avoid it; neat weaving makes the back flatter and more comfortable.
After the picture panel is done, add the inner border that frames it. The blanket in your photo has a narrow contrasting line and then a wider chunky edge. To do this, attach yarn at any corner with the right side facing you. Work a round of single crochet evenly around the entire panel: single crochet across the top edge stitches, then work 3 single crochets in the corner to turn, single crochet evenly down the side (you’ll need to place side stitches proportionally—often 1 sc per row or 2 sc every 3 rows depending on your gauge), then 3 sc in the corner, and repeat. Join with a slip stitch and chain 1. If you want that thin accent line, switch to the tan/brown border color and do 1–3 rounds of single crochet in that accent color, keeping corners consistent with 3 sc.
To create the thick, cozy outer border like the photo, you can use a “chunky texture” stitch such as double crochet with a simple spacing, half double crochet, or a puff-style edge, but the sample looks like a firm, textured border that could be a wide single crochet / half-double crochet frame finished with a bold final round (sometimes a reverse single crochet/crab stitch, or a bobble edging). A reliable way to get a similar look is: switch back to the cream color and work 3–6 rounds of half double crochet around (it builds thickness faster than single crochet without getting too holey). Keep corners neat: (hdc, ch 1, hdc) in each corner space, or 3 hdc in the corner stitch, consistent each round. For the final “statement” edge, do a round of crab stitch (reverse single crochet) in cream; it creates a rope-like finish and looks very polished. If you’d rather have that slightly scalloped, chunky feel, you can finish with a round of bobble stitches every few stitches, but crab stitch is simpler and still bold.
Finally, block and care for the blanket so it lays flat. For acrylic yarn, you can “steam block” gently (careful not to melt the fibers): lay the blanket flat, smooth it to shape, and hover steam above it without pressing hard. For cotton or wool blends, wet block if appropriate: soak briefly, squeeze out water (don’t wring), pin to shape, and dry flat. Blocking helps even out slight tension differences from color changes and makes the picture look cleaner. When you’re done, your blanket will have the same key features as the one in the photo: a crisp single-crochet picture panel with strong outline definition, framed by a narrow accent border and finished with a thick, cozy outer edge.
